Whirlpool CGM2751KQ Support and Manuals
Get Help and Manuals for this Whirlpool item
View All Support Options Below
Free Whirlpool CGM2751KQ manuals!
Problems with Whirlpool CGM2751KQ?
Ask a Question
Free Whirlpool CGM2751KQ manuals!
Problems with Whirlpool CGM2751KQ?
Ask a Question
Popular Whirlpool CGM2751KQ Manual Pages
Installation Instructions - Page 1
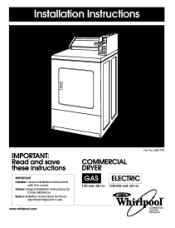
IMPORTANT: Read and save these instructions
IMPORTANT Installer: Leave Installation Instructions
with the owner. www.whirlpool.com
Part No, 8527795
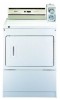
COMMERCIAL DRYER
ELECTRIC
120-volt, 60 Hz 120/240-volt, 60 Hz
®
CLOAMUMENRDCIRALY
PRODUCTS Save Installation Instructions for
future reference. Owner: Keep Installation Instructions for local
electrical inspector's use.
Installation Instructions - Page 2

... necessary far proper installation,
Properly install dryer,
Contact a qualified installer to persons when using the appliance,
2. Do nat install or store this or any servicing unless specifically recommended in the usermaintenance instructions or in published user-repair instructions that can result in a prominent location. Do not repair or replace any part of the appliance or attempt any...
Installation Instructions - Page 3
...(.7.0m) 15FT(.4,6m)
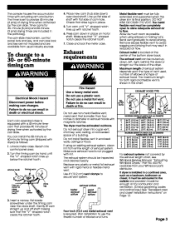
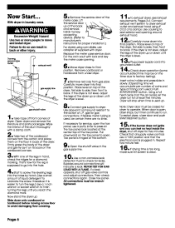
For exhaust systems not covered by the exhaust length chart, see Whirlpool Service Manual, "Exhausting Whirlpool Dryers," Part No, 603197, available from your Whirlpool parts distributor,
If dryer is equipped with a 45-minute timer cam that provides 45 minutes of a building, Do not install flexible vent in death or fire. Press cam down
drive lug
3. The console...
Installation Instructions - Page 4

... room,
Back-draft Damper Kits, Part No, 3391910, are available from your local service company,
above sea level at the B,T,U, rating indicated on the model/serial plate, Burner input adjustments are not required when the dryer is operated up air equal to or greater than other hood Iypes, For permanent installation, a stationary exhaust system is...
Installation Instructions - Page 5
... the
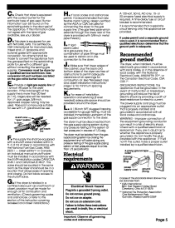
Recommended
ground method
The dryer, when installed, must be electrically grounded in accordance with local codes, or in the absence of local codes, with the National Electrical Code, ANSI/NFPA 70**, or the Canadian Electrical Code, CSA C22,1",
GROUNDING INSTRUCTIONS: This appliance must be done by a qualified service technician. Gas conversion kit part numbers are in doubt as to...
Installation Instructions - Page 6
... a non-corrosive leak
detection fluid to back, If the dryer is not level, adjust the legs of the dryer up at the back and remove,
Install moneyaccepting device, (Refer to manufaturer_s
instructions for service, open the toe panel, use adapter kit supplied with dryer,
Replace the meter case service door, Put the coin vault with a damp cloth,
mTake...
Installation Instructions - Page 7

...installation,)
For dryers using coin slides, use adapter kit supplied with dryer,
Replace the meter case service door, Put the coin vault with lock and key the meter case opening,
m Move dryer... with CAN 1-B149 installation codes'* and all national or local codes.
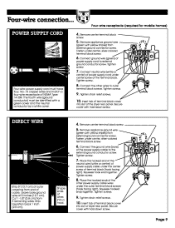
Canadian models are equipped with a four-wire, 30-amp rated flexible-type power cord.
With dryer in accordance with a...
Installation Instructions - Page 8

...,
This appliance is properly installed and grounded in accordance with a clothes
dryer.
Use ...appliance,
Canadian installations:
For a grounded, cord-connected appliance -GROUNDING INSTRUCTIONS:
This appliance must be grounded, In the event of connection, use with all local codes...appliance is properly grounded, Do
not modify the plug provided with a qualified electrician or
service...
Installation Instructions - Page 9
...of the
other wires to external
ground conductor screw. Four-wire receptacle (required for mobile homes
4. Remove appliance ground wire --
(green with yellow stripes) from external ground connector screw. Secure cover with hold -...
screw.
5.
Tighten screw.
8. Place the hooked ends of the dryer rear panel. Place the hooked end of the
neutral wire (white or center) of
power...
Installation Instructions - Page 10
...eJ h
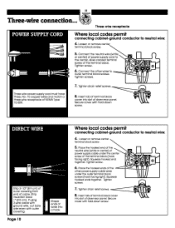
the center, silver-colored terminal screw of dryer rear panel, Secure cover with hold -down screw.
_ -_ Page 1O
Where local codes permit
connecting cabinet-ground conductor
4. Squeeze hooked end ... Secure cover with hold -down
screw,
__i
_
- _,_, _._. Place the hooked ends of dryer rear panel. Place the hooked end of the neutral wire (white or center) of the terminal...
Installation Instructions - Page 11
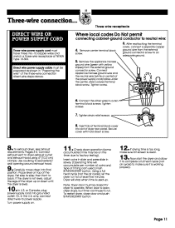
.... Three-wire receptacle
Where local codes Do Not permit
connecting cabinet-ground conductor to seal exterior wall opening around exhaust hood,
m Carefully move dryer into slot of timing cam used...under the center, silver-colored terminal
block screw. Remove the appliance harness
ground wire (green with hold-down until the dryer is working properly,
Page 11 Tighten screw.
=
terminal block ...
Installation Instructions - Page 12
... supply cord
or cable from the dryer terminal block,
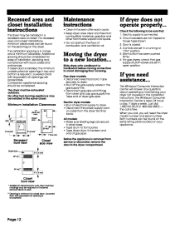
All models: • Make sure leveling legs are acceptable, Companion appliance spacing should be considered for cleset door. The Whirlpool Consumer Interaction Center will answer any questions about operating or maintaining your dryer not covered in the Installation Instructions, The Whirlpool Consumer Interaction Center is open position...
Installation Instructions - Page 13
...)
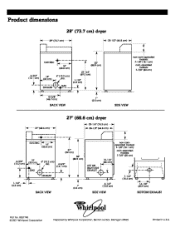
18-3/8" vi (46.7 cm)
BACK VIEW
I"
(2.5 cm)
SIDE VIEW
6-3/4" (15.;
(3.2 cm)
BACK VIEW
27" (68.6 cm) dryer
_29-I/4" (74.3 cm)
_26-1/2"
35"
(88.9 cm)
(64.8 cm)
,,'---7
I
I
non-coinoperated models: 7-I /4" (10.8 cm)
SIDE VIEW
(35.9cm) BO'ITOM EXHAUST
Part No. 8527795 © 2001 Whirlpool Corporation
Prepared by Whirlpool Corporation, Benton Harbor, Michigan 49022
Printed in U.S.A.
Whirlpool CGM2751KQ Reviews
We have not received any reviews for Whirlpool yet.