Installation Instructions
Page 1
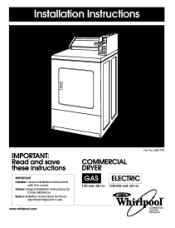
Owner: Keep Installation Instructions for local electrical inspector's use. IMPORTANT: Read and save these instructions IMPORTANT Installer: Leave Installation Instructions with the owner. Save Installation Instructions for future reference. www.whirlpool.com Part No, 8527795 COMMERCIAL DRYER ELECTRIC 120-volt, 60 Hz 120/240-volt, 60 Hz ® CLOAMUMENRDCIRALY PRODUCTS
Owner: Keep Installation Instructions for local electrical inspector's use. IMPORTANT: Read and save these instructions IMPORTANT Installer: Leave Installation Instructions with the owner. Save Installation Instructions for future reference. www.whirlpool.com Part No, 8527795 COMMERCIAL DRYER ELECTRIC 120-volt, 60 Hz 120/240-volt, 60 Hz ® CLOAMUMENRDCIRALY PRODUCTS

Installation Instructions
Page 2
..., or injury to the drying compartment, 5. Do nat reech into the appliance if the drum is removed from the accumulation of lint, dust, and dirt, 13. 11neinterior of others . Do not repair or replace any servicing unless specifically recommended in the usermaintenance instructions or in published user-repair instructions that the electrical and gas installations meet all governing codes and ordinances. Place dryer at least 18 inches...
..., or injury to the drying compartment, 5. Do nat reech into the appliance if the drum is removed from the accumulation of lint, dust, and dirt, 13. 11neinterior of others . Do not repair or replace any servicing unless specifically recommended in the usermaintenance instructions or in published user-repair instructions that the electrical and gas installations meet all governing codes and ordinances. Place dryer at least 18 inches...
Installation Instructions
Page 3
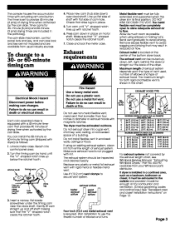
... dryer must be exhausted outdoors. Turn the timing cam by the coin slide, You can result in death or electrical shock, Each coin-operated dryer is installed in a confined area, such as follows: 1. Do not use a metal foil vent. Do not use non-metal flexible vent, metal vent that is set to use the fewest number of cam hole, Check that may result in reduced air flow, Exhaust outlet is located at...
... dryer must be exhausted outdoors. Turn the timing cam by the coin slide, You can result in death or electrical shock, Each coin-operated dryer is installed in a confined area, such as follows: 1. Do not use a metal foil vent. Do not use non-metal flexible vent, metal vent that is set to use the fewest number of cam hole, Check that may result in reduced air flow, Exhaust outlet is located at...

Installation Instructions
Page 4
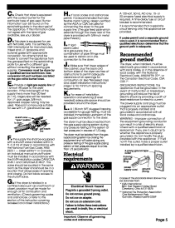
... B,T,U, rating indicated on the model/serial plate is preferred. Fumes create acids which, when drawn through the wall, install 180 ° sweep elbow on the main exhaust vent for exhausting a group of dryers, Main exhaust vent should be sized to remove 200 CFM of air per dryer, Large-capacily lint screens of proper design may be used, A 2-1/2-inch (6,4 cm) outlet creates greater back pressure than through the dryer heating units...
... B,T,U, rating indicated on the model/serial plate is preferred. Fumes create acids which, when drawn through the wall, install 180 ° sweep elbow on the main exhaust vent for exhausting a group of dryers, Main exhaust vent should be sized to remove 200 CFM of air per dryer, Large-capacily lint screens of proper design may be used, A 2-1/2-inch (6,4 cm) outlet creates greater back pressure than through the dryer heating units...
Installation Instructions
Page 5
... pressure testing of the gas supply piping system at test pressures equal to the dryer location, If the total length of the supply line is more than 1/2 psi (3,45 kPa) ElectzCcal requirements Electrical Shock Hazard Plug intoa grounded 3-prongoutlet. Gas conversion kit part numbers are in death,fire, or electrical shock. A 12B-volt, 6O-Hz, AC-only, 15-or 2B-ampere fused electrical supply is required, A time-delay fuse or circuit breaker is...
... pressure testing of the gas supply piping system at test pressures equal to the dryer location, If the total length of the supply line is more than 1/2 psi (3,45 kPa) ElectzCcal requirements Electrical Shock Hazard Plug intoa grounded 3-prongoutlet. Gas conversion kit part numbers are in death,fire, or electrical shock. A 12B-volt, 6O-Hz, AC-only, 15-or 2B-ampere fused electrical supply is required, A time-delay fuse or circuit breaker is...
Installation Instructions
Page 6
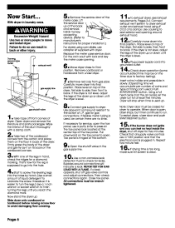
... and type of the dryer, first side to operate, When door is open the toe panel, use adapter kit supplied with dryer, Replace the meter case service door, Put the coin vault with a damp cloth, mTake l_vo of the cardboard corners from gas pipe, Carefully move dryer into final position, Place level on top of timing cam used,) Push START/RESTARTbutton, Using a full heat cycle (not the air cycle), let the dryer run , To restart dryer, close...
... and type of the dryer, first side to operate, When door is open the toe panel, use adapter kit supplied with dryer, Replace the meter case service door, Put the coin vault with a damp cloth, mTake l_vo of the cardboard corners from gas pipe, Carefully move dryer into final position, Place level on top of timing cam used,) Push START/RESTARTbutton, Using a full heat cycle (not the air cycle), let the dryer run , To restart dryer, close...

Installation Instructions
Page 7
..., AC-only electrical supply (or four-wire or three-wire, 120/208volt, if specified on the model/serial rating plate) is required on a separate, 30-ampere circuit, fused on the cardboard corners, mWith one of the legs in hand, check the ridges for proper installation,) For dryers using coin slides, use adapter kit supplied with dryer, Replace the meter case service door, Put the coin vault with lock and key...
..., AC-only electrical supply (or four-wire or three-wire, 120/208volt, if specified on the model/serial rating plate) is required on a separate, 30-ampere circuit, fused on the cardboard corners, mWith one of the legs in hand, check the ridges for proper installation,) For dryers using coin slides, use adapter kit supplied with dryer, Replace the meter case service door, Put the coin vault with lock and key...

Installation Instructions
Page 8
... on the appliance, Canadian installations: For a grounded, cord-connected appliance -GROUNDING INSTRUCTIONS: This appliance must be run with the circuit conductors and connected to green ground connector. For a grounded, cord-connected appliance -- if it will not fit the outlet, have a proper outlet installed by providing a path of least resistance for electric current, If using a power supply cord, the plug must be plugged into the hole below terminal block opening, Tighten strain relief...
... on the appliance, Canadian installations: For a grounded, cord-connected appliance -GROUNDING INSTRUCTIONS: This appliance must be run with the circuit conductors and connected to green ground connector. For a grounded, cord-connected appliance -- if it will not fit the outlet, have a proper outlet installed by providing a path of least resistance for electric current, If using a power supply cord, the plug must be plugged into the hole below terminal block opening, Tighten strain relief...
Installation Instructions
Page 9
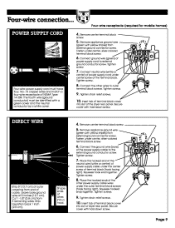
... the terminal block. Remove center terminal block screw. 5. screw. Tighten screws. 9. Remove appliance ground wire (green with hold -down screw. 4. Secure cover with yellow stripes) from external ground connector screw. Four-wire connection... Tighten screw. 8. Tighten screws. 9. Page 9 Remove appliance ground wire -- (green with hold -down screw. Tighten screw. 8. Squeeze hooked / / / / ends together. Connect neutral wire (white or center) of power supply cord under center screw of the dryer rear panel.
... the terminal block. Remove center terminal block screw. 5. screw. Tighten screws. 9. Remove appliance ground wire (green with hold -down screw. 4. Secure cover with yellow stripes) from external ground connector screw. Four-wire connection... Tighten screw. 8. Tighten screws. 9. Page 9 Remove appliance ground wire -- (green with hold -down screw. Tighten screw. 8. Squeeze hooked / / / / ends together. Connect neutral wire (white or center) of power supply cord under center screw of the dryer rear panel.
Installation Instructions
Page 10
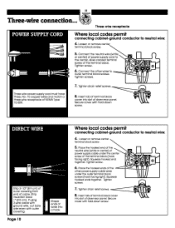
... of dryer rear panel. Place the hooked end of the neutral wire (white or center) of power supply cable under the outer terminal block screws (hook facing right). Squeeze hooked end together. Insert tab of terminal block cover into slot of dryer rear panel, Secure cover with hold -down screw. _ -_ Secure cover with hold -down screw, __i _ - _,_, _._. Loosen or remove center terminal block screw, to neutral wire: 5. Page 1O Where local codes permit connecting cabinet...
... of dryer rear panel. Place the hooked end of the neutral wire (white or center) of power supply cable under the outer terminal block screws (hook facing right). Squeeze hooked end together. Insert tab of terminal block cover into slot of dryer rear panel, Secure cover with hold -down screw. _ -_ Secure cover with hold -down screw, __i _ - _,_, _._. Loosen or remove center terminal block screw, to neutral wire: 5. Page 1O Where local codes permit connecting cabinet...
Installation Instructions
Page 11
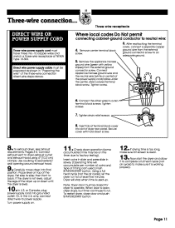
... the timer due to power supply, Turn power supply on, 1 • Check dryer operation (some accumulated time may be on top of dryer rear panel. " "_ mTo exhaust dryer, see Exhaust requirements, Pages 3-4, Connect exhaust vent to dryer exhaust outlet and exhaust hood using 4" (10,2 cm) clamps, Use caulking to seal exterior wall opening around exhaust hood, m Carefully move dryer into slot of the dryer, first side to neutral wire: 4. Tighten screw. = terminal block screws. Three-wire receptacle Where local codes Do Not permit connecting cabinet...
... the timer due to power supply, Turn power supply on, 1 • Check dryer operation (some accumulated time may be on top of dryer rear panel. " "_ mTo exhaust dryer, see Exhaust requirements, Pages 3-4, Connect exhaust vent to dryer exhaust outlet and exhaust hood using 4" (10,2 cm) clamps, Use caulking to seal exterior wall opening around exhaust hood, m Carefully move dryer into slot of the dryer, first side to neutral wire: 4. Tighten screw. = terminal block screws. Three-wire receptacle Where local codes Do Not permit connecting cabinet...
Installation Instructions
Page 12
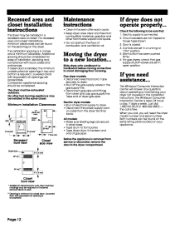
... dryer gas pipe, Electric dryer models: • Shut of electrical supply to dryer, • Disconnect the power supply cord or cable from the dryer terminal block, All models: • Make sure leveling legs are secure in dryer base, • Tape drum to front panel, • Tape dryer door, lint screen and end of installation, servicing and compliance with equivalent air openings are set in a running or "ON" position, 5, Staff button has been pushed firmly, 6, For gas dryers, check that gas supply shutoff valves...
... dryer gas pipe, Electric dryer models: • Shut of electrical supply to dryer, • Disconnect the power supply cord or cable from the dryer terminal block, All models: • Make sure leveling legs are secure in dryer base, • Tape drum to front panel, • Tape dryer door, lint screen and end of installation, servicing and compliance with equivalent air openings are set in a running or "ON" position, 5, Staff button has been pushed firmly, 6, For gas dryers, check that gas supply shutoff valves...
Installation Instructions
Page 13
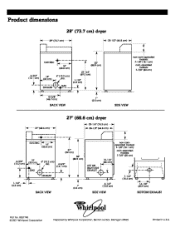
....9cm) BO'ITOM EXHAUST Part No. 8527795 © 2001 Whirlpool Corporation Prepared by Whirlpool Corporation, Benton Harbor, Michigan 49022 Printed in U.S.A. I - I I I I " (2.5 cm) 4- I/4" (18.4 cm) I .\ EXH*UST_ Z \ 7- I/4" _ / dia. (3.2 cm) '-ix._u_;T r non-coin-operated models: 7-I/8" (18.1 cm) coin-operated models: 7-718" (20 cm) 18-3/8" vi (46.7 cm) BACK VIEW I" (2.5 cm) SIDE VIEW 6-3/4" (15.; (3.2 cm) BACK VIEW 27" (68.6 cm) dryer _29-I/4" (74.3 cm...
....9cm) BO'ITOM EXHAUST Part No. 8527795 © 2001 Whirlpool Corporation Prepared by Whirlpool Corporation, Benton Harbor, Michigan 49022 Printed in U.S.A. I - I I I I " (2.5 cm) 4- I/4" (18.4 cm) I .\ EXH*UST_ Z \ 7- I/4" _ / dia. (3.2 cm) '-ix._u_;T r non-coin-operated models: 7-I/8" (18.1 cm) coin-operated models: 7-718" (20 cm) 18-3/8" vi (46.7 cm) BACK VIEW I" (2.5 cm) SIDE VIEW 6-3/4" (15.; (3.2 cm) BACK VIEW 27" (68.6 cm) dryer _29-I/4" (74.3 cm...


