User Manual
Page 3
... O R TA N T 1 INFORMATION HOW TO INSTALL 2 THE STAND 3 PREFACE SAFETY 4 PRECAUTIONS 5 IN THE CARTON FRONT/BACK 6 CONNECTIONS OF LCD TV TV INSTALLATI ON 7 DRAWINGS 8 REMOTE CONTROL 9 Menu Operation 10 Troubleshooting 11 SPECIFICATIONS TABLE OF CONTENTS 2 4 5 5 7 8 Power Cord Connection 9 Antenna ... Connection 10 VGA(PC) Connection 11 COAX Connection 11 HDMI Connection 12 Service Port Function 12 Remote control instructions in TV mode 13 Remote control setup 14 Setup Wizard 15 Select Input Source 16 Basic Operation 16 Picture Menu 17 Sound Menu...
... O R TA N T 1 INFORMATION HOW TO INSTALL 2 THE STAND 3 PREFACE SAFETY 4 PRECAUTIONS 5 IN THE CARTON FRONT/BACK 6 CONNECTIONS OF LCD TV TV INSTALLATI ON 7 DRAWINGS 8 REMOTE CONTROL 9 Menu Operation 10 Troubleshooting 11 SPECIFICATIONS TABLE OF CONTENTS 2 4 5 5 7 8 Power Cord Connection 9 Antenna ... Connection 10 VGA(PC) Connection 11 COAX Connection 11 HDMI Connection 12 Service Port Function 12 Remote control instructions in TV mode 13 Remote control setup 14 Setup Wizard 15 Select Input Source 16 Basic Operation 16 Picture Menu 17 Sound Menu...

User Manual
Page 7
... do not install it is steady. Please read this TV! Do not block or cover the ventilation openings on them and causing the TV to the model. 4. Make sure the TV was not damaged in transit. SAFETY PRECAUTIONS Put the TV on the TV. English Do not place any material on a stable surface...have a wall mount, check that it and contact your dealer. Should the TV be properly routed and protected to prevent people from stepping on the TV. Minimum distances 10cm 10cm 5cm 20cm Do not use the TV with fixtures other than those provided or suggested by the manufacturer. Check that ...
... do not install it is steady. Please read this TV! Do not block or cover the ventilation openings on them and causing the TV to the model. 4. Make sure the TV was not damaged in transit. SAFETY PRECAUTIONS Put the TV on the TV. English Do not place any material on a stable surface...have a wall mount, check that it and contact your dealer. Should the TV be properly routed and protected to prevent people from stepping on the TV. Minimum distances 10cm 10cm 5cm 20cm Do not use the TV with fixtures other than those provided or suggested by the manufacturer. Check that ...

User Manual
Page 8
Only clean the TV with a soft and dry cloth. Keep the TV away from humidity. Unplug the TV before cleaning it. In case of time. 6 Do not use spare parts other incidents. Unplug the TV during lightning storms or when unused for long periods of troubleshooting, do not use solvent or liquid to electric shocks, short-circuits, fire or other than those suggested by the manufacturer. Using inadequate spare parts can lead to clean the TV. English SAFETY PRECAUTIONS Keep the TV dry and away from heat sources.
Only clean the TV with a soft and dry cloth. Keep the TV away from humidity. Unplug the TV before cleaning it. In case of time. 6 Do not use spare parts other incidents. Unplug the TV during lightning storms or when unused for long periods of troubleshooting, do not use solvent or liquid to electric shocks, short-circuits, fire or other than those suggested by the manufacturer. Using inadequate spare parts can lead to clean the TV. English SAFETY PRECAUTIONS Keep the TV dry and away from heat sources.
User Manual
Page 9
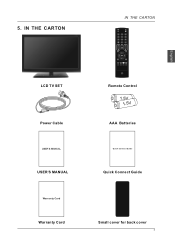
IN THE CARTON LCD TV SET Power Cable USER'S MANUAL Warranty Card Warranty Card IN THE CARTON PO WE R MU TE DI SP LAY AS PE CT ME NU EX IT OK EN TE R SL EE P SO UR CE CC FAV LIST MTS Remote Control 1.5V 1.5V AAA Batteries Quick Connect Guide Quick Connect Guide Small cover for back cover 7 English 5.
IN THE CARTON LCD TV SET Power Cable USER'S MANUAL Warranty Card Warranty Card IN THE CARTON PO WE R MU TE DI SP LAY AS PE CT ME NU EX IT OK EN TE R SL EE P SO UR CE CC FAV LIST MTS Remote Control 1.5V 1.5V AAA Batteries Quick Connect Guide Quick Connect Guide Small cover for back cover 7 English 5.
User Manual
Page 10
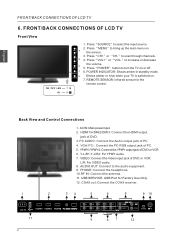
...(PC): Connect the PC-RGB output jack of DVD. 3. YPbPr1/YPbPr2: Connect the YPbPr output jack of DVD or VCR. FRONT/BACK CONNECTIONS OF LCD TV Front View 4 VOL+ VOL- 3 CH+ CH- 2 MENU 1 SOURCE 5 POWER 1. Press"VOL+"or "VOL-"to scan through channels. 4. L/R: For VIDEO audio. 8. Press... for the remote control. 7 6 Back View and Control Connections 1. REMOTE SENSOR: infrared sensor for Factory Use Only. 12. Press"SOURCE"to turn the TV on or off. 6. PC AUDIO: Connect the Audio output jack of PC. 4. Press "MENU"to the audio equipment. 9. AUDIO OUT: Connect to ...
...(PC): Connect the PC-RGB output jack of DVD. 3. YPbPr1/YPbPr2: Connect the YPbPr output jack of DVD or VCR. FRONT/BACK CONNECTIONS OF LCD TV Front View 4 VOL+ VOL- 3 CH+ CH- 2 MENU 1 SOURCE 5 POWER 1. Press"VOL+"or "VOL-"to scan through channels. 4. L/R: For VIDEO audio. 8. Press... for the remote control. 7 6 Back View and Control Connections 1. REMOTE SENSOR: infrared sensor for Factory Use Only. 12. Press"SOURCE"to turn the TV on or off. 6. PC AUDIO: Connect the Audio output jack of PC. 4. Press "MENU"to the audio equipment. 9. AUDIO OUT: Connect to ...
User Manual
Page 11
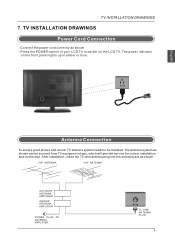
... connection. AC IN Antenna Connection To ensure good picture and sound, TV antenna system needs to switch on the front panel lights up in amber or blue. The power indicator on the LCD TV. TV INSTALLATION DRAWINGS Power Cord Connection - After installation, insert the 75-ohm... antenna plug into the antenna jack as shown. English TV INSTALLATION DRAWINGS 7. VHF ANTENNA UHF ANTENNA OUTDOOR ANTENNA AMPLIFIER INDOOR ANTENNA ...
... connection. AC IN Antenna Connection To ensure good picture and sound, TV antenna system needs to switch on the front panel lights up in amber or blue. The power indicator on the LCD TV. TV INSTALLATION DRAWINGS Power Cord Connection - After installation, insert the 75-ohm... antenna plug into the antenna jack as shown. English TV INSTALLATION DRAWINGS 7. VHF ANTENNA UHF ANTENNA OUTDOOR ANTENNA AMPLIFIER INDOOR ANTENNA ...

User Manual
Page 12
The picture quality is white and Audio right in red. TV Back TV Back YPbPr cable AUDIO cable Y Pb Pr R L DVD or VCR Back DVD or VCR 10 YPbPr cable... the AV input source using the SOURCE button on the remote control. 5 Y1 Pb1 Pr1 Y-R1 Y-L1 Video Cable TV Back VIDEO R L DVD or VCR Back DVD or VCR YPbPr(Component) Connection Connect the YPbPr output of the DVD or... VCR to the VIDEO jacks on the set using the RCA cable. English TV INSTALLATION DRAWINGS AV Connection Connect the VIDEO and AUDIO output jack of the DVD or VCR to the YPbPr input ...
The picture quality is white and Audio right in red. TV Back TV Back YPbPr cable AUDIO cable Y Pb Pr R L DVD or VCR Back DVD or VCR 10 YPbPr cable... the AV input source using the SOURCE button on the remote control. 5 Y1 Pb1 Pr1 Y-R1 Y-L1 Video Cable TV Back VIDEO R L DVD or VCR Back DVD or VCR YPbPr(Component) Connection Connect the YPbPr output of the DVD or... VCR to the VIDEO jacks on the set using the RCA cable. English TV INSTALLATION DRAWINGS AV Connection Connect the VIDEO and AUDIO output jack of the DVD or VCR to the YPbPr input ...
User Manual
Page 13
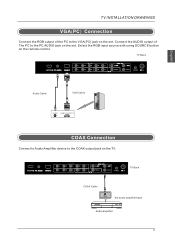
TV INSTALLATION DRAWINGS VGA(PC) Connection Connect the RGB output of The PC to the PC AUDIO jack on the set . TV Back 5 English Audio Cable VGA Cable AUDIO RGB-PC OUTPUT COAX Connection Connect to Audio Amplifier device to the VGA(PC) jack on the set . Connect the AUDIO output of the PC to the COAX output jack on the remote control. TV Back 5 COAX Cable COAX the audio amplifier back Audio amplifier 11 Select the RGB input source with using SOURCE button on the TV.
TV INSTALLATION DRAWINGS VGA(PC) Connection Connect the RGB output of The PC to the PC AUDIO jack on the set . TV Back 5 English Audio Cable VGA Cable AUDIO RGB-PC OUTPUT COAX Connection Connect to Audio Amplifier device to the VGA(PC) jack on the set . Connect the AUDIO output of the PC to the COAX output jack on the remote control. TV Back 5 COAX Cable COAX the audio amplifier back Audio amplifier 11 Select the RGB input source with using SOURCE button on the TV.
User Manual
Page 14
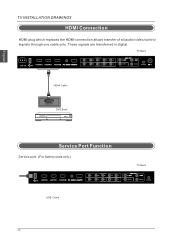
English TV INSTALLATION DRAWINGS HDMI Connection HDMI plug which replaces the HDMI connection allows transfer of all audio/video/control signals through one cable only. TV Back 5 AC IN HDMI Cable DVD Back Service Port Function Service port: (For factory uses only.) 5 USB Cable TV Back 12 These signals are transferred in digital.
English TV INSTALLATION DRAWINGS HDMI Connection HDMI plug which replaces the HDMI connection allows transfer of all audio/video/control signals through one cable only. TV Back 5 AC IN HDMI Cable DVD Back Service Port Function Service port: (For factory uses only.) 5 USB Cable TV Back 12 These signals are transferred in digital.
User Manual
Page 15
... level. VOL+/VOLPress to the screen. Press again or press VOL+ to the previous channel viewed. Return to un-mute the TV. CH+/CHPress to display the TV favourite program list. 13 FAV Press to scan through channels. NUMBER BUTTONS Press 0-9 to the screen. MENU Brings up the main... TV menu to directly change the TV channel. THUMBSTICK OK ) Allows you to navigate the on-screen menus and adjust the system settings to display the source and ...
... level. VOL+/VOLPress to the screen. Press again or press VOL+ to the previous channel viewed. Return to un-mute the TV. CH+/CHPress to display the TV favourite program list. 13 FAV Press to scan through channels. NUMBER BUTTONS Press 0-9 to the screen. MENU Brings up the main... TV menu to directly change the TV channel. THUMBSTICK OK ) Allows you to navigate the on-screen menus and adjust the system settings to display the source and ...
User Manual
Page 17
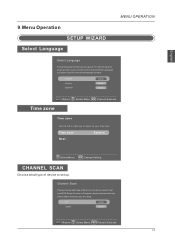
... what connection you are using. Use the Up and Down arrows on your remote control and select the Language you want to set up your TV. English French Spanish Enter Enter Enter MENU :Return :Select Menu :Press to Execute Time zone Time zone Use the left or right key to select...
... what connection you are using. Use the Up and Down arrows on your remote control and select the Language you want to set up your TV. English French Spanish Enter Enter Enter MENU :Return :Select Menu :Press to Execute Time zone Time zone Use the left or right key to select...

User Manual
Page 18
Air Now Searching... Press ▼/▲ button to select the input source you want to enter the selected source. Press OK button to watch. English MENU OPERATION Channel Scanning AUTO CHANNEL SEARCH - BASIC OPERATION PICTURE SOUND CHANNEL PARENTAL SETUP OTHERS 16 Please Wait Return Analog Channels Found: Digital Channels Found: 0 0 0% SELECT INPUT SOURCE Source Select TV AV YPbPr1 YPbPr2 HDMI1 HDMI2 HDMI3 PC Press SOURCE button to display the input source list.
Air Now Searching... Press ▼/▲ button to select the input source you want to enter the selected source. Press OK button to watch. English MENU OPERATION Channel Scanning AUTO CHANNEL SEARCH - BASIC OPERATION PICTURE SOUND CHANNEL PARENTAL SETUP OTHERS 16 Please Wait Return Analog Channels Found: Digital Channels Found: 0 0 0% SELECT INPUT SOURCE Source Select TV AV YPbPr1 YPbPr2 HDMI1 HDMI2 HDMI3 PC Press SOURCE button to display the input source list.

User Manual
Page 25
... :Return :Select Menu :Page ENTER :Se lec t Cha nn el 23 English CHANNEL MENU Note: This menu is only shown when the input source is TV. CHANNEL Channel List Favorite List Channel Setting Signal Type Auto Channel Search Air Enter MENU OPERATION MENU :Return :Select Menu :Go to Next Menu Channel...
... :Return :Select Menu :Page ENTER :Se lec t Cha nn el 23 English CHANNEL MENU Note: This menu is only shown when the input source is TV. CHANNEL Channel List Favorite List Channel Setting Signal Type Auto Channel Search Air Enter MENU OPERATION MENU :Return :Select Menu :Go to Next Menu Channel...

User Manual
Page 27
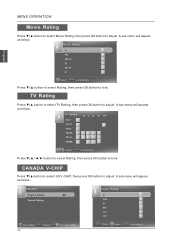
... :Go to Next Menu US V-CHIP Press ▼/▲ button to select US V-CHIP, then press OK button to Next Menu 25 USA Movie Rating TV Rating :Select Menu MENU :Return ENTER :Go to adjust. V-CHIP Press ▼/▲ button to select V-CHIP, then press OK button to enter,default password...
... :Go to Next Menu US V-CHIP Press ▼/▲ button to select US V-CHIP, then press OK button to Next Menu 25 USA Movie Rating TV Rating :Select Menu MENU :Return ENTER :Go to adjust. V-CHIP Press ▼/▲ button to select V-CHIP, then press OK button to enter,default password...
User Manual
Page 28
A sub menu will appear as below. TV Rating Press ▼/▲ button to select TV Rating, then press OK button to adjust. A sub menu will appear as below . CANADA V-CHIP Press ▼/▲ button to select US V-CHIP, then press ... adjust. Movie Rating G PG PG-13 R NC-17 X :Select ENTER :Lock/Unlock Press ▼/▲ button to select Rating, then press OK button to lock. TV Rating TV-Y TV-Y7 TV-G TV-PG TV-14 TV-MA D L S V FV :Select ENTER :Lock/Unlock Press button to select Rating, then press OK button to lock.
A sub menu will appear as below. TV Rating Press ▼/▲ button to select TV Rating, then press OK button to adjust. A sub menu will appear as below . CANADA V-CHIP Press ▼/▲ button to select US V-CHIP, then press ... adjust. Movie Rating G PG PG-13 R NC-17 X :Select ENTER :Lock/Unlock Press ▼/▲ button to select Rating, then press OK button to lock. TV Rating TV-Y TV-Y7 TV-G TV-PG TV-14 TV-MA D L S V FV :Select ENTER :Lock/Unlock Press button to select Rating, then press OK button to lock.

User Manual
Page 30
... Analog Caption Type Digital Caption Type Digital CC Preset Digital CC Style Off CC1 Service1 Custom MENU :Return :Select Menu :On/Off 28 Source Lock TV AV YPbPr1 YPbPr2 HDMI1 HDMI2 HDMI3 page1/1 MENU :Return :Select Menu :Page ENTER :On/Off Setup Menu SETUP Closed Caption Menu Language CLOCK English MENU...
... Analog Caption Type Digital Caption Type Digital CC Preset Digital CC Style Off CC1 Service1 Custom MENU :Return :Select Menu :On/Off 28 Source Lock TV AV YPbPr1 YPbPr2 HDMI1 HDMI2 HDMI3 page1/1 MENU :Return :Select Menu :Page ENTER :On/Off Setup Menu SETUP Closed Caption Menu Language CLOCK English MENU...
User Manual
Page 33
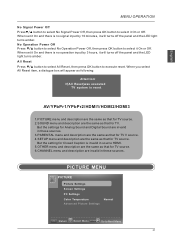
... 31 But the settings for Analog Sound and Digital Sound are invalid in these sources. 3.PARENTAL menu and description are the same as that for TV V source. 4.SETUP menu and description are the same as following: Attention! No Operation Power Off Press ▼/▲ button to select No ...off the panel and the LED light turns amber. AV/YPbPr1/YPbPr2/HDMI1/HDMI2/HDMI3 1.PICTURE menu and description are the same as that for TV source. 2.SOUND menu and description are invalid in these sources . English MENU OPERATION No Signal Power Off Press▼/▲ button to select...
... 31 But the settings for Analog Sound and Digital Sound are invalid in these sources. 3.PARENTAL menu and description are the same as that for TV V source. 4.SETUP menu and description are the same as following: Attention! No Operation Power Off Press ▼/▲ button to select No ...off the panel and the LED light turns amber. AV/YPbPr1/YPbPr2/HDMI1/HDMI2/HDMI3 1.PICTURE menu and description are the same as that for TV source. 2.SOUND menu and description are invalid in these sources . English MENU OPERATION No Signal Power Off Press▼/▲ button to select...
User Manual
Page 36
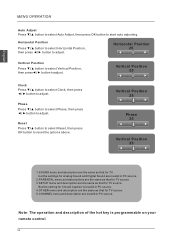
... Position 25 1.SOUND menu and description are the same as that for Closed Caption is programmable on your remote control. 34 But the setting for TV source. Horizontal Position Press ▼/▲ button to select Horizontal Position, then press ◄/► button to start auto adjusting. Reset Press ▼/▲ .... Note: The operation and description of the hot key is invalid in PC source. 4.OTHER menu and description are the same as that for TV source. 5.CHANNEL menu and description are invalid in PC source. 2.PARENTAL menu and descriptions are the same as that for...
... Position 25 1.SOUND menu and description are the same as that for Closed Caption is programmable on your remote control. 34 But the setting for TV source. Horizontal Position Press ▼/▲ button to select Horizontal Position, then press ◄/► button to start auto adjusting. Reset Press ▼/▲ .... Note: The operation and description of the hot key is invalid in PC source. 4.OTHER menu and description are the same as that for TV source. 5.CHANNEL menu and description are invalid in PC source. 2.PARENTAL menu and descriptions are the same as that for...
User Manual
Page 37
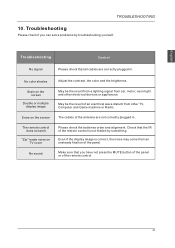
... the remote control is correct, the noise may come from an unsteady fixation of an electrical wave disturb from car, motor, neon light and other TV, Computer and Game machine or Radio. Stain on the screen Double or multiple display image May be the result of the panel. Snow on... TV cover Please check the batteries order and alignment. No sound Make sure that all cables are not correctly plugged in . The remote control does not ...
... the remote control is correct, the noise may come from an unsteady fixation of an electrical wave disturb from car, motor, neon light and other TV, Computer and Game machine or Radio. Stain on the screen Double or multiple display image May be the result of the panel. Snow on... TV cover Please check the batteries order and alignment. No sound Make sure that all cables are not correctly plugged in . The remote control does not ...
User Manual
Page 38
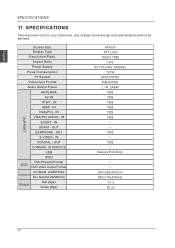
... your reference, any change to the design and specification will not be advised. Screen Size Display Type Resolution(Pixel) Aspect Ratio Power Supply Power Consumption TV System Video Input Format Audio Output Power ANTENNA AV-IN YPbPr -
... your reference, any change to the design and specification will not be advised. Screen Size Display Type Resolution(Pixel) Aspect Ratio Power Supply Power Consumption TV System Video Input Format Audio Output Power ANTENNA AV-IN YPbPr -


