User Manual
Page 8
... different formats. Digital Television Picture Digital television programs are ready to do is High Definition Television (HDTV). The "p" stands for progressive scanning, which first shows every odd line at 1/60th of an integrated digital television set . This High Definition LCD TV has a built-in the... second scan for a complete picture at 1/30th of display formats for a complete picture at one scan of the screen and then follows with a vertical resolution display of...
... different formats. Digital Television Picture Digital television programs are ready to do is High Definition Television (HDTV). The "p" stands for progressive scanning, which first shows every odd line at 1/60th of an integrated digital television set . This High Definition LCD TV has a built-in the... second scan for a complete picture at 1/30th of display formats for a complete picture at one scan of the screen and then follows with a vertical resolution display of...
User Manual
Page 16
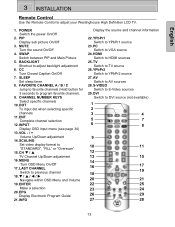
... On/Off 2. CHANNEL NUMBER KEYS Select specific channels 10. EPG Display Electronic Program Guide 21. PIP Display sub picture On/Off 3. SWAP Switch between PIP and Main Picture 5. BACKLIGHT Shortcut to adjust your Westinghouse High Definition LCD TV. 1. ENT Complete channel selection 12. CH T / S TV Channel Up/Down adjustment 16. MUTE Turn the sound On/Off...
... On/Off 2. CHANNEL NUMBER KEYS Select specific channels 10. EPG Display Electronic Program Guide 21. PIP Display sub picture On/Off 3. SWAP Switch between PIP and Main Picture 5. BACKLIGHT Shortcut to adjust your Westinghouse High Definition LCD TV. 1. ENT Complete channel selection 12. CH T / S TV Channel Up/Down adjustment 16. MUTE Turn the sound On/Off...
User Manual
Page 19
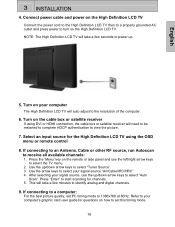
NOTE: The High Definition LCD TV will auto adjust to view the picture. 7. After selecting your signal source "Air/Cable/IRC/HRC". 4. If connecting to an Antenna, Cable or other RF source, run Autoscan to select the TV menu. 2. Press the 'Menu' key on how to start scanning for channels. 5.... Use the arrow keys to 1366x768 at 60Hz. If connecting to a computer: For the best picture quality, set this timing mode. 16 Refer to your computer The High Definition LCD TV will take a few seconds to select "Auto Scan". Press "Enter" to set PC timing mode to ...
NOTE: The High Definition LCD TV will auto adjust to view the picture. 7. After selecting your signal source "Air/Cable/IRC/HRC". 4. If connecting to an Antenna, Cable or other RF source, run Autoscan to select the TV menu. 2. Press the 'Menu' key on how to start scanning for channels. 5.... Use the arrow keys to 1366x768 at 60Hz. If connecting to a computer: For the best picture quality, set this timing mode. 16 Refer to your computer The High Definition LCD TV will take a few seconds to select "Auto Scan". Press "Enter" to set PC timing mode to ...
User Manual
Page 23
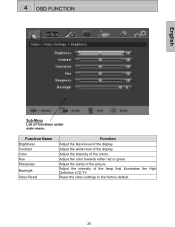
Adjust the intensity of functions under main menu. 4 OSD FUNCTION English Sub-Menu List of the colors. Reset the video settings to the factory default. 20 Adjust the clarity of the lamp that illuminates the High Definition LCD TV. Adjust the intensity of the picture. Function Name Brightness Contrast Color Hue Sharpness Backlight Video Reset Function Adjust the black level of the display. Adjust the color towards either red or green. Adjust the white level of the display.
Adjust the intensity of functions under main menu. 4 OSD FUNCTION English Sub-Menu List of the colors. Reset the video settings to the factory default. 20 Adjust the clarity of the lamp that illuminates the High Definition LCD TV. Adjust the intensity of the picture. Function Name Brightness Contrast Color Hue Sharpness Backlight Video Reset Function Adjust the black level of the display. Adjust the color towards either red or green. Adjust the white level of the display.
User Manual
Page 24
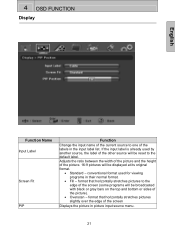
... black or gray bars on the top and bottom or sides of the other source will be reset to one of the screen Displays the picture in picture input source menu. 21 If the input label is already used for viewing programs in their normal format. • Fill - format that ...horizontally stretches pictures slightly over the edge of the labels in the input label list. 4 OSD FUNCTION Display English Function Name Input Label Screen Fit PIP Function ...
... black or gray bars on the top and bottom or sides of the other source will be reset to one of the screen Displays the picture in picture input source menu. 21 If the input label is already used for viewing programs in their normal format. • Fill - format that ...horizontally stretches pictures slightly over the edge of the labels in the input label list. 4 OSD FUNCTION Display English Function Name Input Label Screen Fit PIP Function ...
User Manual
Page 26
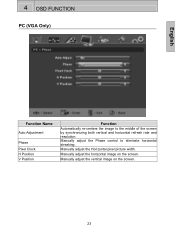
Manually adjust the horizontal image on the screen. 23 Manually adjust the Phase control to the middle of the screen by synchronizing both vertical and horizontal refresh rate and resolution. 4 OSD FUNCTION PC (VGA Only) English Function Name Auto Adjustment Phase Pixel Clock H Position V Position Function Automatically re-centers the image to eliminate horizontal streaking. Manually adjust the Horizontal pixel picture width. Manually adjust the vertical image on the screen.
Manually adjust the horizontal image on the screen. 23 Manually adjust the Phase control to the middle of the screen by synchronizing both vertical and horizontal refresh rate and resolution. 4 OSD FUNCTION PC (VGA Only) English Function Name Auto Adjustment Phase Pixel Clock H Position V Position Function Automatically re-centers the image to eliminate horizontal streaking. Manually adjust the Horizontal pixel picture width. Manually adjust the vertical image on the screen.
User Manual
Page 44
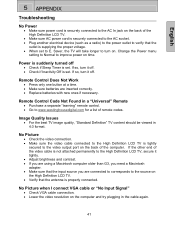
...time. • Make sure batteries are connected to corresponds to the High Definition LCD TV, secure it off • Check if Sleep Timer is set . Saver, the TV will take longer to the video output port on . No Picture • Check the video connection. • Make sure the video cable ...connected to the High Definition LCD TV is tightly secured to turn it tightly. • Adjust brightness ...
...time. • Make sure batteries are connected to corresponds to the High Definition LCD TV, secure it off • Check if Sleep Timer is set . Saver, the TV will take longer to the video output port on . No Picture • Check the video connection. • Make sure the video cable ...connected to the High Definition LCD TV is tightly secured to turn it tightly. • Adjust brightness ...
User Manual
Page 45
...antenna and wait up to another computer. Blocky images appear in the cable connector could cause an improper connection. • Connect the High Definition LCD TV to 10 seconds for signal. • Reduce signal splitters and excessively long cables. • Replace poor antenna cables and/or connectors to ... select "PASSWORD EDIT" and enter "0000" to make sure it is connected securely. How Can I Find More Help? 42 English 5 APPENDIX Troubleshooting Picture is cut off/with sidebar screen. • Use Auto Adjust. • Make sure the aspect ratio is set to SAP or minimum. •...
...antenna and wait up to another computer. Blocky images appear in the cable connector could cause an improper connection. • Connect the High Definition LCD TV to 10 seconds for signal. • Reduce signal splitters and excessively long cables. • Replace poor antenna cables and/or connectors to ... select "PASSWORD EDIT" and enter "0000" to make sure it is connected securely. How Can I Find More Help? 42 English 5 APPENDIX Troubleshooting Picture is cut off/with sidebar screen. • Use Auto Adjust. • Make sure the aspect ratio is set to SAP or minimum. •...


