

User Manual
Page 3
... PRECAUTIONS 7 ANTENNA INSTALLATION SAFETY 8 Lighting 8 Power lines 8 CLEANING THE LCD TV 9 Dolby-Digital Notice 9 PACKAGE CONTENTS 11 CONTROL PANEL 12 TERMINALS 13 REMOTE CONTROL 14 REMOTE CONTROL OPERATION 15 INSTALLING THE REMOTE CONTROL BATTERIES .. 15 REMOTE CONTROL TRANSMISSION RANGE .......... 15 LCD TV BASE 16 INSTALLING THE LCD TV BASE 16 REMOVING THE LCD TV BASE 17 ANTENNA CONNECTION 18 OUTDOOR ANTENNA CONNECTION 18...
... PRECAUTIONS 7 ANTENNA INSTALLATION SAFETY 8 Lighting 8 Power lines 8 CLEANING THE LCD TV 9 Dolby-Digital Notice 9 PACKAGE CONTENTS 11 CONTROL PANEL 12 TERMINALS 13 REMOTE CONTROL 14 REMOTE CONTROL OPERATION 15 INSTALLING THE REMOTE CONTROL BATTERIES .. 15 REMOTE CONTROL TRANSMISSION RANGE .......... 15 LCD TV BASE 16 INSTALLING THE LCD TV BASE 16 REMOVING THE LCD TV BASE 17 ANTENNA CONNECTION 18 OUTDOOR ANTENNA CONNECTION 18...

User Manual
Page 11
...sources, such as lighted candles, on or near the LCD TV. • Do not place anything on the LCD TV that the area around the LCD TV is clean and free of time, unplug the unit and remove the batteries from the remote control. • Avoid touching the display screen by : -... You may be exposed to www.wde.com. - Logging on the LCD TV, audio/video cables, or power cord. • If the LCD TV emits smoke, abnormal noise, or a strange odor, immediately turn it (e.g. Contacting the Westinghouse Customer Service ...
...sources, such as lighted candles, on or near the LCD TV. • Do not place anything on the LCD TV that the area around the LCD TV is clean and free of time, unplug the unit and remove the batteries from the remote control. • Avoid touching the display screen by : -... You may be exposed to www.wde.com. - Logging on the LCD TV, audio/video cables, or power cord. • If the LCD TV emits smoke, abnormal noise, or a strange odor, immediately turn it (e.g. Contacting the Westinghouse Customer Service ...
User Manual
Page 18
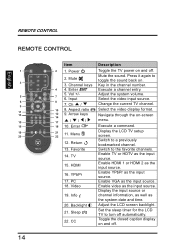
...the channel number. 4 4. Arrow keys 14 17 / // 18 10. Execute a command. 21 11. Return Display the LCD TV setup screen. REMOTE CONTROL English REMOTE CONTROL 1 3 5 6 9 11 13 15 16 19 20 14 Item Description 2 1. Enter ENT Execute a channel entry. ...5. Navigate through the on and off. HDMI Enable HDMI 1 or HDMI 2 as the input source. 17. YPbPr Enable YPbPr as the input source. 16. Menu 22 12. TV Enable TV or HDTV...
...the channel number. 4 4. Arrow keys 14 17 / // 18 10. Execute a command. 21 11. Return Display the LCD TV setup screen. REMOTE CONTROL English REMOTE CONTROL 1 3 5 6 9 11 13 15 16 19 20 14 Item Description 2 1. Enter ENT Execute a channel entry. ...5. Navigate through the on and off. HDMI Enable HDMI 1 or HDMI 2 as the input source. 17. YPbPr Enable YPbPr as the input source. 16. Menu 22 12. TV Enable TV or HDTV...
User Manual
Page 19
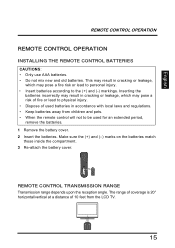
...batteries. The range of coverage is 20° horizontal/vertical at a distance of 10 feet from children and pets. • When the remote control will not to physical injury. • Dispose of fire or lead to be used batteries in cracking or leakage, which may pose a...the (+) and (-) markings. This may result in accordance with local laws and regulations. • Keep batteries away from the LCD TV. 15 English REMOTE CONTROL OPERATION REMOTE CONTROL OPERATION INSTALLING THE REMOTE CONTROL BATTERIES CAUTIONS: • Only use AAA batteries. • Do not mix new and old batteries.
...batteries. The range of coverage is 20° horizontal/vertical at a distance of 10 feet from children and pets. • When the remote control will not to physical injury. • Dispose of fire or lead to be used batteries in cracking or leakage, which may pose a...the (+) and (-) markings. This may result in accordance with local laws and regulations. • Keep batteries away from the LCD TV. 15 English REMOTE CONTROL OPERATION REMOTE CONTROL OPERATION INSTALLING THE REMOTE CONTROL BATTERIES CAUTIONS: • Only use AAA batteries. • Do not mix new and old batteries.

User Manual
Page 25
English POWER CONNECTION POWER CONNECTION CONNECTING AC POWER IMPORTANT: The LCD TV works on how to set up the LCD TV's operational settings. The SetupWizard will guide you on a 120 VAC, 60 Hz power input voltage ONLY. Select the desired language and select Yes to a proper AC outlet. Connect the power cord to the LCD TV then to use the SetupWizard. Power Source Menu Volume Channel 21 INITIAL SETUP Press on the control panel or on the remote control to turn on the LCD TV. Turn off all connected devices before plugging in the power cord.
English POWER CONNECTION POWER CONNECTION CONNECTING AC POWER IMPORTANT: The LCD TV works on how to set up the LCD TV's operational settings. The SetupWizard will guide you on a 120 VAC, 60 Hz power input voltage ONLY. Select the desired language and select Yes to a proper AC outlet. Connect the power cord to the LCD TV then to use the SetupWizard. Power Source Menu Volume Channel 21 INITIAL SETUP Press on the control panel or on the remote control to turn on the LCD TV. Turn off all connected devices before plugging in the power cord.

User Manual
Page 26
... the power cord from the wall outlet and remove the batteries from the remote control. • In standby mode, a small amount of electricity is still consumed even when the power is set to amber when Channel power off the LCD TV. NOTES: • If you are not going to use the TV for..., be sure to OFF. Mute appears on the LCD TV. ADJUSTING THE VOLUME Volume Mute Press Vol+ to turn off . BASIC OPERATIONS English BASIC OPERATIONS TURNING THE POWER ON AND OFF Turning on the power Press on the control panel or on the remote control to turn on the volume bar. Menu Volume on...
... the power cord from the wall outlet and remove the batteries from the remote control. • In standby mode, a small amount of electricity is still consumed even when the power is set to amber when Channel power off the LCD TV. NOTES: • If you are not going to use the TV for..., be sure to OFF. Mute appears on the LCD TV. ADJUSTING THE VOLUME Volume Mute Press Vol+ to turn off . BASIC OPERATIONS English BASIC OPERATIONS TURNING THE POWER ON AND OFF Turning on the power Press on the control panel or on the remote control to turn on the volume bar. Menu Volume on...

User Manual
Page 27
Using the Ch / Buttons Browse channels To browse through the available channels, press Ch / on the remote control or on the control panel. Using the Individual Input Keys TV, PC, Video, YPbPr, HDMI Keys Press any of the following instructions to select the video input source... and press ENT. Using the Channel Keys Selecting channel To change channels. English BASIC OPERATIONS CHANGING CHANNELS Referred to in the following remote control keys to confirm the new favorite channel item. SELECTING THE INPUT SOURCE There are two ways to change to the preferred favorite channel.
Using the Ch / Buttons Browse channels To browse through the available channels, press Ch / on the remote control or on the control panel. Using the Individual Input Keys TV, PC, Video, YPbPr, HDMI Keys Press any of the following instructions to select the video input source... and press ENT. Using the Channel Keys Selecting channel To change channels. English BASIC OPERATIONS CHANGING CHANNELS Referred to in the following remote control keys to confirm the new favorite channel item. SELECTING THE INPUT SOURCE There are two ways to change to the preferred favorite channel.
User Manual
Page 29
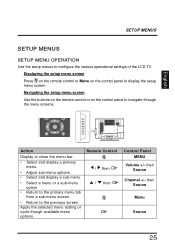
... setup menus to navigate through the menu screens. Navigating the setup menu screen Use the buttons on the remote control or on the control panel to the previous screen. then Source Menu Source 25 Remote Control / then / then Control Panel MENU Volume +/- Power Source Menu Volume Channel Action Display or close the menu bar. • Select... to the primary menu tab from a sub-menu screen. • Return to display the setup menu screen. Displaying the setup menu screen Press on the remote control or Menu on the control panel to configure the various operational settings of the...
... setup menus to navigate through the menu screens. Navigating the setup menu screen Use the buttons on the remote control or on the control panel to the previous screen. then Source Menu Source 25 Remote Control / then / then Control Panel MENU Volume +/- Power Source Menu Volume Channel Action Display or close the menu bar. • Select... to the primary menu tab from a sub-menu screen. • Return to display the setup menu screen. Displaying the setup menu screen Press on the remote control or Menu on the control panel to configure the various operational settings of the...

User Manual
Page 30
.... Contrast Use Contrast to adjust the brightness to adjust the luminance level. Press on the remote control or Menu on the remote control to adjust the option level. 3 Press to save and exit the screen. 26 Brightness Adjusting Brightness 1 Use the / keys to select Brightness and press . 2 Press... the / keys on the remote control to adjust the option level. 3 Press to save and exit the screen. Contrast Adjusting Contrast 1 Use...
.... Contrast Use Contrast to adjust the brightness to adjust the luminance level. Press on the remote control or Menu on the remote control to adjust the option level. 3 Press to save and exit the screen. 26 Brightness Adjusting Brightness 1 Use the / keys to select Brightness and press . 2 Press... the / keys on the remote control to adjust the option level. 3 Press to save and exit the screen. Contrast Adjusting Contrast 1 Use...

User Manual
Page 31
... to save and exit the screen. SETUP MENUS English Saturation Adjusting Saturation 1 Use the / keys to select Saturation and press . 2 Press the / keys on the remote control to adjust the option level. 3 Press to adjust the color intensity.
... to save and exit the screen. SETUP MENUS English Saturation Adjusting Saturation 1 Use the / keys to select Saturation and press . 2 Press the / keys on the remote control to adjust the option level. 3 Press to adjust the color intensity.

User Manual
Page 32
...Pictures appear with a bluish tint. 28 Sharpness Adjusting Sharpness 1 Use the / keys to select Sharpness and press . 2 Press the / keys on the remote control to select the desired option. 3 Press to save and exit the screen. English SETUP MENUS Adjusting Video Presets 1 Use the / keys to select Video... Presets and press . 2 Press the / keys on the remote control to adjust the option level. 3 Press to save and exit the screen. Color Temperature Color temperature refers to adjust the sharpness or softness of...
...Pictures appear with a bluish tint. 28 Sharpness Adjusting Sharpness 1 Use the / keys to select Sharpness and press . 2 Press the / keys on the remote control to select the desired option. 3 Press to save and exit the screen. English SETUP MENUS Adjusting Video Presets 1 Use the / keys to select Video... Presets and press . 2 Press the / keys on the remote control to adjust the option level. 3 Press to save and exit the screen. Color Temperature Color temperature refers to adjust the sharpness or softness of...

User Manual
Page 33
... the current input source. 29 English SETUP MENUS Adjusting Color Temperature 1 Use the / keys to select Color temperature and press . 2 Press the / keys on the remote control to select the desired option. 3 Press to save and exit the screen. Hue Adjusting Hue 1 Use the / keys to select Hue and press . 2 Press the...
... the current input source. 29 English SETUP MENUS Adjusting Color Temperature 1 Use the / keys to select Color temperature and press . 2 Press the / keys on the remote control to select the desired option. 3 Press to save and exit the screen. Hue Adjusting Hue 1 Use the / keys to select Hue and press . 2 Press the...

User Manual
Page 34
Press on the remote control or Menu on the remote control to adjust the option level. 3 Press to save and exit the screen. Any connected audio devices are available: Bass, Treble, Balance, TV Speaker, Audio Presets, ... to save and exit the screen. 30 Treble Use Treble to the LCD TV speakers only. These settings apply to calibrate high-pitched sounds. Bass Adjusting Bass 1 Use the / keys to select Bass and press . 2 Press the / keys on the remote control to adjust the option level. 3 Press to display the Audio sub...
Press on the remote control or Menu on the remote control to adjust the option level. 3 Press to save and exit the screen. Any connected audio devices are available: Bass, Treble, Balance, TV Speaker, Audio Presets, ... to save and exit the screen. 30 Treble Use Treble to the LCD TV speakers only. These settings apply to calibrate high-pitched sounds. Bass Adjusting Bass 1 Use the / keys to select Bass and press . 2 Press the / keys on the remote control to adjust the option level. 3 Press to display the Audio sub...

User Manual
Page 35
English SETUP MENUS Balance Use Balance to toggle the LCD TV speakers on and off. TV Speaker OFF ON Adjusting TV Speaker 1 Use the / keys to select TV Speaker and press . 2 Press the / keys on the remote control to adjust the option level. 3 Press to save and exit the screen. TV Speaker Use this sub-menu to adjust the sound balance between the L/R speakers. Balance Adjusting Balance 1 Use the / keys to select Balance and press . 2 Press the / keys on the remote control to select ON or OFF. 3 Press to save and exit the screen. 31
English SETUP MENUS Balance Use Balance to toggle the LCD TV speakers on and off. TV Speaker OFF ON Adjusting TV Speaker 1 Use the / keys to select TV Speaker and press . 2 Press the / keys on the remote control to adjust the option level. 3 Press to save and exit the screen. TV Speaker Use this sub-menu to adjust the sound balance between the L/R speakers. Balance Adjusting Balance 1 Use the / keys to select Balance and press . 2 Press the / keys on the remote control to select ON or OFF. 3 Press to save and exit the screen. 31
User Manual
Page 36
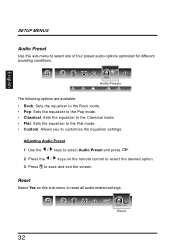
... Classical mode. • Flat: Sets the equalizer to the Flat mode. • Custom: Allows you to customize the equalizer settings. Reset Select Yes on the remote control to select the desired option. 3 Press to save and exit the screen. English SETUP MENUS Audio Preset Use this sub-menu to reset all audio...
... Classical mode. • Flat: Sets the equalizer to the Flat mode. • Custom: Allows you to customize the equalizer settings. Reset Select Yes on the remote control to select the desired option. 3 Press to save and exit the screen. English SETUP MENUS Audio Preset Use this sub-menu to reset all audio...

User Manual
Page 37
... is displayed in VGA mode. Adjusting View Mode 1 Press the / keys on the remote control to select the desired option. 2 Press or to display the View Mode sub-menu. Press on the remote control or Menu on the control panel to display the setup menu screen then select View Mode to adjust the display...: Picture is displayed to cover the entire screen. • Overscan: Picture is displayed to cover the entire screen. 33 Press on the remote control or Menu on the control panel to display the setup menu screen then select View Mode to save and exit the screen. VIEW MODE (VGA) Select PC as...
... is displayed in VGA mode. Adjusting View Mode 1 Press the / keys on the remote control to select the desired option. 2 Press or to display the View Mode sub-menu. Press on the remote control or Menu on the control panel to display the setup menu screen then select View Mode to adjust the display...: Picture is displayed to cover the entire screen. • Overscan: Picture is displayed to cover the entire screen. 33 Press on the remote control or Menu on the control panel to display the setup menu screen then select View Mode to save and exit the screen. VIEW MODE (VGA) Select PC as...

User Manual
Page 39
... sub-menus to manage the channel list, language sound, and to scan for available TV channels in your favorite channels. Press on the remote control or Menu on the control panel to display the setup menu screen then select Channels to display the Channels sub-menu. The following options are available: Favorite, Skip...
... sub-menus to manage the channel list, language sound, and to scan for available TV channels in your favorite channels. Press on the remote control or Menu on the control panel to display the setup menu screen then select Channels to display the Channels sub-menu. The following options are available: Favorite, Skip...

User Manual
Page 42
... SETUP MENUS MTS Use MTS to English, French, or Spanish. Adjusting MTS 1 Use the / keys to select MTS and press . 2 Press the / keys on the remote control to select the desired option. 3 Press to save and exit the screen.
... SETUP MENUS MTS Use MTS to English, French, or Spanish. Adjusting MTS 1 Use the / keys to select MTS and press . 2 Press the / keys on the remote control to select the desired option. 3 Press to save and exit the screen.
User Manual
Page 43
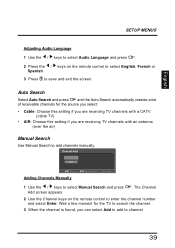
...channels with an antenna (over the air) Manual Search Use Manual Search to add channels manually. The Channel 2 Use the Channel keys on the remote control to select English, French or Spanish. 3 Press to select Manual Search and press Add screen appears. . Channel Add _ Enter :Select Adding .... English SETUP MENUS Adjusting Audio Language 1 Use the / keys to select Audio Language and press . 2 Press the / keys on the remote control to channel. 39 Auto Search Select Auto Search and press and the Auto Search automatically creates a list of receivable channels for the TV to ...
...channels with an antenna (over the air) Manual Search Use Manual Search to add channels manually. The Channel 2 Use the Channel keys on the remote control to select English, French or Spanish. 3 Press to select Manual Search and press Add screen appears. . Channel Add _ Enter :Select Adding .... English SETUP MENUS Adjusting Audio Language 1 Use the / keys to select Audio Language and press . 2 Press the / keys on the remote control to channel. 39 Auto Search Select Auto Search and press and the Auto Search automatically creates a list of receivable channels for the TV to ...

User Manual
Page 44
Press on the remote control or Menu on the control panel to display the setup menu screen then select Settings to configure the LCD TV operational setup and view the current firmware version. Date and Time Date JAN 1, 2009 Day of Week Thursday Time Zone Eastern (UTC-5) Current Time ...
Press on the remote control or Menu on the control panel to display the setup menu screen then select Settings to configure the LCD TV operational setup and view the current firmware version. Date and Time Date JAN 1, 2009 Day of Week Thursday Time Zone Eastern (UTC-5) Current Time ...