User Guide
Page 1
... Channels ...10 The Electronic Program Guide (EPG 11 INTRODUCTION: CONTROLS AND CONNECTIONS 12 PT-16H120S Controls and Connections 12 PT-19H140S Controls and Connections 14 PT-19H520S Controls and Connections 15 REAR MOUNTED CONNECTORS 17 QUICK REFERENCE: HDTV CONNECTION 18 INSTALL BASE...18 INSERTING REMOTE CONTROL BATTERIES 19 REMOTE CONTROL FEATURES...20 HDTV REMOTE CONTROL TIPS 22 HDTV/ACCESSORY SETUP 23 CONNECTING YOUR HDTV ...23...
... Channels ...10 The Electronic Program Guide (EPG 11 INTRODUCTION: CONTROLS AND CONNECTIONS 12 PT-16H120S Controls and Connections 12 PT-19H140S Controls and Connections 14 PT-19H520S Controls and Connections 15 REAR MOUNTED CONNECTORS 17 QUICK REFERENCE: HDTV CONNECTION 18 INSTALL BASE...18 INSERTING REMOTE CONTROL BATTERIES 19 REMOTE CONTROL FEATURES...20 HDTV REMOTE CONTROL TIPS 22 HDTV/ACCESSORY SETUP 23 CONNECTING YOUR HDTV ...23...
User Guide
Page 2
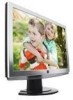
...5555, or visit our Web site at www.wde.com. PACKAGE CONTENTS In addition to your new Westinghouse HDTV and this User Manual, you'll also find the following: • Quick Setup Guide • Remote control • 2 AAA batteries • AC power cord • Warranty card • Stand (...Westinghouse. Don't forget to ensure simple, safe setup and use of all the features offered by your Warranty card or use our online Product Registration feature. This User Manual was created to complete and return your new HDTV. WELCOME Congratulations on the purchase of your High Definition LCD TV...
...5555, or visit our Web site at www.wde.com. PACKAGE CONTENTS In addition to your new Westinghouse HDTV and this User Manual, you'll also find the following: • Quick Setup Guide • Remote control • 2 AAA batteries • AC power cord • Warranty card • Stand (...Westinghouse. Don't forget to ensure simple, safe setup and use of all the features offered by your Warranty card or use our online Product Registration feature. This User Manual was created to complete and return your new HDTV. WELCOME Congratulations on the purchase of your High Definition LCD TV...
User Guide
Page 6
...LCD TV-and keep this apparatus during lightning storms or when unused for future reference. The wide blade or the third prong are difficult to avoid the potential for replacement of time. 10. Refer all servicing to rain or moisture and does not operate normally, or it off and contact the Westinghouse...them. • Always handle your LCD display with the apparatus. SAFETY INSTRUCTIONS Follow and obey all warnings and instructions marked on or pinched, particularly at plugs, convenience receptacles and the point where they exit from the remote control. • Only use your HDTV...
...LCD TV-and keep this apparatus during lightning storms or when unused for future reference. The wide blade or the third prong are difficult to avoid the potential for replacement of time. 10. Refer all servicing to rain or moisture and does not operate normally, or it off and contact the Westinghouse...them. • Always handle your LCD display with the apparatus. SAFETY INSTRUCTIONS Follow and obey all warnings and instructions marked on or pinched, particularly at plugs, convenience receptacles and the point where they exit from the remote control. • Only use your HDTV...

User Guide
Page 12
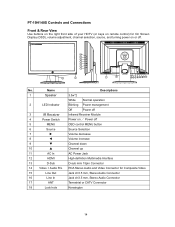
INTRODUCTION: Controls and Connections PT-16H120S Controls and Connections Front View Use buttons on the right front side of your HDTV (or keys on remote control) for On Screen Display (OSD), volume adjustment, channel selection, source, and turning power on / Power off . Name Descriptions 1 Speaker 3.5w*2 White Normal operation 2 LED ...
INTRODUCTION: Controls and Connections PT-16H120S Controls and Connections Front View Use buttons on the right front side of your HDTV (or keys on remote control) for On Screen Display (OSD), volume adjustment, channel selection, source, and turning power on / Power off . Name Descriptions 1 Speaker 3.5w*2 White Normal operation 2 LED ...
User Guide
Page 14
... 2 LED Indicator Blinking Power management Off Power off 3 IR Receiver Infrared Receiver Module 4 Power Switch Power on or off 5 MENU OSD control MENU button 6 Source Source Selection 7 X Volume decrease 8 W Volume increase 9 T Channel down 10 S Channel up 11 AC In ...Connector 17 ANT Terrestrial or CATV Connector 18 Lock hole Kensington 14 No. PT-19H140S Controls and Connections Front & Rear View Use buttons on the right front side of your HDTV (or keys on remote control) for On Screen Display (OSD), volume adjustment, channel selection, source,...
... 2 LED Indicator Blinking Power management Off Power off 3 IR Receiver Infrared Receiver Module 4 Power Switch Power on or off 5 MENU OSD control MENU button 6 Source Source Selection 7 X Volume decrease 8 W Volume increase 9 T Channel down 10 S Channel up 11 AC In ...Connector 17 ANT Terrestrial or CATV Connector 18 Lock hole Kensington 14 No. PT-19H140S Controls and Connections Front & Rear View Use buttons on the right front side of your HDTV (or keys on remote control) for On Screen Display (OSD), volume adjustment, channel selection, source,...

User Guide
Page 15
... button 6 Source Source Selection 7 X Volume decrease 8 W Volume increase 9 T Channel down 10 S Channel up 15 PT-19H520S Controls and Connections Front View Use buttons on the right front side of your HDTV (or keys on remote control) for On Screen Display (OSD), volume adjustment, channel selection, source, and turning power on / Power off . No...
... button 6 Source Source Selection 7 X Volume decrease 8 W Volume increase 9 T Channel down 10 S Channel up 15 PT-19H520S Controls and Connections Front View Use buttons on the right front side of your HDTV (or keys on remote control) for On Screen Display (OSD), volume adjustment, channel selection, source, and turning power on / Power off . No...

User Guide
Page 19
...incorrect battery installation can result in cracking or leakage and may pose a risk for fire or personal injury • Always dispose of time 19 Inserting Remote Control Batteries 1. Reattach cover Precautions: • Only use AAA batteries • Don't mix new and old batteries, which can result in ...accordance with local laws and regulations • Keep all batteries away from children and pets • Remove batteries when the remote control will not be used batteries in cracking or leakage and may pose a risk for an extended period of used for fire or personal...
...incorrect battery installation can result in cracking or leakage and may pose a risk for fire or personal injury • Always dispose of time 19 Inserting Remote Control Batteries 1. Reattach cover Precautions: • Only use AAA batteries • Don't mix new and old batteries, which can result in ...accordance with local laws and regulations • Keep all batteries away from children and pets • Remove batteries when the remote control will not be used batteries in cracking or leakage and may pose a risk for an extended period of used for fire or personal...
User Guide
Page 20
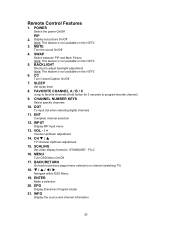
...button for 3 seconds to adjust backlight adjustment Note: This feature is not available on this HDTV. 6. CH T / S TV Channel Up/Down adjustment 15. SWAP Switch between PIP and Main Picture Note: This feature is not available on this HDTV. 3....11. BACK/RETURN Go back to "STANDARD", "FILL" 16. MENU Turn OSD Menu On/Off 17. Remote Control Features 1. INFO Display the source and channel information 20 Display sub picture On/Off Note: This feature is...previous page (menu selection) or channel (watching TV) 18. T / S / W / X Navigate within OSD Menu 19. ENTER Make a selection 20.
...button for 3 seconds to adjust backlight adjustment Note: This feature is not available on this HDTV. 6. CH T / S TV Channel Up/Down adjustment 15. SWAP Switch between PIP and Main Picture Note: This feature is not available on this HDTV. 3....11. BACK/RETURN Go back to "STANDARD", "FILL" 16. MENU Turn OSD Menu On/Off 17. Remote Control Features 1. INFO Display the source and channel information 20 Display sub picture On/Off Note: This feature is...previous page (menu selection) or channel (watching TV) 18. T / S / W / X Navigate within OSD Menu 19. ENTER Make a selection 20.

User Guide
Page 22
PT-16H120S & PT-19H140S PT-19H520S 50∘ 50∘ 3~18 feet 50∘ 50∘ 3~18 feet 22 HDTV Remote Control TIPS Keep remote control 3~18 feet away, in front of IR receiver from HDTV, within 50∘circle range to have the best signal reception.
PT-16H120S & PT-19H140S PT-19H520S 50∘ 50∘ 3~18 feet 50∘ 50∘ 3~18 feet 22 HDTV Remote Control TIPS Keep remote control 3~18 feet away, in front of IR receiver from HDTV, within 50∘circle range to have the best signal reception.
User Guide
Page 23
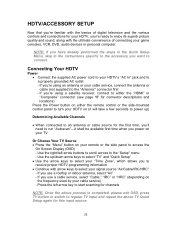
...re familiar with arrow keys to select your HDTV's "AC In" jack and to the "Antenna'" connector first - If you power on your TV Or Choose Your TV Source • Press the "Menu" button on the frequency used by your cable service) - Press the left arrow buttons to scroll across to..., connect to either the "HDMI" or "Composite" connector (see page 17 for connector descriptions and locations) Press the Power button on either the remote control or the side-mounted control panel to turn your HDTV on (it shall be available first time when you use a cable service, select "Cable," "IRC" or "HRC"...
...re familiar with arrow keys to select your HDTV's "AC In" jack and to the "Antenna'" connector first - If you power on your TV Or Choose Your TV Source • Press the "Menu" button on the frequency used by your cable service) - Press the left arrow buttons to scroll across to..., connect to either the "HDMI" or "Composite" connector (see page 17 for connector descriptions and locations) Press the Power button on either the remote control or the side-mounted control panel to turn your HDTV on (it shall be available first time when you use a cable service, select "Cable," "IRC" or "HRC"...

User Guide
Page 26
... ways you can be selected by using your remote's T/S buttons. Similarly, each of the menus includes sub-menus, which can access the OSD-either by pressing the remote control's "Menu" button (located just below the volume controls on the left side of the remote), or by pressing the "Menu" button on... the screen by using the remote's T/S and X buttons. You can select amongst any of the...
... ways you can be selected by using your remote's T/S buttons. Similarly, each of the menus includes sub-menus, which can access the OSD-either by pressing the remote control's "Menu" button (located just below the volume controls on the left side of the remote), or by pressing the "Menu" button on... the screen by using the remote's T/S and X buttons. You can select amongst any of the...
User Guide
Page 40
...format. Remote Control Code Not Found in a "Universal" Remote • Purchase a separate "learning" remote control. • Go to www.wde.com for a list of the video cable is set. No Picture • Check the video connection. • Make sure the video cable connected to the High Definition LCD TV is ...the back of the High Definition LCD TV. • Make sure AC power cord is securely connected to the AC socket. • Plug another electrical device (such as a radio) to the power outlet to verify that the antenna is properly connected. Remote Control Does Not Work • Press...
...format. Remote Control Code Not Found in a "Universal" Remote • Purchase a separate "learning" remote control. • Go to www.wde.com for a list of the video cable is set. No Picture • Check the video connection. • Make sure the video cable connected to the High Definition LCD TV is ...the back of the High Definition LCD TV. • Make sure AC power cord is securely connected to the AC socket. • Plug another electrical device (such as a radio) to the power outlet to verify that the antenna is properly connected. Remote Control Does Not Work • Press...

User Guide
Page 41
...audio is set to SAP or minimum. • Press the Volume + (Up) key on the remote control. Blocky images appear in PC mode • Make sure the aspect ratio is set correctly. Loose or... pins in the cable connector could cause an improper connection. • Connect the High Definition LCD TV to improve signal quality. If necessary, rotate the antenna and wait up to 10 seconds for...should happen, select "PASSWORD EDIT" and enter "0000" to : www.wde.com • Contact Westinghouse Customer Service at (866) 287-5555 or write us at [email protected] 41 Snow Appears on Screen ...
...audio is set to SAP or minimum. • Press the Volume + (Up) key on the remote control. Blocky images appear in PC mode • Make sure the aspect ratio is set correctly. Loose or... pins in the cable connector could cause an improper connection. • Connect the High Definition LCD TV to improve signal quality. If necessary, rotate the antenna and wait up to 10 seconds for...should happen, select "PASSWORD EDIT" and enter "0000" to : www.wde.com • Contact Westinghouse Customer Service at (866) 287-5555 or write us at [email protected] 41 Snow Appears on Screen ...


