User Manual
Page 2
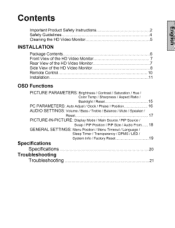
... Cleaning the HD Video Monitor 5 INSTALLATION Package Contents 6 Front View of the HD Video Monitor 7 Rear View of the HD Video Monitor 7 Side View of the HD Video Monitor 8 Remote Control 10 Installation... 11 OSD Functions PICTURE PARAMETERS: Brightness / Contrast / Saturation / Hue / Color Temp / Sharpness / Aspect Ratio / Backlight / Reset 15 PC PARAMETERS: Auto Adjust / Clock / Phase / Position 16 AUDIO SETTINGS: Volume / Bass / Treble / Balance / Mute / Speaker/ Reset 17 PICTURE-IN-PICTURE: Display...
... Cleaning the HD Video Monitor 5 INSTALLATION Package Contents 6 Front View of the HD Video Monitor 7 Rear View of the HD Video Monitor 7 Side View of the HD Video Monitor 8 Remote Control 10 Installation... 11 OSD Functions PICTURE PARAMETERS: Brightness / Contrast / Saturation / Hue / Color Temp / Sharpness / Aspect Ratio / Backlight / Reset 15 PC PARAMETERS: Auto Adjust / Clock / Phase / Position 16 AUDIO SETTINGS: Volume / Bass / Treble / Balance / Mute / Speaker/ Reset 17 PICTURE-IN-PICTURE: Display...
User Manual
Page 4
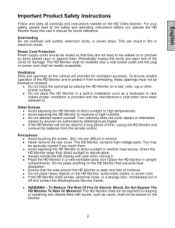
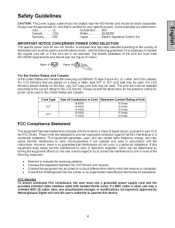
... near a wall socket outlet and the plug on the Monitor. 2 Periodically inspect the cords and each end of the HD Monitor and to . Skin oils are provided for damage. The HD Monitor shall be walked on or pinched by Westinghouse Digital. Precautions • Avoid touching the screen. For your...a bookcase or rack unless proper ventilation is clean and free of time, unplug the HD Monitor and remove the batteries from direct sunlight to reduce glare. • Always handle the HD display with liquids, such as vases, shall not be placed on power cord shall be used for...
... near a wall socket outlet and the plug on the Monitor. 2 Periodically inspect the cords and each end of the HD Monitor and to . Skin oils are provided for damage. The HD Monitor shall be walked on or pinched by Westinghouse Digital. Precautions • Avoid touching the screen. For your...a bookcase or rack unless proper ventilation is clean and free of time, unplug the HD Monitor and remove the batteries from direct sunlight to reduce glare. • Always handle the HD display with liquids, such as vases, shall not be placed on power cord shall be used for...
User Manual
Page 5
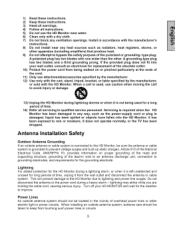
...Power Lines An outside antenna system should be located in any ventilation openings. If the provided plug does not fit into the HD Monitor, it does not operate normally, or the TV has been dropped. Antenna Installation Safety Outdoor Antenna Grounding If an outside antenna ...system, extreme care should not be taken to qualified service personnel. This will prevent damage to the HD Monitor due to improve. 1) Read these instructions. 2) Keep these instructions. 3) Heed all warnings. 4) Follow all servicing to keep from touching such...
...Power Lines An outside antenna system should be located in any ventilation openings. If the provided plug does not fit into the HD Monitor, it does not operate normally, or the TV has been dropped. Antenna Installation Safety Outdoor Antenna Grounding If an outside antenna ...system, extreme care should not be taken to qualified service personnel. This will prevent damage to the HD Monitor due to improve. 1) Read these instructions. 2) Keep these instructions. 3) Heed all warnings. 4) Follow all servicing to keep from touching such...
User Manual
Page 6
...If a BNC cable is no guarantee that are placed on , the user is connected. • Consult the Westinghouse Service Center or an experienced radio/Monitor technician for the LCD Monitor. Use the following measures: • Reorient or relocate the receiving antenna. • Increase the separation between ... limits for this device. 4 SEV Canada CSA Britain BASE/BS Germany .......... The female receptacle of the FCC Rules. For LCD Monitors placed directly on a circuit different from that is enclosed and has been selected according to the country of the following guidelines...
...If a BNC cable is no guarantee that are placed on , the user is connected. • Consult the Westinghouse Service Center or an experienced radio/Monitor technician for the LCD Monitor. Use the following measures: • Reorient or relocate the receiving antenna. • Increase the separation between ... limits for this device. 4 SEV Canada CSA Britain BASE/BS Germany .......... The female receptacle of the FCC Rules. For LCD Monitors placed directly on a circuit different from that is enclosed and has been selected according to the country of the following guidelines...
User Manual
Page 7
... not be liable for damage resulting from the use of any ammonia or alcohol-based cleaners on the HD Monitor screen or case. This removes dust and other particles. 2. Disclaimer Westinghouse Digital does not recommend the use of any ammonia or alcohol-based cleaners. If it still is not clean, apply a small...
... not be liable for damage resulting from the use of any ammonia or alcohol-based cleaners on the HD Monitor screen or case. This removes dust and other particles. 2. Disclaimer Westinghouse Digital does not recommend the use of any ammonia or alcohol-based cleaners. If it still is not clean, apply a small...
User Manual
Page 8
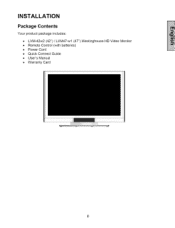
INSTALLATION Package Contents Your product package includes: • LVM-42w2 (42") / LVM47-w1 (47") Westinghouse • Remote Control (with batteries) • Power Cord • Quick Connect Guide • User's Manual • Warranty Card HD Video Monitor
INSTALLATION Package Contents Your product package includes: • LVM-42w2 (42") / LVM47-w1 (47") Westinghouse • Remote Control (with batteries) • Power Cord • Quick Connect Guide • User's Manual • Warranty Card HD Video Monitor
User Manual
Page 9
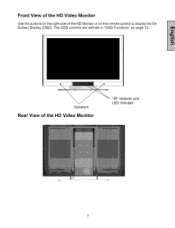
Speakers Rear View of the HD Monitor or on page 12. The OSD controls are defined in "OSD Functions" on the remote control to display the On Screen Display (OSD). Front View of the HD Video Monitor Use the buttons on the right side of the liD Video Monitor "IR" receiver and LED indicator
Speakers Rear View of the HD Monitor or on page 12. The OSD controls are defined in "OSD Functions" on the remote control to display the On Screen Display (OSD). Front View of the HD Video Monitor Use the buttons on the right side of the liD Video Monitor "IR" receiver and LED indicator

User Manual
Page 10
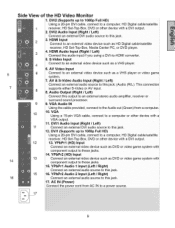
Side View of the HD Video Monitor
Side View of the HD Video Monitor
User Manual
Page 11
... Audio Input (Right/Left) Connect an external audio source to -HDMI converter. 5. HD Digital cable/satellite 1 receiver. 5 14 16 Side View of the HD Video Monitor 1.
... Audio Input (Right/Left) Connect an external audio source to -HDMI converter. 5. HD Digital cable/satellite 1 receiver. 5 14 16 Side View of the HD Video Monitor 1.
User Manual
Page 12
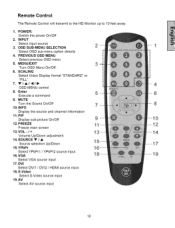
...1 14 Volume Up/Down adjustment 14.SOURCE • / • ! DVI Select DVll / DVl2 / HDMI source input 18. SCALING Select Video Display format "STANDARD" or "FILL" 7. V/A/41/_ 4 OSD MENU control 8. Enter 6 Execute a command 9. VGA 1 Select VGA source input 11.... MUTE Turn the Sound On/Off 7 8 10.1NFO Display the source and channel information 11.PIP Display sub-picture On/Off t0 12. Source selection Up/Down 15.YPbPr 1 Select YPbPrl / YPbPr2 source ... Remote Control will transmit to the HD Monitor up to 10 feet away. 1.
...1 14 Volume Up/Down adjustment 14.SOURCE • / • ! DVI Select DVll / DVl2 / HDMI source input 18. SCALING Select Video Display format "STANDARD" or "FILL" 7. V/A/41/_ 4 OSD MENU control 8. Enter 6 Execute a command 9. VGA 1 Select VGA source input 11.... MUTE Turn the Sound On/Off 7 8 10.1NFO Display the source and channel information 11.PIP Display sub-picture On/Off t0 12. Source selection Up/Down 15.YPbPr 1 Select YPbPrl / YPbPr2 source ... Remote Control will transmit to the HD Monitor up to 10 feet away. 1.
User Manual
Page 14
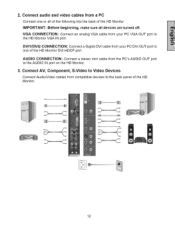
...from compatible devices to one or all of the following into the back of the HD Monitor IMPORTANT: Before beginning, make sure all devices are turned off. DVII/DVI2 CONNECTION: Connect a Digital ...cable from a PC Connect one of the HD Monitor. Connect audio and video cables from your PC VGA OUT port to the AUDIO IN port on the HD Monitor. 3. ii_i_i_;/_ ¸ iiiiiiii/ 12 VGA ...CONNECTION: Connect an analog VGA cable from the PC's AUDIO OUT port to the HD Monitor VGA IN port. AUDIO CONNECTION...
...from compatible devices to one or all of the following into the back of the HD Monitor IMPORTANT: Before beginning, make sure all devices are turned off. DVII/DVI2 CONNECTION: Connect a Digital ...cable from a PC Connect one of the HD Monitor. Connect audio and video cables from your PC VGA OUT port to the AUDIO IN port on the HD Monitor. 3. ii_i_i_;/_ ¸ iiiiiiii/ 12 VGA ...CONNECTION: Connect an analog VGA cable from the PC's AUDIO OUT port to the HD Monitor VGA IN port. AUDIO CONNECTION...
User Manual
Page 15
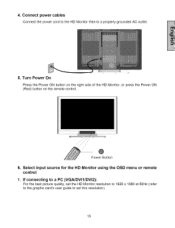
Turn Power On Press the Power ON button on the right side of the HD Monitor, or press the Power ON (Red) button on the remote control. Power Button 6. Select input source for the HD Monitor using the OSD menu or remote control 7. 4. If connecting to a PC (VGA/DVI1/DVI2): For the best picture quality, set this resolution). 13 Connect power cables Connect the power cord to the HD Monitor then to set the HD Monitor resolution to 1920 x 1080 at 60Hz (refer to the graphic card's user guide to a properly grounded AC outlet. 5.
Turn Power On Press the Power ON button on the right side of the HD Monitor, or press the Power ON (Red) button on the remote control. Power Button 6. Select input source for the HD Monitor using the OSD menu or remote control 7. 4. If connecting to a PC (VGA/DVI1/DVI2): For the best picture quality, set this resolution). 13 Connect power cables Connect the power cord to the HD Monitor then to set the HD Monitor resolution to 1920 x 1080 at 60Hz (refer to the graphic card's user guide to a properly grounded AC outlet. 5.
User Manual
Page 16
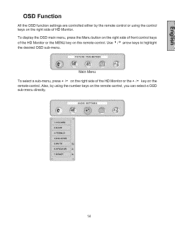
To display the OSD main menu, press the Menu button on the right side of front control keys of the HD Monitor or the • /v key on the remote control. Also, by the remote control or using the number keys on the remote control, you can select a OSD sub-menu directly. 14 Use _ / _ arrow keys to highlight the desired OSD sub-menu. Main Menu To select a sub-menu, press • /v on the right side of the HD Monitor or the MENU key on the remote control. OSD Function All the OSD function settings are controlled either by using the control keys on the right side of HD Monitor.
To display the OSD main menu, press the Menu button on the right side of front control keys of the HD Monitor or the • /v key on the remote control. Also, by the remote control or using the number keys on the remote control, you can select a OSD sub-menu directly. 14 Use _ / _ arrow keys to highlight the desired OSD sub-menu. Main Menu To select a sub-menu, press • /v on the right side of the HD Monitor or the MENU key on the remote control. OSD Function All the OSD function settings are controlled either by using the control keys on the right side of HD Monitor.
User Manual
Page 23
...Press the Volume + (Up) key on the remote control. • Make sure the speaker setting is set to : www.westinghousedigital.com Contact Westinghouse Customer Service [email protected] at (866) 287-5555 or write us at a time. Log on the remote control, so that S-Video and... with new ones if necessary. Remote Control Code Not Found in the cable connector could cause an improper connection. • Connect the HD Monitor to : www.westinqhousediqital.com for updated remote code info. No Sound • Check the audio connection. • Press MUTE on to ...
...Press the Volume + (Up) key on the remote control. • Make sure the speaker setting is set to : www.westinghousedigital.com Contact Westinghouse Customer Service [email protected] at (866) 287-5555 or write us at a time. Log on the remote control, so that S-Video and... with new ones if necessary. Remote Control Code Not Found in the cable connector could cause an improper connection. • Connect the HD Monitor to : www.westinqhousediqital.com for updated remote code info. No Sound • Check the audio connection. • Press MUTE on to ...


