User Manual
Page 2
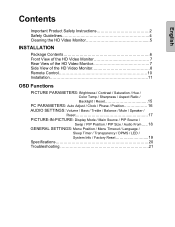
...2 Safety Guidelines 4 Cleaning the HD Video Monitor 5 INSTALLATION Package Contents 6 Front View of the HD Video Monitor 7 Rear View of the HD Video Monitor 7 Side View of the HD Video Monitor 8 Remote Control 10 Installation 11 OSD Functions... PICTURE PARAMETERS: Brightness / Contrast / Saturation / Hue / Color Temp / Sharpness / Aspect Ratio / Backlight / Reset 15 PC PARAMETERS: Auto Adjust / Clock / Phase / Position 16 AUDIO SETTINGS: Volume / Bass / Treble / Balance / Mute / Speaker / Reset 17 PICTURE-IN-PICTURE: Display...
...2 Safety Guidelines 4 Cleaning the HD Video Monitor 5 INSTALLATION Package Contents 6 Front View of the HD Video Monitor 7 Rear View of the HD Video Monitor 7 Side View of the HD Video Monitor 8 Remote Control 10 Installation 11 OSD Functions... PICTURE PARAMETERS: Brightness / Contrast / Saturation / Hue / Color Temp / Sharpness / Aspect Ratio / Backlight / Reset 15 PC PARAMETERS: Auto Adjust / Clock / Phase / Position 16 AUDIO SETTINGS: Volume / Bass / Treble / Balance / Mute / Speaker / Reset 17 PICTURE-IN-PICTURE: Display...
User Manual
Page 4
...; Ensure that they are provided for damage. The HD Monitor shall be installed near a wall socket outlet and the plug on the HD Video Monitor. Ventilation Slots and openings on or pinched by Westinghouse Digital. • If the HD Monitor will not be used for a long period of the... cords for ventilation purposes. Other Notices • Avoid exposing the HD Monitor to direct sunlight or high temperatures. • Avoid exposing the HD Monitor to reduce glare. • Always handle the HD display ...
...; Ensure that they are provided for damage. The HD Monitor shall be installed near a wall socket outlet and the plug on the HD Video Monitor. Ventilation Slots and openings on or pinched by Westinghouse Digital. • If the HD Monitor will not be used for a long period of the... cords for ventilation purposes. Other Notices • Avoid exposing the HD Monitor to direct sunlight or high temperatures. • Avoid exposing the HD Monitor to reduce glare. • Always handle the HD display ...
User Manual
Page 5
...requirements for the grounding electrode. Antenna Installation Safety Outdoor Antenna Grounding If an outside antenna or cable system is connected to the HD Monitor, be sure the antenna or cable system is not being walked on proper grounding of the mast and supporting structure, grounding of the... service personnel. Install in the vicinity of time, unplug it is damaged, liquid has been spilled or objects have fallen into your HD MONITOR and wait for replacement of the cord. 11) Only use attachments/accessories specified by the manufacturer. 12) Use only with the cart, ...
...requirements for the grounding electrode. Antenna Installation Safety Outdoor Antenna Grounding If an outside antenna or cable system is connected to the HD Monitor, be sure the antenna or cable system is not being walked on proper grounding of the mast and supporting structure, grounding of the... service personnel. Install in the vicinity of time, unplug it is damaged, liquid has been spilled or objects have fallen into your HD MONITOR and wait for replacement of the cord. 11) Only use attachments/accessories specified by the manufacturer. 12) Use only with the cart, ...
User Manual
Page 6
... to provide reasonable protection against harmful interference in a residential installation. Some examples are designed to the current rating for the LCD Monitor. This equipment generates, uses, and can be easily accessible. However, there is enclosed and has been selected according to...does cause harmful interference to radio or television reception, which the receiver is connected. • Consult the Westinghouse Service Center or an experienced radio/Monitor technician for assistance. English Safety Guidelines CAUTION: The power supply outlet should be located near the HD...
... to provide reasonable protection against harmful interference in a residential installation. Some examples are designed to the current rating for the LCD Monitor. This equipment generates, uses, and can be easily accessible. However, there is enclosed and has been selected according to...does cause harmful interference to radio or television reception, which the receiver is connected. • Consult the Westinghouse Service Center or an experienced radio/Monitor technician for assistance. English Safety Guidelines CAUTION: The power supply outlet should be located near the HD...
User Manual
Page 7
...chemical cleaners have been reported to damage the screen and/or HD Monitor case. Disclaimer Westinghouse Digital does not recommend the use of any ammonia or alcohol-based cleaners. 5 English Cleaning the HD Video Monitor • MAKE SURE THE HD Monitor IS TURNED OFF • NEVER SPRAY OR POUR ANY LIQUID DIRECTLY... THE SCREEN OR CASE To clean the screen: 1. To clean the case: 1. Westinghouse Digital will not be liable for damage resulting from the use of any ammonia or alcohol-based cleaners on the HD Monitor screen or case. If it still is not clean, apply a small amount of ...
...chemical cleaners have been reported to damage the screen and/or HD Monitor case. Disclaimer Westinghouse Digital does not recommend the use of any ammonia or alcohol-based cleaners. 5 English Cleaning the HD Video Monitor • MAKE SURE THE HD Monitor IS TURNED OFF • NEVER SPRAY OR POUR ANY LIQUID DIRECTLY... THE SCREEN OR CASE To clean the screen: 1. To clean the case: 1. Westinghouse Digital will not be liable for damage resulting from the use of any ammonia or alcohol-based cleaners on the HD Monitor screen or case. If it still is not clean, apply a small amount of ...
User Manual
Page 8
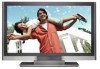
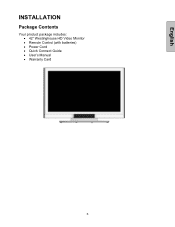
English INSTALLATION Package Contents Your product package includes: • 42" Westinghouse HD Video Monitor • Remote Control (with batteries) • Power Cord • Quick Connect Guide • User's Manual • Warranty Card 6
English INSTALLATION Package Contents Your product package includes: • 42" Westinghouse HD Video Monitor • Remote Control (with batteries) • Power Cord • Quick Connect Guide • User's Manual • Warranty Card 6
User Manual
Page 9
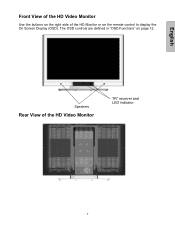
English Front View of the HD Video Monitor Use the buttons on the right side of the HD Video Monitor "IR" receiver and LED indicator 7 Speakers Rear View of the HD Monitor or on page 12. The OSD controls are defined in "OSD Functions" on the remote control to display the On Screen Display (OSD).
English Front View of the HD Video Monitor Use the buttons on the right side of the HD Video Monitor "IR" receiver and LED indicator 7 Speakers Rear View of the HD Monitor or on page 12. The OSD controls are defined in "OSD Functions" on the remote control to display the On Screen Display (OSD).

User Manual
Page 10
Increase/Decrease sound volume or adjust a highlighted control while in the OSD MENU. 5. OSD Selection T/S Highlight Menu. Input Select Active Video Input or choose a selection while in the OSD Menu. 3. Power Button Turn Power ON/OFF 8 Side View of the HD Video Monitor English 1. Volume + / - a control while in the OSD 4. Menu Turn OSD Menu ON/OFF 2.
Increase/Decrease sound volume or adjust a highlighted control while in the OSD MENU. 5. OSD Selection T/S Highlight Menu. Input Select Active Video Input or choose a selection while in the OSD Menu. 3. Power Button Turn Power ON/OFF 8 Side View of the HD Video Monitor English 1. Volume + / - a control while in the OSD 4. Menu Turn OSD Menu ON/OFF 2.
User Manual
Page 11
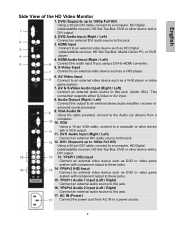
... other device with component output to an external video device such as a VHS player or video game system. 7. English Side View of the HD Video Monitor 1. VGA Using a 15-pin VGA cable, connect to an external stereo audio amplifier, receiver or surround sound processor. 9. VGA Audio IN Using the cable provided...
... other device with component output to an external video device such as a VHS player or video game system. 7. English Side View of the HD Video Monitor 1. VGA Using a 15-pin VGA cable, connect to an external stereo audio amplifier, receiver or surround sound processor. 9. VGA Audio IN Using the cable provided...
User Manual
Page 12
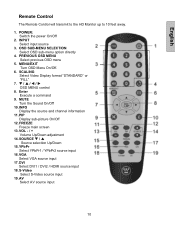
...W / X OSD MENU control 8. INFO Display the source and channel information 11. SOURCE T / S Source selection Up/Down 15. FREEZE Freeze main screen 13. YPbPr Select YPbPr1 / YPbPr2 source input 16. English Remote Control The Remote Control will transmit to the HD Monitor up to 10 feet away. 1. INPUT Select... input source 3. SCALING Select Video Display format "STANDARD" or "FILL" 7. DVI Select DVI1 / DVI2 / HDMI source input 18. ...
...W / X OSD MENU control 8. INFO Display the source and channel information 11. SOURCE T / S Source selection Up/Down 15. FREEZE Freeze main screen 13. YPbPr Select YPbPr1 / YPbPr2 source input 16. English Remote Control The Remote Control will transmit to the HD Monitor up to 10 feet away. 1. INPUT Select... input source 3. SCALING Select Video Display format "STANDARD" or "FILL" 7. DVI Select DVI1 / DVI2 / HDMI source input 18. ...
User Manual
Page 14
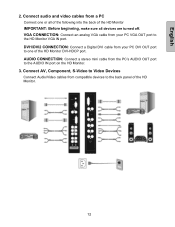
..., Component, S-Video to Video Devices Connect Audio/Video cables from compatible devices to one or all of the following into the back of the HD Monitor IMPORTANT: Before beginning, make sure all devices are turned off. English 2. AUDIO CONNECTION: Connect a stereo mini cable from your PC DVI OUT port... to the back panel of the HD Monitor DVI-HDCP port. VGA CONNECTION: Connect an analog VGA cable from the PC's AUDIO OUT port to the HD Monitor VGA IN port. DVI1/DVI2 CONNECTION: Connect a Digital DVI cable from a PC ...
..., Component, S-Video to Video Devices Connect Audio/Video cables from compatible devices to one or all of the following into the back of the HD Monitor IMPORTANT: Before beginning, make sure all devices are turned off. English 2. AUDIO CONNECTION: Connect a stereo mini cable from your PC DVI OUT port... to the back panel of the HD Monitor DVI-HDCP port. VGA CONNECTION: Connect an analog VGA cable from the PC's AUDIO OUT port to the HD Monitor VGA IN port. DVI1/DVI2 CONNECTION: Connect a Digital DVI cable from a PC ...
User Manual
Page 15
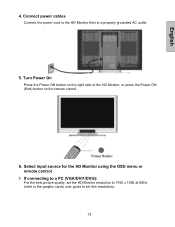
Connect power cables Connect the power cord to the HD Monitor then to set the HD Monitor resolution to 1920 x 1080 at 60Hz (refer to the graphic card's user guide to a properly grounded AC outlet. 5. If connecting to a PC (VGA/DVI1/DVI2): For the best picture quality, set this resolution). 13 Turn Power On Press the Power ON button on the right side of the HD Monitor, or press the Power ON (Red) button on the remote control. 6. Select input source for the HD Monitor using the OSD menu or remote control 7. English 4.
Connect power cables Connect the power cord to the HD Monitor then to set the HD Monitor resolution to 1920 x 1080 at 60Hz (refer to the graphic card's user guide to a properly grounded AC outlet. 5. If connecting to a PC (VGA/DVI1/DVI2): For the best picture quality, set this resolution). 13 Turn Power On Press the Power ON button on the right side of the HD Monitor, or press the Power ON (Red) button on the remote control. 6. Select input source for the HD Monitor using the OSD menu or remote control 7. English 4.
User Manual
Page 16
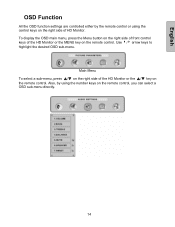
... the OSD function settings are controlled either by using the control keys on the right side of HD Monitor. Also, by the remote control or using the number keys on the remote control. To display the OSD main menu, press the Menu button on the right side of front control keys of... the HD Monitor or the ▲/▼ key on the remote control, you can select a OSD sub-menu directly. 14...
... the OSD function settings are controlled either by using the control keys on the right side of HD Monitor. Also, by the remote control or using the number keys on the remote control. To display the OSD main menu, press the Menu button on the right side of front control keys of... the HD Monitor or the ▲/▼ key on the remote control, you can select a OSD sub-menu directly. 14...
User Manual
Page 23
... for updated remote code info. No Sound • Check the audio connection. • Press MUTE on to : www.westinghousedigital.com • Contact Westinghouse Customer Service at (866) 287-5555 or write us at a time. Remote Control Buttons Do Not Work • Press only one button at service...westinghousedigital.com 21 Remote Control Code Not Found in the cable connector could cause an improper connection. • Connect the HD Monitor to "internal". The HD Monitor audio may be set to another electrical device (such as a radio) to the power outlet to verify that the outlet ...
... for updated remote code info. No Sound • Check the audio connection. • Press MUTE on to : www.westinghousedigital.com • Contact Westinghouse Customer Service at (866) 287-5555 or write us at a time. Remote Control Buttons Do Not Work • Press only one button at service...westinghousedigital.com 21 Remote Control Code Not Found in the cable connector could cause an improper connection. • Connect the HD Monitor to "internal". The HD Monitor audio may be set to another electrical device (such as a radio) to the power outlet to verify that the outlet ...


