
User Manual
Page 2
... Contents 6 Front View of the LCD TV 6 Rear View of the LCD TV 6 Side View of the LCD TV 7 Input connectors of the LCD TV 8 Remote Control 9 Installation 11 OSD Functions IMAGE SETTINGS: Brightness / Contrast / Saturation / Hue / Sharpness / Color Temp/ Reset / VGA Setting 14 DISPLAY SETTINGS: Main Source / PIP Source / Aspect...
... Contents 6 Front View of the LCD TV 6 Rear View of the LCD TV 6 Side View of the LCD TV 7 Input connectors of the LCD TV 8 Remote Control 9 Installation 11 OSD Functions IMAGE SETTINGS: Brightness / Contrast / Saturation / Hue / Sharpness / Color Temp/ Reset / VGA Setting 14 DISPLAY SETTINGS: Main Source / PIP Source / Aspect...

User Manual
Page 4
... electronic shock. The LCD TV shall not be exposed to dripping or splashing and objects filled with care when moving it off and contact the Westinghouse Service Center. • WARNING - Keep this user's manual for a long period of moisture. • Do not place heavy objects on the TV. 3 ...such as a bookcase or rack unless proper ventilation is clean and free of time, unplug the LCD TV and remove the batteries from the remote control. Precautions • Avoid touching the screen. Your warranty does not cover repairs or attempted repairs by anyone not authorized by items placed ...
... electronic shock. The LCD TV shall not be exposed to dripping or splashing and objects filled with care when moving it off and contact the Westinghouse Service Center. • WARNING - Keep this user's manual for a long period of moisture. • Do not place heavy objects on the TV. 3 ...such as a bookcase or rack unless proper ventilation is clean and free of time, unplug the LCD TV and remove the batteries from the remote control. Precautions • Avoid touching the screen. Your warranty does not cover repairs or attempted repairs by anyone not authorized by items placed ...
User Manual
Page 7
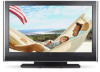
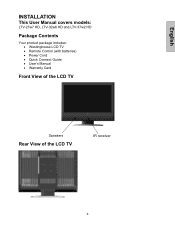
English INSTALLATION This User Manual covers models: LTV-27w7 HD, LTV-32w6 HD and LTV-37w2 HD Package Contents Your product package includes: • Westinghouse LCD TV • Remote Control (with batteries) • Power Cord • Quick Connect Guide • User's Manual • Warranty Card Front View of the LCD TV Speakers Rear View of the LCD TV IR receiver 6
English INSTALLATION This User Manual covers models: LTV-27w7 HD, LTV-32w6 HD and LTV-37w2 HD Package Contents Your product package includes: • Westinghouse LCD TV • Remote Control (with batteries) • Power Cord • Quick Connect Guide • User's Manual • Warranty Card Front View of the LCD TV Speakers Rear View of the LCD TV IR receiver 6
User Manual
Page 10
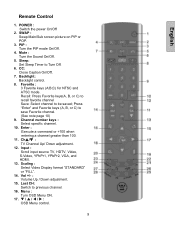
..." or "FILL". 14. Backlight: Backlight control. 8. Ch▲/▼ : TV Channel Up/ Down adjustment. 12. T / S / W / X : OSD Menu control. 9 Mute : Turn the Sound On/Off. 5. English Remote Control 1. Favorite : 3 Favorite keys (A;B;C) for NTSC and ATSC mode. Last CH: Switch to be saved; SWAP : Swap Main/Sub screen picture on PIP or POP...
..." or "FILL". 14. Backlight: Backlight control. 8. Ch▲/▼ : TV Channel Up/ Down adjustment. 12. T / S / W / X : OSD Menu control. 9 Mute : Turn the Sound On/Off. 5. English Remote Control 1. Favorite : 3 Favorite keys (A;B;C) for NTSC and ATSC mode. Last CH: Switch to be saved; SWAP : Swap Main/Sub screen picture on PIP or POP...

User Manual
Page 12
Insert Remote Control Batteries 1) Remove the battery cover. 2) Insert the batteries corresponding to (+) and (−) markings. CAUTION: • Only use AAA batteries. • Do not mix new ... in cracking or leakage, which may result in accordance with local laws and regulations. • Keep batteries away from children and pets. • When the remote control will not to be used for an extended period, remove the batteries. 11 English Installation 1.
Insert Remote Control Batteries 1) Remove the battery cover. 2) Insert the batteries corresponding to (+) and (−) markings. CAUTION: • Only use AAA batteries. • Do not mix new ... in cracking or leakage, which may result in accordance with local laws and regulations. • Keep batteries away from children and pets. • When the remote control will not to be used for an extended period, remove the batteries. 11 English Installation 1.
User Manual
Page 14
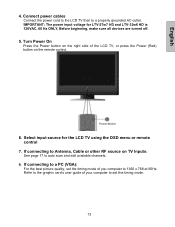
...or press the Power (Red) button on the remote control. 6. Turn Power On Press the Power button on TV Inputs: See page 17 to a properly grounded AC outlet. If connecting to 1360 x 768 at 60Hz. Select input source for LTV-27w7 HD and LTV-32w6 HD is 120VAC, 60 Hz ONLY, Before beginning, make... sure all devices are turned off. 5. IMPORTANT: The power input voltage for the LCD TV using the OSD menu or remote control 7. If connecting to Antenna, Cable or other ...
...or press the Power (Red) button on the remote control. 6. Turn Power On Press the Power button on TV Inputs: See page 17 to a properly grounded AC outlet. If connecting to 1360 x 768 at 60Hz. Select input source for LTV-27w7 HD and LTV-32w6 HD is 120VAC, 60 Hz ONLY, Before beginning, make... sure all devices are turned off. 5. IMPORTANT: The power input voltage for the LCD TV using the OSD menu or remote control 7. If connecting to Antenna, Cable or other ...
User Manual
Page 15
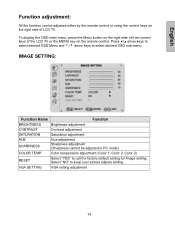
... Brightness adjustment CONTRAST Contrast adjustment SATURATION Saturation adjustment HUE SHARPNESS Hue adjustment Sharpness adjustment (Sharpness cannot be adjusted either by the remote control or using the control keys on the remote control. Select "NO" to call the factory default setting for Image setting. English Function adjustment: All the function can be adjusted...
... Brightness adjustment CONTRAST Contrast adjustment SATURATION Saturation adjustment HUE SHARPNESS Hue adjustment Sharpness adjustment (Sharpness cannot be adjusted either by the remote control or using the control keys on the remote control. Select "NO" to call the factory default setting for Image setting. English Function adjustment: All the function can be adjusted...

User Manual
Page 19
Use remote control to key in the number and enter the parental controls sub-menu. TV PG RATING Select "TV-MA", "TV-Y", "TV-Y7", "TV-G", "TV-PG", "...
Use remote control to key in the number and enter the parental controls sub-menu. TV PG RATING Select "TV-MA", "TV-Y", "TV-Y7", "TV-G", "TV-PG", "...
User Manual
Page 24
... LCD TV. • Make sure the speaker setting is connected securely. The LCD TV audio may be set to "internal". 23 Snow Appears on the remote control, so that the outlet is tightly secured to the video output port on the back of the video cable is "Lost" • In the... audio settings. Power is ON but No Screen Image • Make sure the video cable connected to the LCD TV is supplying the proper voltage. Remote Control Buttons Do Not Work • Press only one button at a time. No Sound • Check the audio connection. • Press MUTE on Screen •...
... LCD TV. • Make sure the speaker setting is connected securely. The LCD TV audio may be set to "internal". 23 Snow Appears on the remote control, so that the outlet is tightly secured to the video output port on the back of the video cable is "Lost" • In the... audio settings. Power is ON but No Screen Image • Make sure the video cable connected to the LCD TV is supplying the proper voltage. Remote Control Buttons Do Not Work • Press only one button at a time. No Sound • Check the audio connection. • Press MUTE on Screen •...
User Manual
Page 25
Image Quality Issues • For the best TV image quality, "Standard Definition" TV should be viewed in a "Universal" Remote • Purchase a separate "learning" remote control. How Can I Find More Help? • Log on to: www.westinghousedigital.com • Contact Westinghouse Customer Service at (866) 287-5555 or write us at [email protected] 24 Remote Control Code Not Found in 4:3 format. English Remote Control Does Not Work • Make sure batteries are inserted correctly. • Replace batteries with new ones if necessary.
Image Quality Issues • For the best TV image quality, "Standard Definition" TV should be viewed in a "Universal" Remote • Purchase a separate "learning" remote control. How Can I Find More Help? • Log on to: www.westinghousedigital.com • Contact Westinghouse Customer Service at (866) 287-5555 or write us at [email protected] 24 Remote Control Code Not Found in 4:3 format. English Remote Control Does Not Work • Make sure batteries are inserted correctly. • Replace batteries with new ones if necessary.


