
User Manual
Page 3
... with all warnings, cautions, and instructions in the literature accompanying the appliance. DISCLAIMER Westinghouse Digital does not recommend the use of the following occurs, unplug the LCD TV and contact your warranty. To reduce the risk of electric shock do not perform any...enclosure that contained in such a manner not approved by qualified service personnel only. Modifying the LCD TV in the operating instructions unless you contact your warranty. Westinghouse Digital will also void your distributor. CAUTION RISK OF ELECTRIC SHOCK DO NOT OPEN WARNING: TO REDUCE...
... with all warnings, cautions, and instructions in the literature accompanying the appliance. DISCLAIMER Westinghouse Digital does not recommend the use of the following occurs, unplug the LCD TV and contact your warranty. To reduce the risk of electric shock do not perform any...enclosure that contained in such a manner not approved by qualified service personnel only. Modifying the LCD TV in the operating instructions unless you contact your warranty. Westinghouse Digital will also void your distributor. CAUTION RISK OF ELECTRIC SHOCK DO NOT OPEN WARNING: TO REDUCE...

User Manual
Page 5
... control 07 1-7-1 Inserting batteries and effective range of the remote 07 1-7-2 Remote Control Button Description 07 II. Basic operation and Adjustment 3-1 Turning on your LCD TV & Watching a TV program 18 3-2 Using the On Screen Display OSD 19 3-2-1 OSD Main Menu contents & OSD switch loop 19 3-2-2 OSD Instruction 20 3-2-2-1 DISPLAY 20 3-2-2-2 ADVANCED 21...
... control 07 1-7-1 Inserting batteries and effective range of the remote 07 1-7-2 Remote Control Button Description 07 II. Basic operation and Adjustment 3-1 Turning on your LCD TV & Watching a TV program 18 3-2 Using the On Screen Display OSD 19 3-2-1 OSD Main Menu contents & OSD switch loop 19 3-2-2 OSD Instruction 20 3-2-2-1 DISPLAY 20 3-2-2-2 ADVANCED 21...

User Manual
Page 6
...L) x 1 (support 480 i/p) Antenna In Color system Video system Built-in 408 (H) x 306 (V) 4:3 0.2125(H) x 0.6375(V) mm 640 x R.G.B. After you use our LCD TV to watch TV or other video sources, please go through this away in a safe place for future reference. 1-2 Specifications Display panel Signals Input / Out Compatibility Audio Output... Ratio Pixel Pitch Number of our product specifications, which will allow you to maximize the TV's connections and performance. 1 Introduction 20" LCD TV User's Manual 1-1 Before Use Before you have finished reading the instructions, put this page...
...L) x 1 (support 480 i/p) Antenna In Color system Video system Built-in 408 (H) x 306 (V) 4:3 0.2125(H) x 0.6375(V) mm 640 x R.G.B. After you use our LCD TV to watch TV or other video sources, please go through this away in a safe place for future reference. 1-2 Specifications Display panel Signals Input / Out Compatibility Audio Output... Ratio Pixel Pitch Number of our product specifications, which will allow you to maximize the TV's connections and performance. 1 Introduction 20" LCD TV User's Manual 1-1 Before Use Before you have finished reading the instructions, put this page...

User Manual
Page 7
... a surface with the glass facing downwards unless it is in our product accessory box. 02 LCD TV user manual) Power Mute 1 2 3 4 5 6 7 8 9 100 0 C.C. Dimensional Overview 94.6 mm 307mm 409mm 118 mm 476.4 mm 460mm 20" LCD TV User's Manual 1-3 Package Contents Since the glass can be included in good condition and all standard...
... a surface with the glass facing downwards unless it is in our product accessory box. 02 LCD TV user manual) Power Mute 1 2 3 4 5 6 7 8 9 100 0 C.C. Dimensional Overview 94.6 mm 307mm 409mm 118 mm 476.4 mm 460mm 20" LCD TV User's Manual 1-3 Package Contents Since the glass can be included in good condition and all standard...

User Manual
Page 8
...should be maintained between the back of the electronic components. When an extension cord is approximately 75 watts. If you would like to mount the TV to avoid tipping. Avoid installing the product in landscape orientation. Any 90 clockwise or counterclockwise installation may induce poor ventilation and successive component damage....must not be installed on a flat surface to the wall, please see Preparing the LCD for Wall Mounting, for proper ventilation. 1-4 Installation 20" LCD TV User's Manual Please read the user manual carefully before performing the installation.
...should be maintained between the back of the electronic components. When an extension cord is approximately 75 watts. If you would like to mount the TV to avoid tipping. Avoid installing the product in landscape orientation. Any 90 clockwise or counterclockwise installation may induce poor ventilation and successive component damage....must not be installed on a flat surface to the wall, please see Preparing the LCD for Wall Mounting, for proper ventilation. 1-4 Installation 20" LCD TV User's Manual Please read the user manual carefully before performing the installation.

User Manual
Page 9
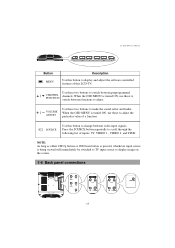
The LED indicator will glow green when the power is on. Headphone Connector Headphone Color Code Green Description For connecting the earphone. 04 1-5 Front panel controls 20" LCD TV User's Manual POWER / Remote LED sensor window indicator Button POWER / Remote sensor window Description Use this button to import. The LED indicator will glow red when the LCD-TV has no signal to indentify the LCD-TV current states.
The LED indicator will glow green when the power is on. Headphone Connector Headphone Color Code Green Description For connecting the earphone. 04 1-5 Front panel controls 20" LCD TV User's Manual POWER / Remote LED sensor window indicator Button POWER / Remote sensor window Description Use this button to import. The LED indicator will glow red when the LCD-TV has no signal to indentify the LCD-TV current states.
User Manual
Page 10
... two buttons to scroll through the following list of a function. SOURCE Use this LCD-TV. VOLUME ADJUST Use these to adjust the particular value of inputs: TV, VIDEO 1 , VIDEO 2, and YPbPr. 20" LCD TV User's Manual Button MENU Description Use this button to display and adjust the software-controlled features... of this button to change between video input signals. When the OSD MENU is being viewed will immediately be switched to TV input source to switch between preprogrammed CHANNEL channels. Press the SOURCE button repeatedly to make the sound softer and louder.
... two buttons to scroll through the following list of a function. SOURCE Use this LCD-TV. VOLUME ADJUST Use these to adjust the particular value of inputs: TV, VIDEO 1 , VIDEO 2, and YPbPr. 20" LCD TV User's Manual Button MENU Description Use this button to display and adjust the software-controlled features... of this button to change between video input signals. When the OSD MENU is being viewed will immediately be switched to TV input source to switch between preprogrammed CHANNEL channels. Press the SOURCE button repeatedly to make the sound softer and louder.

User Manual
Page 11
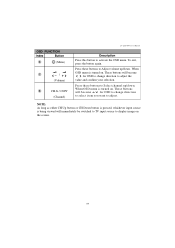
...device such as Component. In socket(R/L) with this set of connection. Antenna input Connector VHF / UHF Input Color Code Silver Description Attach your TV antenna or analog cable service here. (75ohm coaxial cable with F-type connector) 06 Video 1 Input LeftAudio AV RightAudio White Red S-Video ...Yellow Black S-Video: 1 DIN, 2 RCA jacks. AV : 3 RCA jacks. 20" LCD TV User's Manual Video Connectors Component Input Color Code Description Left Audio Y Right Audio Pb Pr White Red Green Blue Red 5 RCA jacks. To prevent...
...device such as Component. In socket(R/L) with this set of connection. Antenna input Connector VHF / UHF Input Color Code Silver Description Attach your TV antenna or analog cable service here. (75ohm coaxial cable with F-type connector) 06 Video 1 Input LeftAudio AV RightAudio White Red S-Video ...Yellow Black S-Video: 1 DIN, 2 RCA jacks. AV : 3 RCA jacks. 20" LCD TV User's Manual Video Connectors Component Input Color Code Description Left Audio Y Right Audio Pb Pr White Red Green Blue Red 5 RCA jacks. To prevent...

User Manual
Page 12
1-7 Remote control 20" LCD TV User's Manual 1-7-1 Inserting batteries and effective range of the television. 30 1-7-2 Remote Control Button Description 1 2 Power Mute 1 2 3 4 5 6 3 7 8 9 100 0 4 6 C.C. 5 CH 7 8 9 10 CH MTS Source Pic-mode ...
1-7 Remote control 20" LCD TV User's Manual 1-7-1 Inserting batteries and effective range of the television. 30 1-7-2 Remote Control Button Description 1 2 Power Mute 1 2 3 4 5 6 3 7 8 9 100 0 4 6 C.C. 5 CH 7 8 9 10 CH MTS Source Pic-mode ...

User Manual
Page 13
... Pad followed by two digits for each button depicted in standby. 2 Mute Use this button to activate subtitle. CC1, CC2, 5 C.C. 20" LCD TV User's Manual The index number corresponds to the callout number for channels 100 or greater. 4 (Return) Use this button to see if available). The ...power indicator will glow red when the LCD-TV is on and standby modes. TV FUNCTION Index Button Description Use this button to turn the volume off Caption Vision. 08 Press this button to the American NTSC...
... Pad followed by two digits for each button depicted in standby. 2 Mute Use this button to activate subtitle. CC1, CC2, 5 C.C. 20" LCD TV User's Manual The index number corresponds to the callout number for channels 100 or greater. 4 (Return) Use this button to see if available). The ...power indicator will glow red when the LCD-TV is on and standby modes. TV FUNCTION Index Button Description Use this button to turn the volume off Caption Vision. 08 Press this button to the American NTSC...
User Manual
Page 14
... to Select channel up /down . OSD FUNCTION Index Button 6 (Menu) 7 / (Volume) 8 CH / CH (Channel) 20" LCD TV User's Manual Description Press this button to adjust. WhenOSD menu is being viewed will immediately be switched to TV input source to Adjust volume up /down . Press these buttons to display image on . These buttons...
... to Select channel up /down . OSD FUNCTION Index Button 6 (Menu) 7 / (Volume) 8 CH / CH (Channel) 20" LCD TV User's Manual Description Press this button to adjust. WhenOSD menu is being viewed will immediately be switched to TV input source to Adjust volume up /down . Press these buttons to display image on . These buttons...

User Manual
Page 15
...Press this button to select among 5 user situation 10 Pic-mode modes. < Standard Nature High bright Cinema User > 11 Source Use this LCD-TV after a preset period of audio and to use to MTS MONO reduce the noise during stereo broadcasts. 9 (Multi channel Television Stereo) STEREO ...Select for switching the TV to second audio programs when a signal is used to automatically shut off this button to select from favorite channel table (Complete the action ...
...Press this button to select among 5 user situation 10 Pic-mode modes. < Standard Nature High bright Cinema User > 11 Source Use this LCD-TV after a preset period of audio and to use to MTS MONO reduce the noise during stereo broadcasts. 9 (Multi channel Television Stereo) STEREO ...Select for switching the TV to second audio programs when a signal is used to automatically shut off this button to select from favorite channel table (Complete the action ...

User Manual
Page 16
... clean the remote control with a clean, damp cloth. 11 Do not take apart the batteries, heat them, or throw them with fresh batteries. 20" LCD TV User's Manual [Caution] The remote control should be kept dry and away from heat sources. If the batteries are low or exhausted, replace them into...
... clean the remote control with a clean, damp cloth. 11 Do not take apart the batteries, heat them, or throw them with fresh batteries. 20" LCD TV User's Manual [Caution] The remote control should be kept dry and away from heat sources. If the batteries are low or exhausted, replace them into...

User Manual
Page 17
NOTE: 1. The headphone is not included in the supplied accessories. 2. Household power outlet 2-2 Connecting with Headphone Plug the headphone mini-plug into an AC wall socket. [Caution] Turn off your LCD TV and unplug the power cord when not used for a long period of the set . 12 No sound will be heard from the main unit speakers when connecting the headphone set . 2 Equipment Connections and Setup 20" LCD TV User's Manual 2-1 Power Connection Plug the power cord into the headphone jack location on the right side of time.
NOTE: 1. The headphone is not included in the supplied accessories. 2. Household power outlet 2-2 Connecting with Headphone Plug the headphone mini-plug into an AC wall socket. [Caution] Turn off your LCD TV and unplug the power cord when not used for a long period of the set . 12 No sound will be heard from the main unit speakers when connecting the headphone set . 2 Equipment Connections and Setup 20" LCD TV User's Manual 2-1 Power Connection Plug the power cord into the headphone jack location on the right side of time.

User Manual
Page 18
... Please select the connection method based on page 18. 13 A VHF Only Or VHF / UHF Or Cable 75-Ohm Coaxial Cable VHF / UHF Rear of TV B VHF Only Or UHF Only Or VHF / UHF 300-Ohm Twin Lead Cable VHF / UHF Antenna Connector Rear of splitter, RF switch or combiner that... might be required. You need a decoder to the TV In socket of decoder to watch TV program, please see "Section 3.1 Turning on your LCD TV and watching a TV program" on the signal cable at home (Please check A). Cable In Side of TV Cable Box Out TV In NOTE: Consult the Dealer or Service Center for...
... Please select the connection method based on page 18. 13 A VHF Only Or VHF / UHF Or Cable 75-Ohm Coaxial Cable VHF / UHF Rear of TV B VHF Only Or UHF Only Or VHF / UHF 300-Ohm Twin Lead Cable VHF / UHF Antenna Connector Rear of splitter, RF switch or combiner that... might be required. You need a decoder to the TV In socket of decoder to watch TV program, please see "Section 3.1 Turning on your LCD TV and watching a TV program" on the signal cable at home (Please check A). Cable In Side of TV Cable Box Out TV In NOTE: Consult the Dealer or Service Center for...

User Manual
Page 19
... is split into three signals, two color, and one to the most commonly found on -screen through a single "pin." Component. 2-4 Connecting Other Components 20" LCD TV User's Manual Your LCD TV has four different ways to connect your LCD TV. Connection Cable and Quality Connector Description Basic VHF/UHF. Text displayed on devices.
... is split into three signals, two color, and one to the most commonly found on -screen through a single "pin." Component. 2-4 Connecting Other Components 20" LCD TV User's Manual Your LCD TV has four different ways to connect your LCD TV. Connection Cable and Quality Connector Description Basic VHF/UHF. Text displayed on devices.

User Manual
Page 20
20" LCD TV User's Manual 2-4-1 Connecting Composite video/S-video (suggest) white red white red yellow white red black yellow yellow red white white red S-Video Audio(L) Audio(R) Video red white Audio(R) Audio(L) IMPORTANT: Before connecting any external equipment, turn off all main power switches. If there is no switch remove the main plug from the wall socket. 15
20" LCD TV User's Manual 2-4-1 Connecting Composite video/S-video (suggest) white red white red yellow white red black yellow yellow red white white red S-Video Audio(L) Audio(R) Video red white Audio(R) Audio(L) IMPORTANT: Before connecting any external equipment, turn off all main power switches. If there is no switch remove the main plug from the wall socket. 15
User Manual
Page 21
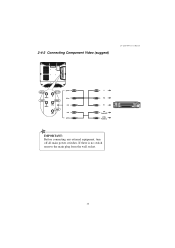
2-4-2 Connecting Component Video (suggest) 20" LCD TV User's Manual white red green blue red green blue red red white Y Pb Pr red Audio(R) white Audio(L) IMPORTANT: Before connecting any external equipment, turn off all main power switches. If there is no switch remove the main plug from the wall socket. 16
2-4-2 Connecting Component Video (suggest) 20" LCD TV User's Manual white red green blue red green blue red red white Y Pb Pr red Audio(R) white Audio(L) IMPORTANT: Before connecting any external equipment, turn off all main power switches. If there is no switch remove the main plug from the wall socket. 16

User Manual
Page 22
20" LCD TV User's Manual NOTE: 1. The video input terminal and the S-Video input terminal on the Video-in side are shared connections with priority given to Video 1 ...
20" LCD TV User's Manual NOTE: 1. The video input terminal and the S-Video input terminal on the Video-in side are shared connections with priority given to Video 1 ...

User Manual
Page 23
...check the following conditions: 1 Please check to see whether or not the video cable that connected from your video equipment to turn on your LCD TV & Watching a TV program 1 Press the 2 Press the 3 Press the button to your set is plugged firmly and correctly. 2 Please make sure the display ... have been checked and the problem still exists, contact your local dealer for further assistance. 18 3 Basic operation and Adjustment 20" LCD TV User's Manual 3-1 Turning on the LCD TV. TV CH SCAN CATV / AIR CH ADD / ERASE 4 Choose the type of CATV or AIR. 5 Use "CH SCAN" command to automatically...
...check the following conditions: 1 Please check to see whether or not the video cable that connected from your video equipment to turn on your LCD TV & Watching a TV program 1 Press the 2 Press the 3 Press the button to your set is plugged firmly and correctly. 2 Please make sure the display ... have been checked and the problem still exists, contact your local dealer for further assistance. 18 3 Basic operation and Adjustment 20" LCD TV User's Manual 3-1 Turning on the LCD TV. TV CH SCAN CATV / AIR CH ADD / ERASE 4 Choose the type of CATV or AIR. 5 Use "CH SCAN" command to automatically...


