User Manual
Page 2
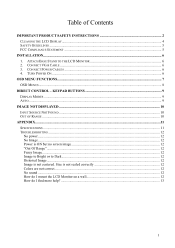
... BASE STAND TO THE LCD MONITOR 6 2. TURN POWER ON ...6 OSD MENU FUNCTIONS...7 OSD MENUS...8 DIRECT CONTROL - KEYPAD BUTTONS 9 DISPLAY MODES ...9 AUTO ...9 IMAGE NOT DISPLAYED ...10 INPUT SOURCE NOT FOUND ...10 OUT OF RANGE ...10 APPENDIX ...11 SPECIFICATIONS ...11 TROUBLESHOOTING ...12 No power...12 No Image...12 Power is ON but no screen image...12 "Out Of Range"...12 Fuzzy Image...12 Image to Bright or to Dark...12 Distorted Image...12 Image is not scaled correctly 12 Colors are not correct...12 No sound...
... BASE STAND TO THE LCD MONITOR 6 2. TURN POWER ON ...6 OSD MENU FUNCTIONS...7 OSD MENUS...8 DIRECT CONTROL - KEYPAD BUTTONS 9 DISPLAY MODES ...9 AUTO ...9 IMAGE NOT DISPLAYED ...10 INPUT SOURCE NOT FOUND ...10 OUT OF RANGE ...10 APPENDIX ...11 SPECIFICATIONS ...11 TROUBLESHOOTING ...12 No power...12 No Image...12 Power is ON but no screen image...12 "Out Of Range"...12 Fuzzy Image...12 Image to Bright or to Dark...12 Distorted Image...12 Image is not scaled correctly 12 Colors are not correct...12 No sound...
User Manual
Page 3
.... Avoid touching the LCD screen. Avoid exposing the LCD display to assure sufficient airflow and ventilation. Never place heavy or sharp objects on the cabinet are difficult to protect it from the product. Do not route power cord under rugs or carpeting. Ventilation Slots and openings on the LCD display, video cable, or power cord. Increased temperatures may come in possible damage or injury. Keep LCD Monitor...
.... Avoid touching the LCD screen. Avoid exposing the LCD display to assure sufficient airflow and ventilation. Never place heavy or sharp objects on the cabinet are difficult to protect it from the product. Do not route power cord under rugs or carpeting. Ventilation Slots and openings on the LCD display, video cable, or power cord. Increased temperatures may come in possible damage or injury. Keep LCD Monitor...
User Manual
Page 4
... the product in a built-in installation, such as a bookcase or enclosed rack, unless proper ventilation is present, immediately unplug the power cord. Your LCD display contains high-voltage parts. You may be used for extended periods of time, unplug the power cord. 3 Refer all servicing and repairs to qualified service personnel. Your warranty does not cover repairs or attempted repairs by anyone not authorized by...
... the product in a built-in installation, such as a bookcase or enclosed rack, unless proper ventilation is present, immediately unplug the power cord. Your LCD display contains high-voltage parts. You may be used for extended periods of time, unplug the power cord. 3 Refer all servicing and repairs to qualified service personnel. Your warranty does not cover repairs or attempted repairs by anyone not authorized by...

User Manual
Page 5
... onto a clean, soft, lint-free cloth, and wipe the screen. Wipe the screen with a clean, soft, lint-free cloth. Manufacturer will not be liable for damage resulting from use of any ammonia or alcohol-based cleaners on the LCD display screen or case. Some chemical cleaners have been reported to damage the screen and/or LCD display case. Cleaning the LCD Display • MAKE SURE THE LCD DISPLAY IS TURNED OFF...
... onto a clean, soft, lint-free cloth, and wipe the screen. Wipe the screen with a clean, soft, lint-free cloth. Manufacturer will not be liable for damage resulting from use of any ammonia or alcohol-based cleaners on the LCD display screen or case. Some chemical cleaners have been reported to damage the screen and/or LCD display case. Cleaning the LCD Display • MAKE SURE THE LCD DISPLAY IS TURNED OFF...
User Manual
Page 6
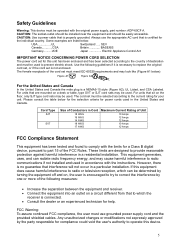
... comply with the instructions. Use the following measures: • Increase the separation between the equipment and receiver. • Connect the equipment into an outlet on , the user is encouraged to try to correct the interference by turning the equipment off and on a circuit different from that to replace the original cord set, or if the cord set for compliance could...
... comply with the instructions. Use the following measures: • Increase the separation between the equipment and receiver. • Connect the equipment into an outlet on , the user is encouraged to try to correct the interference by turning the equipment off and on a circuit different from that to replace the original cord set, or if the cord set for compliance could...
User Manual
Page 7
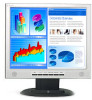
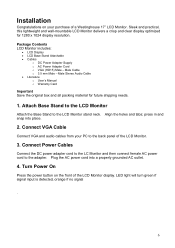
... the back panel of the LCD Monitor. 3. Plug the AC power cord into place. 2. Male Cable o 3.5 mm Male - Male Stereo Audio Cable • Literature o User's Manual o Warranty Card Important Save the original box and all packing material for 1280 x 1024 display resolution. Connect VGA Cable Connect VGA and audio cables from your purchase of a Westinghouse 17" LCD Monitor. LED light will turn green if signal input is detected, orange if no signal . 6 press in and snap into a properly grounded AC outlet. 4. Installation Congratulations...
... the back panel of the LCD Monitor. 3. Plug the AC power cord into place. 2. Male Cable o 3.5 mm Male - Male Stereo Audio Cable • Literature o User's Manual o Warranty Card Important Save the original box and all packing material for 1280 x 1024 display resolution. Connect VGA Cable Connect VGA and audio cables from your purchase of a Westinghouse 17" LCD Monitor. LED light will turn green if signal input is detected, orange if no signal . 6 press in and snap into a properly grounded AC outlet. 4. Installation Congratulations...
User Manual
Page 8
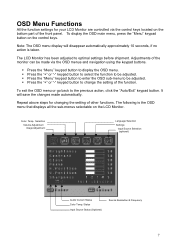
... OSD menu that displays all the sub-menus selectable on the LCD Monitor. Color Temp. Selection Volume Adjustment Image Adjustment Language Selection Settings Input Source Selection (optional) Audio Current Status Color Temp. To display the OSD main menu, press the "Menu" keypad button on the bottom part of the front panel. Press the "+" or "-" keypad button to select the function to display the OSD menu. OSD Menu Functions All the function settings for changing the setting of other functions. Press the "Menu" keypad button...
... OSD menu that displays all the sub-menus selectable on the LCD Monitor. Color Temp. Selection Volume Adjustment Image Adjustment Language Selection Settings Input Source Selection (optional) Audio Current Status Color Temp. To display the OSD main menu, press the "Menu" keypad button on the bottom part of the front panel. Press the "+" or "-" keypad button to select the function to display the OSD menu. OSD Menu Functions All the function settings for changing the setting of other functions. Press the "Menu" keypad button...
User Manual
Page 9
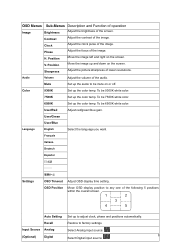
...temp. OSD Menus Sub-Menus Description and Function of operation Image Brightness Adjust the brightness of the audio. V. Audio Volume Adjust the volume of the screen. User/Green User/Blue Language English Select the language you want. Mute Set up to factory settings Input Source Analog Select Analog input source: (Optional) Digital Select Digital input source: 8 To be mute on the screen. To be 6500K white color. Recall Restore to adjust clock, phase and positions automatically. Position Move the image left and right on or off. User/Red Adjust red/green/blue...
...temp. OSD Menus Sub-Menus Description and Function of operation Image Brightness Adjust the brightness of the audio. V. Audio Volume Adjust the volume of the screen. User/Green User/Blue Language English Select the language you want. Mute Set up to factory settings Input Source Analog Select Analog input source: (Optional) Digital Select Digital input source: 8 To be mute on the screen. To be 6500K white color. Recall Restore to adjust clock, phase and positions automatically. Position Move the image left and right on or off. User/Red Adjust red/green/blue...
User Manual
Page 10
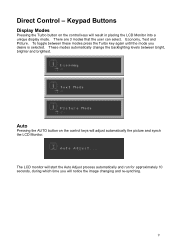
... between bright, brighter and brightest. The LCD monitor will start the Auto Adjust process automatically and run for approximately 10 seconds, during which time you desire is selected. These modes automatically change the backlighting levels between these modes press the Turbo key again until the mode you will result in placing the LCD Monitor into a unique display mode. Direct Control - Keypad Buttons Display Modes Pressing the Turbo button on the control...
... between bright, brighter and brightest. The LCD monitor will start the Auto Adjust process automatically and run for approximately 10 seconds, during which time you desire is selected. These modes automatically change the backlighting levels between these modes press the Turbo key again until the mode you will result in placing the LCD Monitor into a unique display mode. Direct Control - Keypad Buttons Display Modes Pressing the Turbo button on the control...
User Manual
Page 11
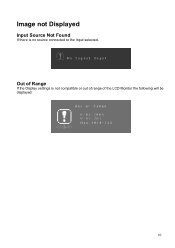
Out of Range If the Display settings is no source connected to the Input selected. Image not Displayed Input Source Not Found If there is not compatible or out of range of the LCD Monitor the following will be displayed: 10
Out of Range If the Display settings is no source connected to the Input selected. Image not Displayed Input Source Not Found If there is not compatible or out of range of the LCD Monitor the following will be displayed: 10
User Manual
Page 12
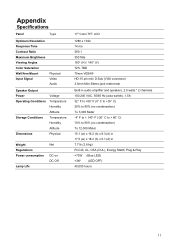
Appendix Specifications Panel Type Optimum Resolution Response Time Contrast Ratio Maximum Brightness Viewing Angles Color Saturation Wall/Arm Mount Input Signal Physical Video Audio Speaker Output Power Voltage Operating Conditions Temperature Humidity Altitude Storage Conditions Temperature Humidity Altitude Dimensions Physical Weight Regulations Power consumption Lamp Life Net DC on DC Off 17" Color TFT LCD 1280 x 1024 14 ms 350:1 350 Nits 160° (H) / 140° (V) 72% TBD 75mm VESA®...
Appendix Specifications Panel Type Optimum Resolution Response Time Contrast Ratio Maximum Brightness Viewing Angles Color Saturation Wall/Arm Mount Input Signal Physical Video Audio Speaker Output Power Voltage Operating Conditions Temperature Humidity Altitude Storage Conditions Temperature Humidity Altitude Dimensions Physical Weight Regulations Power consumption Lamp Life Net DC on DC Off 17" Color TFT LCD 1280 x 1024 14 ms 350:1 350 Nits 160° (H) / 140° (V) 72% TBD 75mm VESA®...
User Manual
Page 13
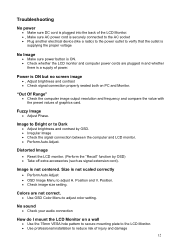
... Auto Adjust • OSD Image Menu to adjust color setting. Colors are plugged in and whether there is a supply of power. No sound • Check your audio connection How do I mount the LCD Monitor on PC and Monitor. "Out Of Range" • Check the computer image output resolution and frequency and compare the value with the preset values of injury and damage 12 Position and V. Fuzzy Image • Adjust Phase. Image is not centered. Troubleshooting No power • Make sure DC cord is plugged...
... Auto Adjust • OSD Image Menu to adjust color setting. Colors are plugged in and whether there is a supply of power. No sound • Check your audio connection How do I mount the LCD Monitor on PC and Monitor. "Out Of Range" • Check the computer image output resolution and frequency and compare the value with the preset values of injury and damage 12 Position and V. Fuzzy Image • Adjust Phase. Image is not centered. Troubleshooting No power • Make sure DC cord is plugged...
User Manual
Page 14
How do I find more help? • www.westinghousedigital.com • Contact customer service at (866) 287-5555 or service@westinghousedigital.com 13
How do I find more help? • www.westinghousedigital.com • Contact customer service at (866) 287-5555 or service@westinghousedigital.com 13


