
User Manual
Page 2
PRECAUTIONS Information for users applicable in European Union countries 1 Information for users applicable in United States of America 1 Installation 1 Power connection 1 Maintenance 1 Transporting the monitor 1 GETTING STARTED Package contents 2 Monitor installation 2 Identifying parts and controls 3 Working with OSD Group 3 Customizing your Monitor 3 Introduction to Hotkeys 4 The operation of Function menu 4 OSD icon list 5 Troubleshooting 6 Technical Features and Specifications Interface Frequency 7 Addendum FCC compliance 8
PRECAUTIONS Information for users applicable in European Union countries 1 Information for users applicable in United States of America 1 Installation 1 Power connection 1 Maintenance 1 Transporting the monitor 1 GETTING STARTED Package contents 2 Monitor installation 2 Identifying parts and controls 3 Working with OSD Group 3 Customizing your Monitor 3 Introduction to Hotkeys 4 The operation of Function menu 4 OSD icon list 5 Troubleshooting 6 Technical Features and Specifications Interface Frequency 7 Addendum FCC compliance 8
User Manual
Page 3
... cover or block the ventilation ports on the monitor's rear, as normal operation position. To disassemble the neck and base, please press the release button located on the power cable. 4.Only use the monitor for an extended period. 5.2 The cable is your local related electrical and electronic equipment waste management authority or the retailer where you bought the product. Power connection 1.Use the correct power cord for repair...
... cover or block the ventilation ports on the monitor's rear, as normal operation position. To disassemble the neck and base, please press the release button located on the power cable. 4.Only use the monitor for an extended period. 5.2 The cable is your local related electrical and electronic equipment waste management authority or the retailer where you bought the product. Power connection 1.Use the correct power cord for repair...
User Manual
Page 4
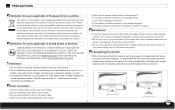
... area) 4. Analog Signal Cable 5. Digital Signal Cable (optional) 6. Audio Cable (optional) 7. CD-ROM (contains user manual) 8 .Quick Installation Guide Monitor installation 1.Setting up the monitor 1.1 Take out the monitor, stand and monitor base from the package. 1.2 Grasp the monitor with both hands and then slide the monitor into the neck. (Make sure the direction of the neck is correct) 2.Connecting signal cable 2.1 Switch off your computer 2.2 Connect the signal cable to the D-SUB or DVI port at the rear of the monitor. 3.2 Plug the other...
... area) 4. Analog Signal Cable 5. Digital Signal Cable (optional) 6. Audio Cable (optional) 7. CD-ROM (contains user manual) 8 .Quick Installation Guide Monitor installation 1.Setting up the monitor 1.1 Take out the monitor, stand and monitor base from the package. 1.2 Grasp the monitor with both hands and then slide the monitor into the neck. (Make sure the direction of the neck is correct) 2.Connecting signal cable 2.1 Switch off your computer 2.2 Connect the signal cable to the D-SUB or DVI port at the rear of the monitor. 3.2 Plug the other...

User Manual
Page 5
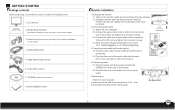
... of the architecture. When dormant, the LED Light is orange. 2.The power button is bright bule. Activate the OSD munu. Identifying parts and controls 1.The LED light indicates the state of the function menus. During operation, the LED Light is used for all settings. Details for adjusting all the function menus are used to start. 2. Working with OSD Group You will find that a button represents different functions in different levels...
... of the architecture. When dormant, the LED Light is orange. 2.The power button is bright bule. Activate the OSD munu. Identifying parts and controls 1.The LED light indicates the state of the function menus. During operation, the LED Light is used for all settings. Details for adjusting all the function menus are used to start. 2. Working with OSD Group You will find that a button represents different functions in different levels...
User Manual
Page 6
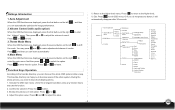
This tree-like a map. Confirm the selection: Press the button. < 3. Return to the higher level. 6. Power Auto-Adjustment Theme Mode Menu Main Menu Volume General Movie Picture Game Brightness Contrast Input Signal Select OSD Menu Language Display Ratio Color Temperature System Recall Analog(D-SUB) Digital(DVI) 17 Lauguages control menu Native Full Screen Red Green Blue 6500K 7500K 9300K White Balance DDC/CI Demo Clock Phase Horizontal Position Vertical Position Information English Français Deutsch Español Italiano Nederlands Polski Svenska Dansk Portuqu...
This tree-like a map. Confirm the selection: Press the button. < 3. Return to the higher level. 6. Power Auto-Adjustment Theme Mode Menu Main Menu Volume General Movie Picture Game Brightness Contrast Input Signal Select OSD Menu Language Display Ratio Color Temperature System Recall Analog(D-SUB) Digital(DVI) 17 Lauguages control menu Native Full Screen Red Green Blue 6500K 7500K 9300K White Balance DDC/CI Demo Clock Phase Horizontal Position Vertical Position Information English Français Deutsch Español Italiano Nederlands Polski Svenska Dansk Portuqu...

User Manual
Page 7
... 2 times over. * Show the frequency, resolution, input interface and other operating details about this function, some of OSD menu. WHITE BALANCE * Adjust the balance of the screen. contents * Adjust the luminance level of the input signal. - 5 - CONTRAST * Adjust the contrast level of the display. NATIVE SCREEN * Display equality screen according to factory preset values. OSD Icon List SYSTEM AUTO ADJUSTMENT THEME MODE BRIGHTNESS * Optimize the picture performance automatically. * Activate the built-in color engine to enhance the graphic...
... 2 times over. * Show the frequency, resolution, input interface and other operating details about this function, some of OSD menu. WHITE BALANCE * Adjust the balance of the screen. contents * Adjust the luminance level of the input signal. - 5 - CONTRAST * Adjust the contrast level of the display. NATIVE SCREEN * Display equality screen according to factory preset values. OSD Icon List SYSTEM AUTO ADJUSTMENT THEME MODE BRIGHTNESS * Optimize the picture performance automatically. * Activate the built-in color engine to enhance the graphic...

User Manual
Page 8
...). 3 Check if the video signal cable is properly connected to the monitor and computer. 1 Check if your display setup is properly connected to the monitor and computer. 1.Picture shows " INPUT SIGNAL OUT OF RANGE " 1. Troubleshooting Symptom 1.No picture 2.LED indicator is not lit. 1.No picture 2.LED indicator is turned on . 2 Check if the video signal cable is under 18.5" VESA 1366X768@60Hz, 21.6" VESA 1920x1080@ 60Hz. - 6 - Check if the monitor is orange 1.Picture shows " NO SIGNAL INPUT " Check Items 1. Ensure that the resolution and/or refresh rate...
...). 3 Check if the video signal cable is properly connected to the monitor and computer. 1 Check if your display setup is properly connected to the monitor and computer. 1.Picture shows " INPUT SIGNAL OUT OF RANGE " 1. Troubleshooting Symptom 1.No picture 2.LED indicator is not lit. 1.No picture 2.LED indicator is turned on . 2 Check if the video signal cable is under 18.5" VESA 1366X768@60Hz, 21.6" VESA 1920x1080@ 60Hz. - 6 - Check if the monitor is orange 1.Picture shows " NO SIGNAL INPUT " Check Items 1. Ensure that the resolution and/or refresh rate...

User Manual
Page 9
Technical Features and Specifications Item Panel Display Size Pixel Pitch 18.5" 21.6" 18.5" 21.6" Connector Analog Digital Tilt Tilt Angle Dimensions (W x H x D) Net 18.5" 21.6" Weight 18.5" Net 21.6" Power AC Consumption 18.5" 21.6" Operating Condition Temperature Humidity Altitude Storage Condition Temperature Humidity Altitude Description 409.8(H) x 230.4(V)mm 477.5 (H) x 268.6 (V)mm 0.300(H) x 0.300(V)mm 0.248 (H) x 0.248 (V)mm D-sub DVI-D(Optional) -5°~15° About 440(W)x359(H)x195(D)mm About...
Technical Features and Specifications Item Panel Display Size Pixel Pitch 18.5" 21.6" 18.5" 21.6" Connector Analog Digital Tilt Tilt Angle Dimensions (W x H x D) Net 18.5" 21.6" Weight 18.5" Net 21.6" Power AC Consumption 18.5" 21.6" Operating Condition Temperature Humidity Altitude Storage Condition Temperature Humidity Altitude Description 409.8(H) x 230.4(V)mm 477.5 (H) x 268.6 (V)mm 0.300(H) x 0.300(V)mm 0.248 (H) x 0.248 (V)mm D-sub DVI-D(Optional) -5°~15° About 440(W)x359(H)x195(D)mm About...

User Manual
Page 10
... frequency energy and, if not installed and used in a residential installation. Operation is subject to the following measures: 3.Reorient or relocate the receiving antenna. 4.Increase the separation between the equipment and receiver. 5.Connect the equipment to an outlet on , the user is connected. 6.Consult the dealer or an experienced radio/TV technician for a Class B digital device, pursuant to part...
... frequency energy and, if not installed and used in a residential installation. Operation is subject to the following measures: 3.Reorient or relocate the receiving antenna. 4.Increase the separation between the equipment and receiver. 5.Connect the equipment to an outlet on , the user is connected. 6.Consult the dealer or an experienced radio/TV technician for a Class B digital device, pursuant to part...
User Manual
Page 11
Westinghouse Digital Electronics Santa Fe Springs, CA www.wde.com SE-UM-1914-0801
Westinghouse Digital Electronics Santa Fe Springs, CA www.wde.com SE-UM-1914-0801


