
User Manual
Page 1
TABLE OF CONTENTS IMPORTANT PRODUCT SAFETY INSTRUCTION 2 CLEANING THE DIGITAL PHOTO FRAME 5 INSTALLATION / QUICK START 6 DIAGRAM OF THE DIGITAL PHOTO FRAME 7 OSD MENU FUNCTIONS 8 KEYPAD BUTTON FUNCTIONS 9 USING USB 1.1 CONNECTION / BUILT-IN MEMORY 10 TECHNICAL SPECIFICATIONS 12 FREQUENTLY ASKED QUESTIONS 13 PRODUCT WARRANTY 14
TABLE OF CONTENTS IMPORTANT PRODUCT SAFETY INSTRUCTION 2 CLEANING THE DIGITAL PHOTO FRAME 5 INSTALLATION / QUICK START 6 DIAGRAM OF THE DIGITAL PHOTO FRAME 7 OSD MENU FUNCTIONS 8 KEYPAD BUTTON FUNCTIONS 9 USING USB 1.1 CONNECTION / BUILT-IN MEMORY 10 TECHNICAL SPECIFICATIONS 12 FREQUENTLY ASKED QUESTIONS 13 PRODUCT WARRANTY 14

User Manual
Page 2
... of a Westinghouse 5.6" LCD Digital Photo Frame. Do not place it may come in this User's Manual in personal injury or damage to direct sunlight or high temperatures, which can result in possible damage or injury. Orient the Digital Photo Frames away from direct sunlight to remove. IMPORTANT PRODUCT SAFETY INSTRUCTIONS Congratulations on your purchase of the Digital Photo Frame Always handle the Digital Photo Frame with water. Important: Save the original...
... of a Westinghouse 5.6" LCD Digital Photo Frame. Do not place it may come in this User's Manual in personal injury or damage to direct sunlight or high temperatures, which can result in possible damage or injury. Orient the Digital Photo Frames away from direct sunlight to remove. IMPORTANT PRODUCT SAFETY INSTRUCTIONS Congratulations on your purchase of the Digital Photo Frame Always handle the Digital Photo Frame with water. Important: Save the original...
User Manual
Page 3
... Digital Photo Frame are no user serviceable parts inside. The power supply cord should never be used for ventilation purposes. Periodically inspect the power cord and each end of four (4) inches away from any wall to qualified service personnel. The warranty does not cover repairs or attempted repairs by anyone not authorized by placing the Digital Photo Frame on the power supply cord. Keep the Digital Photo Frame a minimum of the cord for wear or damage. Power Cord...
... Digital Photo Frame are no user serviceable parts inside. The power supply cord should never be used for ventilation purposes. Periodically inspect the power cord and each end of four (4) inches away from any wall to qualified service personnel. The warranty does not cover repairs or attempted repairs by anyone not authorized by placing the Digital Photo Frame on the power supply cord. Keep the Digital Photo Frame a minimum of the cord for wear or damage. Power Cord...
User Manual
Page 4
CAUTION TO REDUCE THE RISK OF ELECTRIC SHOCK, DO NOT REMOVE THE PLASTIC CASE. This symbol is intended to alert the user of the presence of electric shock to constitute a risk of important operation and maintenance instructions in the Digital Photo Frame User's Manual. NO SERVICABLE PARTS INSIDE. REFER SERVICING TO QUALIFIED PERSONNEL. 4 SE-UM-0561-0501 This symbol is intended to alert...
CAUTION TO REDUCE THE RISK OF ELECTRIC SHOCK, DO NOT REMOVE THE PLASTIC CASE. This symbol is intended to alert the user of the presence of electric shock to constitute a risk of important operation and maintenance instructions in the Digital Photo Frame User's Manual. NO SERVICABLE PARTS INSIDE. REFER SERVICING TO QUALIFIED PERSONNEL. 4 SE-UM-0561-0501 This symbol is intended to alert...

User Manual
Page 5
... Clean the Frame: 1. Westinghouse Digital will not be liable for wood. This removes dust and other particles. 2. If it still is not clean, apply a small amount of non-ammonia, non-alcohol based, mild non-abrasive detergent on a clean, soft, lint-free cloth to damage the screen and/or display case. Cleaning the Digital Photo Frame • MAKE SURE THE DIGITAL PHOTO FRAME IS TURNED OFF...
... Clean the Frame: 1. Westinghouse Digital will not be liable for wood. This removes dust and other particles. 2. If it still is not clean, apply a small amount of non-ammonia, non-alcohol based, mild non-abrasive detergent on a clean, soft, lint-free cloth to damage the screen and/or display case. Cleaning the Digital Photo Frame • MAKE SURE THE DIGITAL PHOTO FRAME IS TURNED OFF...

User Manual
Page 6
Once the Digital Photo Frame has turned on the back left-side of frames to use and carefully remove the frame from . Installation / Quick Start Package Contents • Digital Photo Frame (5.6" LCD Screen) • Frames o Mahogany Frame (1) o Black Frame (1) o Brushed Aluminum Frame (1) • AC/DC Power Supply Adapter • User's Manual Quick Start 1. Compact FlashTM or Micro DriveTM 3. If you wish to view images individually, Press the Menu button to bring up The Main Menu and select Thumbnail Mode.Select a Photo and press thePlay (4) button to touch...
Once the Digital Photo Frame has turned on the back left-side of frames to use and carefully remove the frame from . Installation / Quick Start Package Contents • Digital Photo Frame (5.6" LCD Screen) • Frames o Mahogany Frame (1) o Black Frame (1) o Brushed Aluminum Frame (1) • AC/DC Power Supply Adapter • User's Manual Quick Start 1. Compact FlashTM or Micro DriveTM 3. If you wish to view images individually, Press the Menu button to bring up The Main Menu and select Thumbnail Mode.Select a Photo and press thePlay (4) button to touch...
User Manual
Page 7
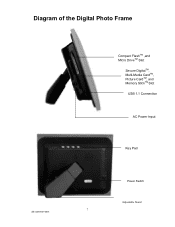
Diagram of the Digital Photo Frame SE-UM-0561-0501 Compact FlashTM ,and Micro DriveTM Slot Secure DigitalTM, Multi-Media CardTM, Picture CardTM, and Memory StickTM Slot USB 1.1 Connection AC Power Input Key Pad Power Switch Adjustable Stand 7
Diagram of the Digital Photo Frame SE-UM-0561-0501 Compact FlashTM ,and Micro DriveTM Slot Secure DigitalTM, Multi-Media CardTM, Picture CardTM, and Memory StickTM Slot USB 1.1 Connection AC Power Input Key Pad Power Switch Adjustable Stand 7
User Manual
Page 8
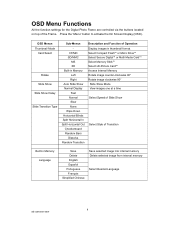
...;ois Simplified Chinese Save selected image into internal memory Delete selected image from internal memory Select Desired Language 8 SE-UM-0561-0501 OSD Menus Thumbnail Mode Card Select Rotate Slide Show Slide Show Delay Slide Transition Type Sub-Menus CF/MD SD/MMC MS XD Built-in thumbnail format. OSD Menu Functions All the function settings for the Digital Photo Frame are controlled via the buttons located on top...
...;ois Simplified Chinese Save selected image into internal memory Delete selected image from internal memory Select Desired Language 8 SE-UM-0561-0501 OSD Menus Thumbnail Mode Card Select Rotate Slide Show Slide Show Delay Slide Transition Type Sub-Menus CF/MD SD/MMC MS XD Built-in thumbnail format. OSD Menu Functions All the function settings for the Digital Photo Frame are controlled via the buttons located on top...
User Manual
Page 9
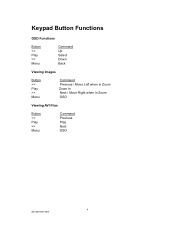
Keypad Button Functions OSD Functions Button > Menu Command Up Select Down Back Viewing Images Button > Menu Command Previous / Move Left when in Zoom Zoom In Next / Move Right when in Zoom OSD Viewing AVI Files Button > Menu Command Previous Play Next OSD 9 SE-UM-0561-0501
Keypad Button Functions OSD Functions Button > Menu Command Up Select Down Back Viewing Images Button > Menu Command Previous / Move Left when in Zoom Zoom In Next / Move Right when in Zoom OSD Viewing AVI Files Button > Menu Command Previous Play Next OSD 9 SE-UM-0561-0501
User Manual
Page 10
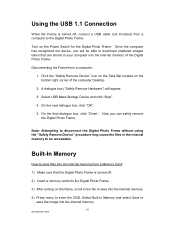
Note: Attempting to disconnect the Digital Photo Frame without using the "Safely Remove Device" procedure may cause the files in the internal memory to be able to download unaltered images taken that the Digital Photo Frame is turned off . 2) Insert a memory card into the Digital Photo Frame. 3) After turning on the frame, scroll to the file to save into the internal memory. 4) Press menu to enter the OSD. Select USB Mass Storage Device and click "Stop". 4. On the final dialogue box, click...
Note: Attempting to disconnect the Digital Photo Frame without using the "Safely Remove Device" procedure may cause the files in the internal memory to be able to download unaltered images taken that the Digital Photo Frame is turned off . 2) Insert a memory card into the Digital Photo Frame. 3) After turning on the frame, scroll to the file to save into the internal memory. 4) Press menu to enter the OSD. Select USB Mass Storage Device and click "Stop". 4. On the final dialogue box, click...

User Manual
Page 11
How to delete files from the internal memory. 3) Enter the OSD again. Highlight "Card Select" and select "Built-in Memory" and then select "Delete" to enter the OSD. Highlight "Built-in Memory". 2) Scroll to the file that you want to delete from the internal memory: 1) Press "Menu" to erase the file from the internal memory. 11 SE-UM-0561-0501
How to delete files from the internal memory. 3) Enter the OSD again. Highlight "Card Select" and select "Built-in Memory" and then select "Delete" to enter the OSD. Highlight "Built-in Memory". 2) Scroll to the file that you want to delete from the internal memory: 1) Press "Menu" to erase the file from the internal memory. 11 SE-UM-0561-0501
User Manual
Page 12
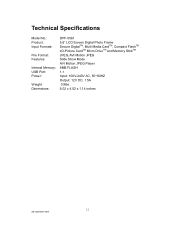
Technical Specifications Model No.: Product: Input Formats: File Format: Features: Internal Memory: USB Port: Power: Weight: Dimensions: DPF-0561 5.6" LCD Screen Digital Photo Frame Secure DigitalTM, Multi Media CardTM, Compact FlashTM xD-Picture CardTM Micro DriveTM and Memory StickTM JPEG, AVI Motion JPEG Slide Show Mode AVI Motion JPEG Player 8MB FLASH 1.1 Input: 100V-240V AC, 50~60HZ Output: 12V DC, 1.5A 0.9lbs 6.02 x 4.52 x 1.14 inches 12 SE-UM-0561-0501
Technical Specifications Model No.: Product: Input Formats: File Format: Features: Internal Memory: USB Port: Power: Weight: Dimensions: DPF-0561 5.6" LCD Screen Digital Photo Frame Secure DigitalTM, Multi Media CardTM, Compact FlashTM xD-Picture CardTM Micro DriveTM and Memory StickTM JPEG, AVI Motion JPEG Slide Show Mode AVI Motion JPEG Player 8MB FLASH 1.1 Input: 100V-240V AC, 50~60HZ Output: 12V DC, 1.5A 0.9lbs 6.02 x 4.52 x 1.14 inches 12 SE-UM-0561-0501
User Manual
Page 13
... memory card. Q: Where can the Digital Photo Frame support? Why will speed up loading time. Third, press the Menu button and in the Digital Photo Frame, but it not play all the way into non-standard formats. Q: I have been manipulated or altered in its raw picture format. Finally, make certain that have a memory card in the OSD make sure that you are pictures that is inserted all images or movie files? The Digital Photo Frame may not read images...
... memory card. Q: Where can the Digital Photo Frame support? Why will speed up loading time. Third, press the Menu button and in the Digital Photo Frame, but it not play all the way into non-standard formats. Q: I have been manipulated or altered in its raw picture format. Finally, make certain that have a memory card in the OSD make sure that you are pictures that is inserted all images or movie files? The Digital Photo Frame may not read images...
User Manual
Page 14
... damage due to: (i) improper installation, set-up adjustments, operation, or maintenance; (ii) power surges, connection to State. This warranty is not covered by anyone other than an authorized Westinghouse Digital Electronics service facility. PROOF OF ORIGINAL PURCHASE - This warranty extends to the original purchaser and is not responsible for the locations of you . EITHER REPAIR OR REPLACEMENT IS YOUR EXCLUSIVE REMEDY...
... damage due to: (i) improper installation, set-up adjustments, operation, or maintenance; (ii) power surges, connection to State. This warranty is not covered by anyone other than an authorized Westinghouse Digital Electronics service facility. PROOF OF ORIGINAL PURCHASE - This warranty extends to the original purchaser and is not responsible for the locations of you . EITHER REPAIR OR REPLACEMENT IS YOUR EXCLUSIVE REMEDY...


