
User Manual
Page 2
TABLE OF CONTENTS QUICK START 2 DIAGRAM OF THE DIGITAL PHOTO FRAME 3 KEYPAD BUTTON FUNCTIONS 4 DIGITAL PHOTO FRAME NAVIGATION 5 OSD MENU FUNCTIONS 6 MOSAICVIEWTM AND ADDITIONAL PHOTO FRAME FEATURES 7 ADDITIONAL FEATURES CONTINUED 8 USING THE MINI-USB FOR FILE TRANSFER 9 SAVING AND DELETING FILE FROM INTERNAL MEMORY 10 TECHINICAL SPECIFICATIONS 11 FREQUENTLY ASKED QUESTIONS 12 IMPORTANT SAFETY INSTRUCTIONS 13 CLEANING THE DIGITAL PHOTO FRAME 15 WARRANTY INFORMATION 16 1
TABLE OF CONTENTS QUICK START 2 DIAGRAM OF THE DIGITAL PHOTO FRAME 3 KEYPAD BUTTON FUNCTIONS 4 DIGITAL PHOTO FRAME NAVIGATION 5 OSD MENU FUNCTIONS 6 MOSAICVIEWTM AND ADDITIONAL PHOTO FRAME FEATURES 7 ADDITIONAL FEATURES CONTINUED 8 USING THE MINI-USB FOR FILE TRANSFER 9 SAVING AND DELETING FILE FROM INTERNAL MEMORY 10 TECHINICAL SPECIFICATIONS 11 FREQUENTLY ASKED QUESTIONS 12 IMPORTANT SAFETY INSTRUCTIONS 13 CLEANING THE DIGITAL PHOTO FRAME 15 WARRANTY INFORMATION 16 1
User Manual
Page 3
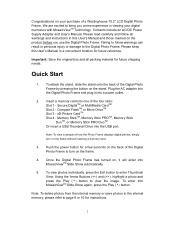
... Photo Frame by pressing the button on the stand. To view photos individually, press the Exit button to the Digital Photo Frame. Contents include an AC/DC Power Supply Adapter and User's Manual. xD-Picture CardTM Slot 4 - Memory StickTM, Memory Stick PROTM, Memory Stick DuoTM, or Memory Stick PRO DuoTM Or insert a USB Thumbnail Drive into a power outlet. 2. Note: To delete photos from the internal memory or save photos to the internal memory, please refer to turn on the product before you a new...
... Photo Frame by pressing the button on the stand. To view photos individually, press the Exit button to the Digital Photo Frame. Contents include an AC/DC Power Supply Adapter and User's Manual. xD-Picture CardTM Slot 4 - Memory StickTM, Memory Stick PROTM, Memory Stick DuoTM, or Memory Stick PRO DuoTM Or insert a USB Thumbnail Drive into a power outlet. 2. Note: To delete photos from the internal memory or save photos to the internal memory, please refer to turn on the product before you a new...

User Manual
Page 5
... Screen Display (OSD), press the Menu button at any time (except when in Slide Show or playing a video). To exit the OSD, simply press the Exit button. Button > Exit Menu Command Up Select Down Exit OSD Menu Enter OSD Menu Viewing Images Individually Button > Exit Menu Command Go to Previous Image Start Slide Show Go to Next Image Return to Thumbnail View Enter OSD Menu Thumbnail View / Select Mode Page / Card Select Page Button > Exit Menu...
... Screen Display (OSD), press the Menu button at any time (except when in Slide Show or playing a video). To exit the OSD, simply press the Exit button. Button > Exit Menu Command Up Select Down Exit OSD Menu Enter OSD Menu Viewing Images Individually Button > Exit Menu Command Go to Previous Image Start Slide Show Go to Next Image Return to Thumbnail View Enter OSD Menu Thumbnail View / Select Mode Page / Card Select Page Button > Exit Menu...
User Manual
Page 6
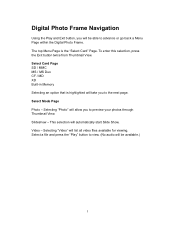
... the Exit button twice from Thumbnail View. Slideshow - Select a file and press the "Play" button to view. (No audio will be able to advance or go back a Menu Page within the Digital Photo Frame. Select Mode Page Photo - This selection will list all video files available for viewing. The top Menu Page is highlighted will take you to the next page. Selecting "Video" will automatically start Slide Show. Video - Select Card Page...
... the Exit button twice from Thumbnail View. Slideshow - Select a file and press the "Play" button to view. (No audio will be able to advance or go back a Menu Page within the Digital Photo Frame. Select Mode Page Photo - This selection will list all video files available for viewing. The top Menu Page is highlighted will take you to the next page. Selecting "Video" will automatically start Slide Show. Video - Select Card Page...

User Manual
Page 7
... and can be turned on top of Operation MosaicViewTM allows you to zoom into the internal flash memory. Resets all settings back to be deleted from a memory card into a picture. OSD Menu MosaicViewTM Image Size Slide Show Effect Slide Show Speed Slide Show Shuffle Video Repeat Save Changes Copy File Delete File Rotate Zoom Set Favorite Reset Settings Language Brightness Contrast Color Tint Description and Function of the Frame. "Optimal" optimizes the image to fit the screen This selections...
... and can be turned on top of Operation MosaicViewTM allows you to zoom into the internal flash memory. Resets all settings back to be deleted from a memory card into a picture. OSD Menu MosaicViewTM Image Size Slide Show Effect Slide Show Speed Slide Show Shuffle Video Repeat Save Changes Copy File Delete File Rotate Zoom Set Favorite Reset Settings Language Brightness Contrast Color Tint Description and Function of the Frame. "Optimal" optimizes the image to fit the screen This selections...

User Manual
Page 8
... images displayed at the same time. Additional Photo Frame Features Setting Favorite Pictures Marking an image as a Favorite allows you to see the image more often during slide show. How MosaicViewTM works: With MosaicView™, up to view multiple photos at the same time. To do so, in the Select Mode Page, select Slide Show. MosaicViewTM is an exciting new technology developed by hitting the Menu button...
... images displayed at the same time. Additional Photo Frame Features Setting Favorite Pictures Marking an image as a Favorite allows you to see the image more often during slide show. How MosaicViewTM works: With MosaicView™, up to view multiple photos at the same time. To do so, in the Select Mode Page, select Slide Show. MosaicViewTM is an exciting new technology developed by hitting the Menu button...
User Manual
Page 9
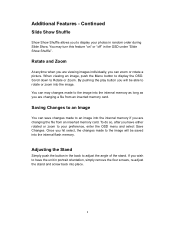
... allows you are changing the file from an inserted memory card. When viewing an image, push the Menu button to Rotate or Zoom. Adjusting the Stand Simply push the button in random order during Slide Show. You may changes made to the image into the image. Scroll down to display the OSD. By pushing the play button you hit select, the changes made to an image into the internal memory if you...
... allows you are changing the file from an inserted memory card. When viewing an image, push the Menu button to Rotate or Zoom. Adjusting the Stand Simply push the button in random order during Slide Show. You may changes made to the image into the image. Scroll down to display the OSD. By pushing the play button you hit select, the changes made to an image into the internal memory if you...
User Manual
Page 10
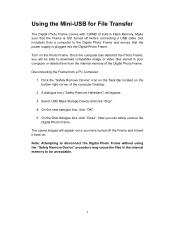
... Frame from a computer to download compatible image or video files stored in Flash Memory. A dialogue box ("Safely Remove Hardware") will appear once you can safely remove the Digital Photo Frame. Select USB Mass Storage Device and click "Stop". 4. The saved images will appear. 3. On the next dialogue box, click "OK". 5. Turn on the bottom right corner of built-in your computer or delete them from the internal memory of the Digital Photo Frame. Make sure that the Frame...
... Frame from a computer to download compatible image or video files stored in Flash Memory. A dialogue box ("Safely Remove Hardware") will appear once you can safely remove the Digital Photo Frame. Select USB Mass Storage Device and click "Stop". 4. The saved images will appear. 3. On the next dialogue box, click "OK". 5. Turn on the bottom right corner of built-in your computer or delete them from the internal memory of the Digital Photo Frame. Make sure that the Frame...
User Manual
Page 11
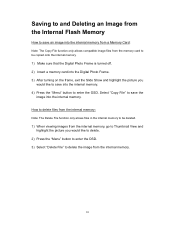
... internal memory to be copied onto the internal memory. 1) Make sure that the Digital Photo Frame is turned off. 2) Insert a memory card into the Digital Photo Frame. 3) After turning on the frame, exit the Slide Show and highlight the picture you would like to delete. 2) Press the "Menu" button to enter the OSD. 3) Select "Delete File" to delete the image from the internal memory, go to Thumbnail View and highlight the picture you would like to save the image into the internal memory. Saving...
... internal memory to be copied onto the internal memory. 1) Make sure that the Digital Photo Frame is turned off. 2) Insert a memory card into the Digital Photo Frame. 3) After turning on the frame, exit the Slide Show and highlight the picture you would like to delete. 2) Press the "Menu" button to enter the OSD. 3) Select "Delete File" to delete the image from the internal memory, go to Thumbnail View and highlight the picture you would like to save the image into the internal memory. Saving...
User Manual
Page 12
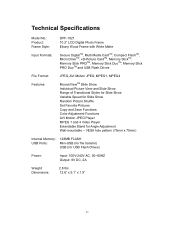
... for Slide Show Variable Speed for Slide Show Random Picture Shuffle Set Favorite Pictures Copy and Save Functions Color Adjustment Functions AVI Motion JPEG Player MPEG 1 and 4 Video Player Extendable Stand for USB Flash Drives) Power: Input: 100V-240V AC, 50~60HZ Output: 9V DC, 2A Weight: Dimensions: 2.8 lbs 12.6" x 9.1" x 1.9" 11 VESA hole pattern (75mm x 75mm) Internal Memory: USB Ports: 128MB FLASH Mini-USB (for file transfer) USB (for Angle Adjustment Wall-mountable -
... for Slide Show Variable Speed for Slide Show Random Picture Shuffle Set Favorite Pictures Copy and Save Functions Color Adjustment Functions AVI Motion JPEG Player MPEG 1 and 4 Video Player Extendable Stand for USB Flash Drives) Power: Input: 100V-240V AC, 50~60HZ Output: 9V DC, 2A Weight: Dimensions: 2.8 lbs 12.6" x 9.1" x 1.9" 11 VESA hole pattern (75mm x 75mm) Internal Memory: USB Ports: 128MB FLASH Mini-USB (for file transfer) USB (for Angle Adjustment Wall-mountable -
User Manual
Page 13
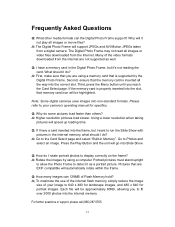
... Flash Memory hold? Second, ensure that are EXIF compatible will automatically rotate within the frame. Please refer to fit over 2000 photos into the frame, but it not play all images or video files downloaded from the Internet. Each file will it 's not reading the card. Q: I want to detect it as well. Q: If I have a memory card in the Digital Photo Frame, but I have a card inserted into the internal memory. Portrait pictures must stand upright to allow the Photo Frame...
... Flash Memory hold? Second, ensure that are EXIF compatible will automatically rotate within the frame. Please refer to fit over 2000 photos into the frame, but it not play all images or video files downloaded from the Internet. Each file will it 's not reading the card. Q: I want to detect it as well. Q: If I have a memory card in the Digital Photo Frame, but I have a card inserted into the internal memory. Portrait pictures must stand upright to allow the Photo Frame...
User Manual
Page 14
... using the Digital Photo Frame. Orient the Digital Photo Frames away from foot traffic and contact with care. The power supply cord should never be routed away from direct sunlight to direct sunlight or high temperatures, which can damage or shorten its useful life. Never place heavy or sharp objects on a stable and level surface. Power Cord Protection Minimize wear on the power supply cord. IMPORTANT PRODUCT SAFETY INSTRUCTIONS...
... using the Digital Photo Frame. Orient the Digital Photo Frames away from foot traffic and contact with care. The power supply cord should never be routed away from direct sunlight to direct sunlight or high temperatures, which can damage or shorten its useful life. Never place heavy or sharp objects on a stable and level surface. Power Cord Protection Minimize wear on the power supply cord. IMPORTANT PRODUCT SAFETY INSTRUCTIONS...
User Manual
Page 15
... device failure. If the Frame begins to emit smoke, an abnormal noise, or a strange odor, immediately turn it in a built-in installation, such as a bookcase or enclosed rack, unless proper ventilation is provided. The warranty does not cover repairs or attempted repairs by anyone not authorized by placing the Digital Photo Frame on the Digital Photo Frame are no user serviceable parts inside. Keep the Digital Photo Frame...
... device failure. If the Frame begins to emit smoke, an abnormal noise, or a strange odor, immediately turn it in a built-in installation, such as a bookcase or enclosed rack, unless proper ventilation is provided. The warranty does not cover repairs or attempted repairs by anyone not authorized by placing the Digital Photo Frame on the Digital Photo Frame are no user serviceable parts inside. Keep the Digital Photo Frame...
User Manual
Page 16
.... 2. Cleaning the Digital Photo Frame • MAKE SURE THE DIGITAL PHOTO FRAME IS TURNED OFF • NEVER SPRAY OR POUR LIQUID DIRECTLY ONTO THE SCREEN OR PLASTIC CASING To Clean the Screen: 1. If it still is not clean, apply a small amount of any ammonia or alcohol-based cleaners on a clean, soft, lint-free cloth to damage the screen and/or display case. To Clean...
.... 2. Cleaning the Digital Photo Frame • MAKE SURE THE DIGITAL PHOTO FRAME IS TURNED OFF • NEVER SPRAY OR POUR LIQUID DIRECTLY ONTO THE SCREEN OR PLASTIC CASING To Clean the Screen: 1. If it still is not clean, apply a small amount of any ammonia or alcohol-based cleaners on a clean, soft, lint-free cloth to damage the screen and/or display case. To Clean...
User Manual
Page 17
..., Westinghouse Digital Electronics will repair any Product that occurs during shipping. Replacement parts will supply new or rebuilt replacement parts in exchange for damage to any defect in material or workmanship in the Product, or at (866) 287-5555 for the locations of the nearest Westinghouse Digital Electronics service center. To obtain warranty services, you , the purchaser. Damage to obtain warranty service. The factory-applied serial number must...
..., Westinghouse Digital Electronics will repair any Product that occurs during shipping. Replacement parts will supply new or rebuilt replacement parts in exchange for damage to any defect in material or workmanship in the Product, or at (866) 287-5555 for the locations of the nearest Westinghouse Digital Electronics service center. To obtain warranty services, you , the purchaser. Damage to obtain warranty service. The factory-applied serial number must...


