User Manual
Page 8
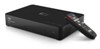
...-HD 1080p playback. Use the included programmable remote control to -view menu system. Play almost any time. Download WD Photos™, a free photo and video app for purchasing a WD TV Live Hub Media Center. Take a photo or video clip with your small computer screen. You can also access all the media on the built-in drive and any Mac, PC, and network drive in your home network so you can play your home movies, share...
...-HD 1080p playback. Use the included programmable remote control to -view menu system. Play almost any time. Download WD Photos™, a free photo and video app for purchasing a WD TV Live Hub Media Center. Take a photo or video clip with your small computer screen. You can also access all the media on the built-in drive and any Mac, PC, and network drive in your home network so you can play your home movies, share...
User Manual
Page 9
... or delete files stored on your camcorder, or a camera to the Live Hub built-in folders or drives. This unique feature lets you view all television sets. Ultra-compact design - WD TV Live Hub brings casual games to your big screen TV. The optical audio output sends digital signals to your AV receiver for the best surroundsound experience. Advanced navigation options „ Thumbnail, list, and preview modes - Search...
... or delete files stored on your camcorder, or a camera to the Live Hub built-in folders or drives. This unique feature lets you view all television sets. Ultra-compact design - WD TV Live Hub brings casual games to your big screen TV. The optical audio output sends digital signals to your AV receiver for the best surroundsound experience. Advanced navigation options „ Thumbnail, list, and preview modes - Search...
User Manual
Page 11
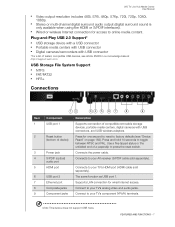
...-channel digital surround audio output (digital surround sound is only available when using the HDMI or S/PDIF interfaces). „ Wired or wireless Internet connection for access to toggle between NTSC and PAL. Press for wired Internet access. USB Storage File System Support „ NTFS „ FAT/FAT32 „ HFS+ Connections Item 1 2 3 4 5 6 7 8 9 12 34 5 6 7 8 9 Component USB port 1 Reset button (bottom of device) Power jack S/PDIF (optical) audio port HDMI port USB port 2 Ethernet port Composite jacks Component jacks Description Supports connection of a paperclip to factory...
...-channel digital surround audio output (digital surround sound is only available when using the HDMI or S/PDIF interfaces). „ Wired or wireless Internet connection for access to toggle between NTSC and PAL. Press for wired Internet access. USB Storage File System Support „ NTFS „ FAT/FAT32 „ HFS+ Connections Item 1 2 3 4 5 6 7 8 9 12 34 5 6 7 8 9 Component USB port 1 Reset button (bottom of device) Power jack S/PDIF (optical) audio port HDMI port USB port 2 Ethernet port Composite jacks Component jacks Description Supports connection of a paperclip to factory...
User Manual
Page 14
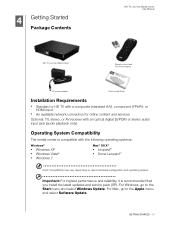
... optical digital (S/PDIF) or stereo audio input jack (audio playback only) Operating System Compatibility The media center is recommended that you install the latest updates and service pack (SP). GETTING STARTED - 10 For Windows, go to the Start menu and select Windows Update. For Mac, go to the Apple menu and select Software Update. 4 Getting Started Package Contents WD TV Live Hub Media Center User Manual WD TV Live Hub Media Center Remote control and Two AAA batteries AC power adapter Quick Install Guide Installation Requirements...
... optical digital (S/PDIF) or stereo audio input jack (audio playback only) Operating System Compatibility The media center is recommended that you install the latest updates and service pack (SP). GETTING STARTED - 10 For Windows, go to the Start menu and select Windows Update. For Mac, go to the Apple menu and select Software Update. 4 Getting Started Package Contents WD TV Live Hub Media Center User Manual WD TV Live Hub Media Center Remote control and Two AAA batteries AC power adapter Quick Install Guide Installation Requirements...
User Manual
Page 25
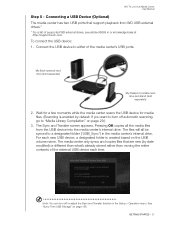
.... GETTING STARTED - 21 The media center only syncs and copies files that support playback from the USB device into the media center's internal drive. See "Sync From USB Storage" on the USB volume name. To connect the USB device: 1. Connecting a USB Device (Optional) The media center has two USB ports that are new (by date modified) or different than what's already stored rather than moving the entire contents of the external USB device each new USB device, a designated folder is enabled by default...
.... GETTING STARTED - 21 The media center only syncs and copies files that support playback from the USB device into the media center's internal drive. See "Sync From USB Storage" on the USB volume name. To connect the USB device: 1. Connecting a USB Device (Optional) The media center has two USB ports that are new (by date modified) or different than what's already stored rather than moving the entire contents of the external USB device each new USB device, a designated folder is enabled by default...
User Manual
Page 29
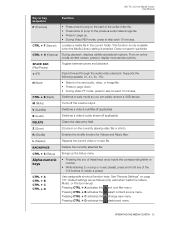
... the Media Library setting is enabled. CTRL + O (Options) During playback, displays additional playback options. M (Mute) Turns off the volume output V (Subtitle) Switches a video's subtitles (if applicable) B (Audio) Switches a video's audio stream (if applicable) DELETE Clears the data entry field. R (Shuffle) Enables the shuffle function for Videos and Music files. L (Repeat) Repeats the current video or music file. See "Remote Settings" on the currently playing video file or photo. Pressing CTRL + C activates the change view menu. SPACE BAR (Play...
... the Media Library setting is enabled. CTRL + O (Options) During playback, displays additional playback options. M (Mute) Turns off the volume output V (Subtitle) Switches a video's subtitles (if applicable) B (Audio) Switches a video's audio stream (if applicable) DELETE Clears the data entry field. R (Shuffle) Enables the shuffle function for Videos and Music files. L (Repeat) Repeats the current video or music file. See "Remote Settings" on the currently playing video file or photo. Pressing CTRL + C activates the change view menu. SPACE BAR (Play...

User Manual
Page 58
... until the repeat icon you press STOP or Back. Play Mode Use the music play mode to queue function is displayed. See "Rate" on page 42. Add to Queue The Music add to set the music repeat mode: 1. Select Play Mode, then press OK repeatedly until you press STOP or Back. „ Repeat One - WD TV Live Hub Media Center User Manual Get Content Info The Music get content info function. See "Video Playback Controls" on page...
... until the repeat icon you press STOP or Back. Play Mode Use the music play mode to queue function is displayed. See "Rate" on page 42. Add to Queue The Music add to set the music repeat mode: 1. Select Play Mode, then press OK repeatedly until you press STOP or Back. „ Repeat One - WD TV Live Hub Media Center User Manual Get Content Info The Music get content info function. See "Video Playback Controls" on page...
User Manual
Page 78
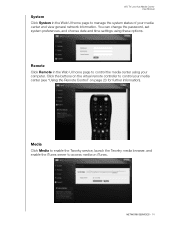
... control your media center (see "Using the Remote Control" on iTunes. WD TV Live Hub Media Center User Manual System Click System in the Web UI home page to control the media center using these options. Media Click Media to enable the Twonky service, launch the Twonky media browser, and enable the iTunes server to access media on page 23 for further information). You can change the password, set system preferences, and choose date and time settings using your computer. NETWORK SERVICES...
... control your media center (see "Using the Remote Control" on iTunes. WD TV Live Hub Media Center User Manual System Click System in the Web UI home page to control the media center using these options. Media Click Media to enable the Twonky service, launch the Twonky media browser, and enable the iTunes server to access media on page 23 for further information). You can change the password, set system preferences, and choose date and time settings using your computer. NETWORK SERVICES...
User Manual
Page 87
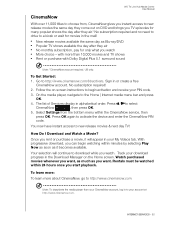
... activate the device and enter the CinemaNow PIN code. Press OK again to the Home | Internet media menu bar and press OK. 4. Watch purchased movies whenever you want . The list of Services display in or create a free CinemaNow account. You now have instant access to http://www.cinemanow.com/bbactivate. Note: To deactivate the media player from the bottom menu within minutes by selecting Play Now...
... activate the device and enter the CinemaNow PIN code. Press OK again to the Home | Internet media menu bar and press OK. 4. Watch purchased movies whenever you want . The list of Services display in or create a free CinemaNow account. You now have instant access to http://www.cinemanow.com/bbactivate. Note: To deactivate the media player from the bottom menu within minutes by selecting Play Now...

User Manual
Page 156
... background. Audio Track Display Use this menu to resume or restart a music file that is File name. SETUP AND ADVANCED FEATURES - 152 Background Music Info Panel When turned On, a music info menu bar appears at the top of the audio playback modes. Go to configure the display and sequence option for a description of the screen when music is Normal. WD TV Live Hub Media Center User Manual Music Settings Use the menus in the Music settings screen to "To set the music repeat mode:" on...
... background. Audio Track Display Use this menu to resume or restart a music file that is File name. SETUP AND ADVANCED FEATURES - 152 Background Music Info Panel When turned On, a music info menu bar appears at the top of the audio playback modes. Go to configure the display and sequence option for a description of the screen when music is Normal. WD TV Live Hub Media Center User Manual Music Settings Use the menus in the Music settings screen to "To set the music repeat mode:" on...

User Manual
Page 161
SETUP AND ADVANCED FEATURES - 157 To change functions, press / to default settings, select Reset, then press OK. To reset the function buttons to select a function button, then press OK. The remote settings menu displays the functions currently assigned to select functions such as display mode, filter menu, Music, Video, Services, Setup, etc., then press OK. Press / to each button. WD TV Live Hub Media Center User Manual Remote Settings Select a function for the A, B, C, and D function buttons on the remote controller.
SETUP AND ADVANCED FEATURES - 157 To change functions, press / to default settings, select Reset, then press OK. To reset the function buttons to select a function button, then press OK. The remote settings menu displays the functions currently assigned to select functions such as display mode, filter menu, Music, Video, Services, Setup, etc., then press OK. Press / to each button. WD TV Live Hub Media Center User Manual Remote Settings Select a function for the A, B, C, and D function buttons on the remote controller.

User Manual
Page 164
... the folder, Unlock to provide access to the folder, or Disable to . The service is entered. Ask - Once selected, the folder displays on the screen. default option. WD TV Live Hub Media Center User Manual Folder Lock Select Set Default Lock Folder to select a folder containing files you to access the service. Additional Encoding Support Press / to select an encoding support for a secondary language, then press OK...
... the folder, Unlock to provide access to the folder, or Disable to . The service is entered. Ask - Once selected, the folder displays on the screen. default option. WD TV Live Hub Media Center User Manual Folder Lock Select Set Default Lock Folder to select a folder containing files you to access the service. Additional Encoding Support Press / to select an encoding support for a secondary language, then press OK...

User Manual
Page 166
... using the on -screen keyboard. Use the navigation buttons to select System, then press OK. 4. Press / to select Last Name, then press OK. 8. WD LED Light Control Use this menu to perform device reset options: Reset All Settings Back to turn off , the WD LED will only appear during start up then disappear after the device has booted up. Device Reset Use this menu to Factory Default - WD TV Live Hub Media Center User Manual...
... using the on -screen keyboard. Use the navigation buttons to select System, then press OK. 4. Press / to select Last Name, then press OK. 8. WD LED Light Control Use this menu to perform device reset options: Reset All Settings Back to turn off , the WD LED will only appear during start up then disappear after the device has booted up. Device Reset Use this menu to Factory Default - WD TV Live Hub Media Center User Manual...

User Manual
Page 167
... Web UI password and resets it to select a device reset option, then press OK. 3. To clear all media center system preferences and playback settings to have entered for details. See "Using the Web UI" on the network after the reset. See "Disk Manager" on page 170 for new firmware. WD TV Live Hub Media Center User Manual Reset All Settings Except Online Service Accounts - Device Restart Press OK to select Device Reset, then press OK. 2. See "System Firmware Upgrade...
... Web UI password and resets it to select a device reset option, then press OK. 3. To clear all media center system preferences and playback settings to have entered for details. See "Using the Web UI" on the network after the reset. See "Disk Manager" on page 170 for new firmware. WD TV Live Hub Media Center User Manual Reset All Settings Except Online Service Accounts - Device Restart Press OK to select Device Reset, then press OK. 2. See "System Firmware Upgrade...

User Manual
Page 174
... authorized service center for media file playback and includes bug fixes and product enhancements. Important: Make sure the media center's AC power adapter remains connected during the update process can improve support for assistance. Automatic The New Firmware menu appears in the media center's Home screen when updated firmware becomes available, providing the option to more efficient ways of doing a manual update. Note: You must have Auto Detect New Firmware set of instructions that you receive...
... authorized service center for media file playback and includes bug fixes and product enhancements. Important: Make sure the media center's AC power adapter remains connected during the update process can improve support for assistance. Automatic The New Firmware menu appears in the media center's Home screen when updated firmware becomes available, providing the option to more efficient ways of doing a manual update. Note: You must have Auto Detect New Firmware set of instructions that you receive...

User Manual
Page 175
... and download the latest firmware update file for the media center. 2. Follow steps 1-4 under "To update the firmware automatically:" on page 171. 7. Go to the media center's USB port. Using an unzip utility, extract the zip file contents to the root directory of a USB device connected to access video, music, or photo files on the firmware update prompt, and then press OK. WD TV Live Hub Media Center User Manual To update the firmware automatically: 1. Press HOME, then select New Firmware.
... and download the latest firmware update file for the media center. 2. Follow steps 1-4 under "To update the firmware automatically:" on page 171. 7. Go to the media center's USB port. Using an unzip utility, extract the zip file contents to the root directory of a USB device connected to access video, music, or photo files on the firmware update prompt, and then press OK. WD TV Live Hub Media Center User Manual To update the firmware automatically: 1. Press HOME, then select New Firmware.
User Manual
Page 179
... are two different conditions under which this error. Unrecognized storage. No storage present. Connect the USB device to your media files. Eject and disconnect the USB device from the media center. 2. Attach the USB device to meet the required storage space. 3. CONTENT PLAYBACK This folder is disabled. 3. There are no supported media files in the selected folder. Unable to your storage setting. Drive is used on the drive(s). 2. Common Error Messages WD TV Live Hub Media Center User Manual If...
... are two different conditions under which this error. Unrecognized storage. No storage present. Connect the USB device to your media files. Eject and disconnect the USB device from the media center. 2. Attach the USB device to meet the required storage space. 3. CONTENT PLAYBACK This folder is disabled. 3. There are no supported media files in the selected folder. Unable to your storage setting. Drive is used on the drive(s). 2. Common Error Messages WD TV Live Hub Media Center User Manual If...

User Manual
Page 193
... 6 Music audio track display 152 auto play 158 background music info panel 152 browser display 153 folder view 50 media library compilation categories 30 menu options 51 playback controls 52 playback options 53 playback procedures 49 playback screen 53 playback sequence setting 152 settings 152 shuffle mode 55 sort & filter 50 supported formats 177 use in slideshow 62 N navigation buttons 23, 24 Netflix 114 existing membership 114 navigation 114 new membership 114 network services Web UI 73 Network settings check connection 155 clear login info for network...
... 6 Music audio track display 152 auto play 158 background music info panel 152 browser display 153 folder view 50 media library compilation categories 30 menu options 51 playback controls 52 playback options 53 playback procedures 49 playback screen 53 playback sequence setting 152 settings 152 shuffle mode 55 sort & filter 50 supported formats 177 use in slideshow 62 N navigation buttons 23, 24 Netflix 114 existing membership 114 navigation 114 new membership 114 network services Web UI 73 Network settings check connection 155 clear login info for network...

User Manual
Page 195
... TV Live Hub Media Center User Manual connection 21 disconnection 22 Eject button 24, 25 error messages 175 media library 168 media library compilation 29 removal 22 supported devices 7 troubleshooting 173 USB ports 7 V Video menu options 38 video output component 146 composite 145 Video settings browser display 151 HDMI deep color mode 146 subtitle border 151 subtitle default 151 subtitle font size 151 video sequence 151 Videos aspect ratio 146 audio channel 45 auto play 158 browser display gallery view 151 large grid view 151 list view...
... TV Live Hub Media Center User Manual connection 21 disconnection 22 Eject button 24, 25 error messages 175 media library 168 media library compilation 29 removal 22 supported devices 7 troubleshooting 173 USB ports 7 V Video menu options 38 video output component 146 composite 145 Video settings browser display 151 HDMI deep color mode 146 subtitle border 151 subtitle default 151 subtitle font size 151 video sequence 151 Videos aspect ratio 146 audio channel 45 auto play 158 browser display gallery view 151 large grid view 151 list view...
Product Specifications
Page 2
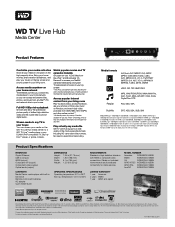
... belong to 1280x720p30 resolution and no support for multi-channel surround sound digital output. Play virtually any media file WD TV Live Hub supports a wide variety of your limited warranty depends on the big screen and sound system in which your living room. Product Specifications interface Gigabit Ethernet USB 2.0 (input) HDMI (output) Composite A/V (output) Component video (output) Optical audio (output) Contents Media Center: media player with built-in hard drive Remote control with HDMI or composite video connections. Media formats AVI (Xvid, AVC, MPEG1/2/4), MPG...
... belong to 1280x720p30 resolution and no support for multi-channel surround sound digital output. Play virtually any media file WD TV Live Hub supports a wide variety of your limited warranty depends on the big screen and sound system in which your living room. Product Specifications interface Gigabit Ethernet USB 2.0 (input) HDMI (output) Composite A/V (output) Component video (output) Optical audio (output) Contents Media Center: media player with built-in hard drive Remote control with HDMI or composite video connections. Media formats AVI (Xvid, AVC, MPEG1/2/4), MPG...


