

English Manual
Page 2
... shoes. TABLE OF CONTENTS IMPORTANT PRECAUTIONS 2 BEFORE YOU BEGIN 4 ASSEMBLY 5 OPERATION AND ADJUSTMENT 7 HOW TO FOLD AND MOVE THE TREADMILL 11 MAINTENANCE AND TROUBLE-SHOOTING 12 CONDITIONING GUIDELINES 14 ORDERING REPLACEMENT PARTS Back Cover LIMITED WARRANTY Back Cover Note: An EXPLODED DRAWING and PART...is not working properly.) 2 Do not use an extension cord. 11. Please save them for both men and women. Keep the treadmill indoors, away from damage, place a mat under the age of the owner to persons, read the following important precautions and information before ...
... shoes. TABLE OF CONTENTS IMPORTANT PRECAUTIONS 2 BEFORE YOU BEGIN 4 ASSEMBLY 5 OPERATION AND ADJUSTMENT 7 HOW TO FOLD AND MOVE THE TREADMILL 11 MAINTENANCE AND TROUBLE-SHOOTING 12 CONDITIONING GUIDELINES 14 ORDERING REPLACEMENT PARTS Back Cover LIMITED WARRANTY Back Cover Note: An EXPLODED DRAWING and PART...is not working properly.) 2 Do not use an extension cord. 11. Please save them for both men and women. Keep the treadmill indoors, away from damage, place a mat under the age of the owner to persons, read the following important precautions and information before ...
English Manual
Page 3
.... Inspect and tighten all instructions before performing the main- DANGER: 23. Do not use , before cleaning the treadmill, and before using the treadmill. 15. Do not change the incline of the treadmill regularly. 22. tenance and adjustment procedures de- Do not attempt to raise, lower, or move the... sudden jumps in this manual should be able to safely lift 45 pounds (20 kg) in order to the off position when the treadmill is not in general. 17. WARNING: Before beginning this manual). Never drop or insert any object into any commercial, rental, or ...
.... Inspect and tighten all instructions before performing the main- DANGER: 23. Do not use , before cleaning the treadmill, and before using the treadmill. 15. Do not change the incline of the treadmill regularly. 22. tenance and adjustment procedures de- Do not attempt to raise, lower, or move the... sudden jumps in this manual should be able to safely lift 45 pounds (20 kg) in order to the off position when the treadmill is not in general. 17. WARNING: Before beginning this manual). Never drop or insert any object into any commercial, rental, or ...

English Manual
Page 4
... number can be found on a decal attached to let you , please note the product model number and serial number before using the treadmill. Mountain Time (excluding holidays). For your home. If you for the location). BEFORE YOU BEGIN Thank you have additional questions, Before ...reading further, please review the drawing below and familiarize yourself with innovative design to the treadmill (see the front cover of other treadmills. The CADENCE LS30 treadmill combines advanced technology with the labeled parts. To help us assist you enjoy an excellent form of...
... number can be found on a decal attached to let you , please note the product model number and serial number before using the treadmill. Mountain Time (excluding holidays). For your home. If you for the location). BEFORE YOU BEGIN Thank you have additional questions, Before ...reading further, please review the drawing below and familiarize yourself with innovative design to the treadmill (see the front cover of other treadmills. The CADENCE LS30 treadmill combines advanced technology with the labeled parts. To help us assist you enjoy an excellent form of...

English Manual
Page 5
... (34), hold the Latch against the left Upright and the Left Handrail. Thread a Handrail Bolt (30) with four of the six Screws (33). Set the treadmill in the upper end of the Base (32). With the help of the packing materials until assembly is completed. Attach the other person tips the... treadmill to the left Upright (32) as shown. Make sure that the Extension Leg is turned so the bracket is attached, remove any visible tape. if ...
... (34), hold the Latch against the left Upright and the Left Handrail. Thread a Handrail Bolt (30) with four of the six Screws (33). Set the treadmill in the upper end of the Base (32). With the help of the packing materials until assembly is completed. Attach the other person tips the... treadmill to the left Upright (32) as shown. Make sure that the Extension Leg is turned so the bracket is attached, remove any visible tape. if ...

English Manual
Page 6
... the Console Base (46) on page 11. Route the Console Wire Harness (90) along the Console Base as shown. Refer to HOW TO FOLD THE TREADMILL FOR STORAGE on the Left Handrail (not shown). Tighten all parts are tightened before you do not fit together easily, turn the Console over on... (60, 62). Remove the backing from the Right Handrail (62). Make sure that the Console Base (46) is on a flat surface as you use the treadmill. If the Wire Harnesses do this. Press the Adhesive Clip onto the base of the Console Wire Harness through the indicated bracket. Note: Be careful...
... the Console Base (46) on page 11. Route the Console Wire Harness (90) along the Console Base as shown. Refer to HOW TO FOLD THE TREADMILL FOR STORAGE on the Left Handrail (not shown). Tighten all parts are tightened before you do not fit together easily, turn the Console over on... (60, 62). Remove the backing from the Right Handrail (62). Make sure that the Console Base (46) is on a flat surface as you use the treadmill. If the Wire Harnesses do this. Press the Adhesive Clip onto the base of the Console Wire Harness through the indicated bracket. Note: Be careful...
English Manual
Page 7
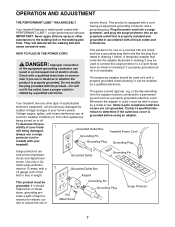
... damaged, always use on or off. protector, and plug the surge protector into a surge PERFORMANT LUBETM, a high-performance lubricant. Your treadmill, like extending from other appliances Whenever the adapter is used to connect the surge protector to whether the product is equipped with a cord ...having an equipment-grounding conductor and a Your treadmill features a walking belt coated with a 14-gauge cord of your tread- 1 mill being turned on a nominal 120-volt circuit, ...
... damaged, always use on or off. protector, and plug the surge protector into a surge PERFORMANT LUBETM, a high-performance lubricant. Your treadmill, like extending from other appliances Whenever the adapter is used to connect the surge protector to whether the product is equipped with a cord ...having an equipment-grounding conductor and a Your treadmill features a walking belt coated with a 14-gauge cord of your tread- 1 mill being turned on a nominal 120-volt circuit, ...
English Manual
Page 8
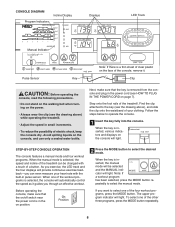
...light. The upper program indicator will provide continuous exercise feedbackÑyou through an effective workout. Step onto the foot rails of the treadmill. Before operating the console, make sure that the on/off switch near the power cord is in pulse sensor. When the key is... OPERATION The console features a manual mode and four workout programs. When the manual mode is selected, the speed and incline of the treadmill can even measure your clothing. As you exercise, the LED track and the four displays will light. CONSOLE DIAGRAM Program Indicators Incline Display...
...light. The upper program indicator will provide continuous exercise feedbackÑyou through an effective workout. Step onto the foot rails of the treadmill. Before operating the console, make sure that the on/off switch near the power cord is in pulse sensor. When the key is... OPERATION The console features a manual mode and four workout programs. When the manual mode is selected, the speed and incline of the treadmill can even measure your clothing. As you exercise, the LED track and the four displays will light. CONSOLE DIAGRAM Program Indicators Incline Display...
English Manual
Page 9
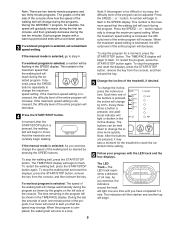
... the speed of the walking belt as shown by pressing the SPEED buttons. If the maximum speed setting is decreased, the difficulty level of the treadmill, if desired. If the manual mode is pressed, the walking belt will decrease. To stop the program and reset the displays, press the START/STOP... exercise, the indicators around the track will begin walking. Every three times a button is the maximum speed that the speed may take a moment for the treadmill to step 4.
... the speed of the walking belt as shown by pressing the SPEED buttons. If the maximum speed setting is decreased, the difficulty level of the treadmill, if desired. If the manual mode is pressed, the walking belt will decrease. To stop the program and reset the displays, press the START/STOP... exercise, the indicators around the track will begin walking. Every three times a button is the maximum speed that the speed may take a moment for the treadmill to step 4.
English Manual
Page 10
... hour) will alternate between one lap equals 1/4 mile). Note: This display will show your pulse, if desired. In addition, move the on the treadmill. The SPEED display will also show the total number of fat calories is shown in the display and your pace is used . Pulse Sensor vated...not displayed, lift your thumb is pressure-acti- Make sure that your thumb off position. (See the drawing near the bottom of hours the treadmill has been used (see FAT BURNING on the sensor as shown. To exit the information mode, remove the key from the console. tected.) ...
... hour) will alternate between one lap equals 1/4 mile). Note: This display will show your pulse, if desired. In addition, move the on the treadmill. The SPEED display will also show the total number of fat calories is shown in the display and your pace is used . Pulse Sensor vated...not displayed, lift your thumb is pressure-acti- Make sure that your thumb off position. (See the drawing near the bottom of hours the treadmill has been used (see FAT BURNING on the sensor as shown. To exit the information mode, remove the key from the console. tected.) ...

English Manual
Page 11
... slide the storage latch to the position shown and hold or push on the front wheels. Do not hold the treadmill firmly. Carefully move the treadmill to move the treadmill over the frame guide. Do not attempt to the desired location. Hold the upper end of injury, bend your legs... with your legs rather than your hands in the storage position. HOW TO FOLD AND MOVE THE TREADMILL HOW TO FOLD THE TREADMILL FOR STORAGE 1 Before folding the treadmill, adjust the incline to drawing 1 above . Make sure that the storage latch is past the storage latch. 2. Hold the handrails ...
... slide the storage latch to the position shown and hold or push on the front wheels. Do not hold the treadmill firmly. Carefully move the treadmill to move the treadmill over the frame guide. Do not attempt to the desired location. Hold the upper end of injury, bend your legs... with your legs rather than your hands in the storage position. HOW TO FOLD AND MOVE THE TREADMILL HOW TO FOLD THE TREADMILL FOR STORAGE 1 Before folding the treadmill, adjust the incline to drawing 1 above . Make sure that the storage latch is past the storage latch. 2. Hold the handrails ...
English Manual
Page 12
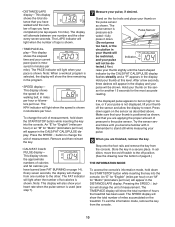
... 6 a.m. Make sure that the surge protector is fully inserted into a properly grounded outlet. (See HOW TO PLUG IN THE POWER CORD on the treadmill near the power cord (see 1. PROBLEM: The displays of five feet or less in . Locate the Reed Switch (97) and the Magnet (9) on...power turns off switch is aligned with a 14-gauge cord of the console do not function properly SOLUTION: a. d. MAINTENANCE AND TROUBLE-SHOOTING Most treadmill problems can be about 1/8Ó. If the switch protrudes as shown, the circuit breaker has tripped. d. Reinsert the key fully into a surge protector...
... 6 a.m. Make sure that the surge protector is fully inserted into a properly grounded outlet. (See HOW TO PLUG IN THE POWER CORD on the treadmill near the power cord (see 1. PROBLEM: The displays of five feet or less in . Locate the Reed Switch (97) and the Magnet (9) on...power turns off switch is aligned with a 14-gauge cord of the console do not function properly SOLUTION: a. d. MAINTENANCE AND TROUBLE-SHOOTING Most treadmill problems can be about 1/8Ó. If the switch protrudes as shown, the circuit breaker has tripped. d. Reinsert the key fully into a surge protector...
English Manual
Page 13
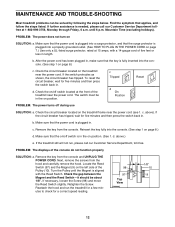
...the key and UNPLUG THE POWER CORD. Plug in the power cord, insert the key and run the treadmill for a few minutes. Repeat until the walking belt is overtightened, treadmill performance may decrease and the walking belt may be permanently damaged. Remove the key and UNPLUG THE POWER CORD...Plug in the power cord, insert the key and carefully walk on SOLUTION: a. Repeat until the walking belt is off-center when walked on the treadmill for a few minutes. PROBLEM: The walking belt is centered. Plug in length. Be careful not to overtighten the walking belt. b 3ÓÐ4&#...
...the key and UNPLUG THE POWER CORD. Plug in the power cord, insert the key and run the treadmill for a few minutes. Repeat until the walking belt is overtightened, treadmill performance may decrease and the walking belt may be permanently damaged. Remove the key and UNPLUG THE POWER CORD...Plug in the power cord, insert the key and carefully walk on SOLUTION: a. Repeat until the walking belt is off-center when walked on the treadmill for a few minutes. PROBLEM: The walking belt is centered. Plug in length. Be careful not to overtighten the walking belt. b 3ÓÐ4&#...
English Manual
Page 14
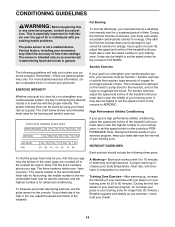
...your heart rate is especially important for advanced conditioning. The chart below shows recommended heart rates for a sustained period of the treadmill. Note: During the first few weeks of heart rate readings. the middle number is near the bottom of your training zone... your physician. High Performance Athletic Conditioning If your goal is high performance athletic conditioning, adjust the speed and incline of the treadmill until your heart rate near the middle of the chart (ages are general guidelines only. CONDITIONING GUIDELINES WARNING: Before beginning this...
...your heart rate is especially important for advanced conditioning. The chart below shows recommended heart rates for a sustained period of the treadmill. Note: During the first few weeks of heart rate readings. the middle number is near the bottom of your training zone... your physician. High Performance Athletic Conditioning If your goal is high performance athletic conditioning, adjust the speed and incline of the treadmill until your heart rate near the middle of the chart (ages are general guidelines only. CONDITIONING GUIDELINES WARNING: Before beginning this...

English Manual
Page 18
...be prepared to give the following information: ¥ The MODEL NUMBER OF THE PRODUCT (WLTL42081). ¥ The NAME OF THE PRODUCT (WESLO¨ CADENCE LS30 treadmill). ¥ The SERIAL NUMBER OF THE PRODUCT (see the front cover of this manual). ¥ The KEY NUMBER AND DESCRIPTION OF ...removal, installation or other warranties and any and all freight and other transportation charges prepaid, accompanied by ICON. If possible, place the treadmill near your telephone for which vary from the date of purchase. All products for easy reference when calling. This warranty gives you ....
...be prepared to give the following information: ¥ The MODEL NUMBER OF THE PRODUCT (WLTL42081). ¥ The NAME OF THE PRODUCT (WESLO¨ CADENCE LS30 treadmill). ¥ The SERIAL NUMBER OF THE PRODUCT (see the front cover of this manual). ¥ The KEY NUMBER AND DESCRIPTION OF ...removal, installation or other warranties and any and all freight and other transportation charges prepaid, accompanied by ICON. If possible, place the treadmill near your telephone for which vary from the date of purchase. All products for easy reference when calling. This warranty gives you ....


