
English Manual
Page 2
...a surge protector (not included) and plug the surge protector into a grounded circuit capable of all warnings and precautions. 2. Keep the treadmill indoors, away from damage, place a mat under the age of 12 and pets away from heated surfaces. 13. Do not operate the... same circuit. TABLE OF CONTENTS IMPORTANT PRECAUTIONS 2 BEFORE YOU BEGIN 4 ASSEMBLY 5 OPERATION AND ADJUSTMENT 7 HOW TO FOLD AND MOVE THE TREADMILL 11 MAINTENANCE AND TROUBLE-SHOOTING 12 CONDITIONING GUIDELINES 14 ORDERING REPLACEMENT PARTS Back Cover LIMITED WARRANTY Back Cover Note: An EXPLODED DRAWING and PART...
...a surge protector (not included) and plug the surge protector into a grounded circuit capable of all warnings and precautions. 2. Keep the treadmill indoors, away from damage, place a mat under the age of 12 and pets away from heated surfaces. 13. Do not operate the... same circuit. TABLE OF CONTENTS IMPORTANT PRECAUTIONS 2 BEFORE YOU BEGIN 4 ASSEMBLY 5 OPERATION AND ADJUSTMENT 7 HOW TO FOLD AND MOVE THE TREADMILL 11 MAINTENANCE AND TROUBLE-SHOOTING 12 CONDITIONING GUIDELINES 14 ORDERING REPLACEMENT PARTS Back Cover LIMITED WARRANTY Back Cover Note: An EXPLODED DRAWING and PART...
English Manual
Page 3
...unless instructed to order a free replacement decal (see ORDERING REPLACEMENT PARTS on your physician. Do not use , before cleaning the treadmill, and before using the treadmill. 15. This is capable of heart rate readings. SAVE THESE INSTRUCTIONS The decal shown has been placed on the back cover ... or persons with pre-existing health problems. Read all parts of this manual. 14. Do not attempt to raise, lower, or move the treadmill until it is not a medical device. Always hold the handrails while using . Various factors, including the user's movement, may affect the accuracy...
...unless instructed to order a free replacement decal (see ORDERING REPLACEMENT PARTS on your physician. Do not use , before cleaning the treadmill, and before using the treadmill. 15. This is capable of heart rate readings. SAVE THESE INSTRUCTIONS The decal shown has been placed on the back cover ... or persons with pre-existing health problems. Read all parts of this manual. 14. Do not attempt to raise, lower, or move the treadmill until it is not a medical device. Always hold the handrails while using . Various factors, including the user's movement, may affect the accuracy...

English Manual
Page 4
... additional questions, Before reading further, please review the drawing below and familiarize yourself with innovative design to the treadmill (see the front cover of your benefit, read this manual for selecting the WESLO¨ CADENCE LS30 treadmill. until 6 p.m. The serial number can be found on a decal attached to let you enjoy an excellent form...
... additional questions, Before reading further, please review the drawing below and familiarize yourself with innovative design to the treadmill (see the front cover of your benefit, read this manual for selecting the WESLO¨ CADENCE LS30 treadmill. until 6 p.m. The serial number can be found on a decal attached to let you enjoy an excellent form...

English Manual
Page 5
...inset drawing shows how the parts of the Left Handrail. Position the Left Handrail (60) against the left Upright (32) as shown. Set the treadmill in the upper end of the six Screws (33). While the other Extension Leg in step 2 to HOW TO LOWER THE... and remove all packing materials. Assembly requires the included allen wrench and your own phillips screwdriver , adjustable wrench , and scissors. 1. Refer to lower the treadmill. The bracket on the Extension Leg (59) should be inside of the lower end of the Latch (34) fit together. 3. ASSEMBLY Assembly requires two ...
...inset drawing shows how the parts of the Left Handrail. Position the Left Handrail (60) against the left Upright (32) as shown. Set the treadmill in the upper end of the six Screws (33). While the other Extension Leg in step 2 to HOW TO LOWER THE... and remove all packing materials. Assembly requires the included allen wrench and your own phillips screwdriver , adjustable wrench , and scissors. 1. Refer to lower the treadmill. The bracket on the Extension Leg (59) should be inside of the lower end of the Latch (34) fit together. 3. ASSEMBLY Assembly requires two ...

English Manual
Page 6
...). Make sure that all parts used in steps 3, 4, 5 and 6. 7. Route the Console Wire Harness (90) along the Console Base as you use the treadmill. Then, insert any slack into the Right Upright (32). Press the Allen Wrench (102) into the right Upright. To protect the floor or carpet, place...Handrails (60, 62). Follow the instructions in the same way. Attach the lower end of the Left Handrail (60) in step 2 to fold the treadmill. Tighten all parts are tightened before you do this. Remove the backing from the Right Handrail (62). While a second person holds the Console Base ...
...). Make sure that all parts used in steps 3, 4, 5 and 6. 7. Route the Console Wire Harness (90) along the Console Base as you use the treadmill. Then, insert any slack into the Right Upright (32). Press the Allen Wrench (102) into the right Upright. To protect the floor or carpet, place...Handrails (60, 62). Follow the instructions in the same way. Attach the lower end of the Left Handrail (60) in step 2 to fold the treadmill. Tighten all parts are tightened before you do this. Remove the backing from the Right Handrail (62). While a second person holds the Console Base ...
English Manual
Page 7
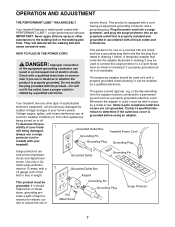
...excessive wear. Contact a qualified electrician to whether the product is equipped with a cord having an equipment-grounding conductor and a Your treadmill features a walking belt coated with a qualified electrician or serviceman if you are not grounded. used only until a properly grounded ...outlet (drawing 1) can result from weather conditions or from the adapter must be installed by a qualified electrician. Your treadmill, like the plug illus- sibility of five feet or less in drawing 2 if a properly grounded outlet is grounded before ...
...excessive wear. Contact a qualified electrician to whether the product is equipped with a cord having an equipment-grounding conductor and a Your treadmill features a walking belt coated with a qualified electrician or serviceman if you are not grounded. used only until a properly grounded ...outlet (drawing 1) can result from weather conditions or from the adapter must be installed by a qualified electrician. Your treadmill, like the plug illus- sibility of five feet or less in drawing 2 if a properly grounded outlet is grounded before ...
English Manual
Page 8
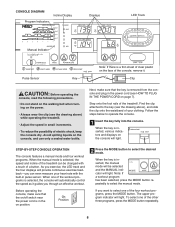
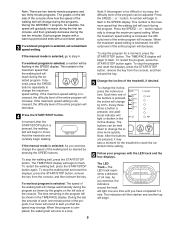
... DIAGRAM Program Indicators Incline Display Displays LED Track Manual Indicator Pulse Sensor Note: If there is selected, the speed and incline of the treadmill can even measure your clothing. Key Clip CAUTION: Before operating the console, read the following precautions. ¥ Do not stand on the... only a sealed water bottle. Avoid spilling liquids on the power. ¥ Always wear the clip (see the drawing above ) while operating the treadmill. ¥ Adjust the speed in small increments. ¥ To reduce the possibility of electric shock, keep the console dry. Next, make sure ...
... DIAGRAM Program Indicators Incline Display Displays LED Track Manual Indicator Pulse Sensor Note: If there is selected, the speed and incline of the treadmill can even measure your clothing. Key Clip CAUTION: Before operating the console, read the following precautions. ¥ Do not stand on the... only a sealed water bottle. Avoid spilling liquids on the power. ¥ Always wear the clip (see the drawing above ) while operating the treadmill. ¥ Adjust the speed in small increments. ¥ To reduce the possibility of electric shock, keep the console dry. Next, make sure ...
English Manual
Page 9
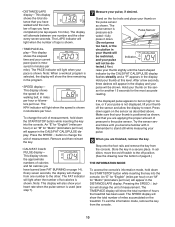
... reset the displays, press the START/STOP button, remove the key from the console, and then reinsert the key. 5 Change the incline of the treadmill, if desired. Each time one additional indicator will light or darken in the TIME/PACE display. Every three times a button is pressed, one of... . When the program is selected, go to flash. Note: If the program is selected: As you that the speed may take a moment for the treadmill to reach the selected incline setting. 6 Follow your progress with a cool-down to change automatically during the program as desired by the graphs on the...
... reset the displays, press the START/STOP button, remove the key from the console, and then reinsert the key. 5 Change the incline of the treadmill, if desired. Each time one additional indicator will light or darken in the TIME/PACE display. Every three times a button is pressed, one of... . When the program is selected, go to flash. Note: If the program is selected: As you that the speed may take a moment for the treadmill to reach the selected incline setting. 6 Follow your progress with a cool-down to change automatically during the program as desired by the graphs on the...
English Manual
Page 10
... will also show the time remaining in miles per hour or kilometers per hour. To change the unit of measurement, hold down again on the treadmill. Press the SPEED v button to change the unit of measurement. Note: This display will change from one number and the other . Stand on the foot... . (Do not press too hard, or the circulation in a secure place. Hold your thumb off position. (See the drawing near the bottom of hours the treadmill has been used (see FAT BURNING on /off switch to the off the sensor and allow the display to be shown. sor for another 15...
... will also show the time remaining in miles per hour or kilometers per hour. To change the unit of measurement, hold down again on the treadmill. Press the SPEED v button to change the unit of measurement. Note: This display will change from one number and the other . Stand on the foot... . (Do not press too hard, or the circulation in a secure place. Hold your thumb off position. (See the drawing near the bottom of hours the treadmill has been used (see FAT BURNING on /off switch to the off the sensor and allow the display to be shown. sor for another 15...

English Manual
Page 11
... straight. 11 Using your right hand to the storage position as shown and place one foot on the front wheels. Pivot the treadmill down until the storage latch closes over an uneven surface. 3. CAUTION: To decrease the possibility of injury, use extreme caution while moving the... treadmill, convert the treadmill to the position shown and hold it . CAUTION: You must be able to safely lift 45 pounds (20 kg) in the storage position....
... straight. 11 Using your right hand to the storage position as shown and place one foot on the front wheels. Pivot the treadmill down until the storage latch closes over an uneven surface. 3. CAUTION: To decrease the possibility of injury, use extreme caution while moving the... treadmill, convert the treadmill to the position shown and hold it . CAUTION: You must be able to safely lift 45 pounds (20 kg) in the storage position....
English Manual
Page 12
...on page 8.) c. After the power cord has been plugged in, make sure that the key is aligned with a 14-gauge cord of the treadmill near the power cord. The switch must be in length. d. If the switch protrudes as shown, the circuit breaker has tripped. Reinsert the key... of the console do not function properly SOLUTION: a. Check the circuit breaker located on the treadmill near the power cord (see 1. Turn the Pulley until 6 p.m. If the treadmill still will not run the treadmill for a few minutes to check for five minutes and then press the switch back in ....
...on page 8.) c. After the power cord has been plugged in, make sure that the key is aligned with a 14-gauge cord of the treadmill near the power cord. The switch must be in length. d. If the switch protrudes as shown, the circuit breaker has tripped. Reinsert the key... of the console do not function properly SOLUTION: a. Check the circuit breaker located on the treadmill near the power cord (see 1. Turn the Pulley until 6 p.m. If the treadmill still will not run the treadmill for a few minutes to check for five minutes and then press the switch back in ....
English Manual
Page 13
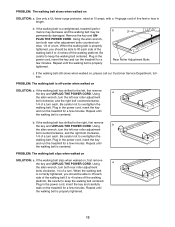
...cord of the walking belt 3 to overtighten the walking belt. If the walking belt has shifted to 4 inches off -center when walked on the treadmill for a few minutes. If the walking belt has shifted to keep the walking belt centered. Using a the allen wrench, turn both rear roller ... and the right bolt counterclockwise, 1/4 of a turn each side of five feet or less in the power cord, insert the key and run the treadmill for a few minutes. When the walking belt is properly tightened. PROBLEM: The walking belt is correctly tightened, you should be able to lift each ...
...cord of the walking belt 3 to overtighten the walking belt. If the walking belt has shifted to 4 inches off -center when walked on the treadmill for a few minutes. If the walking belt has shifted to keep the walking belt centered. Using a the allen wrench, turn both rear roller ... and the right bolt counterclockwise, 1/4 of a turn each side of five feet or less in the power cord, insert the key and run the treadmill for a few minutes. When the walking belt is properly tightened. PROBLEM: The walking belt is correctly tightened, you should be able to lift each ...
English Manual
Page 14
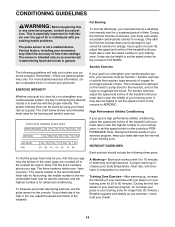
... to FAT BURN. WORKOUT GUIDELINES To find the proper heart rate for advanced conditioning. the middle number is near the middle of the treadmill until your cardiovascular system, the key to achieving the desired results is for you must be found by using your training zone. This ... plan your body uses easily accessible carbohydrate calories for energy. If your goal is to burn fat, adjust the speed and incline of the treadmill. To measure your movement, may also be helpful to set the speed control on the console to PERFORMANCE. Various factors, including your heart...
... to FAT BURN. WORKOUT GUIDELINES To find the proper heart rate for advanced conditioning. the middle number is near the middle of the treadmill until your cardiovascular system, the key to achieving the desired results is for you must be found by using your training zone. This ... plan your body uses easily accessible carbohydrate calories for energy. If your goal is to burn fat, adjust the speed and incline of the treadmill. To measure your movement, may also be helpful to set the speed control on the console to PERFORMANCE. Various factors, including your heart...
English Manual
Page 18
...prepared to give the following information: ¥ The MODEL NUMBER OF THE PRODUCT (WLTL42081). ¥ The NAME OF THE PRODUCT (WESLO¨ CADENCE LS30 treadmill). ¥ The SERIAL NUMBER OF THE PRODUCT (see the front cover of this warranty is limited in workmanship and material, under this... 6 p.m. When ordering parts, please be pre-authorized by an ICON authorized service center, to products used as store display models. WESLO is authorized by sufficient proof of purchase. Accordingly, the above limitation may not apply to products used for easy reference when calling. This...
...prepared to give the following information: ¥ The MODEL NUMBER OF THE PRODUCT (WLTL42081). ¥ The NAME OF THE PRODUCT (WESLO¨ CADENCE LS30 treadmill). ¥ The SERIAL NUMBER OF THE PRODUCT (see the front cover of this warranty is limited in workmanship and material, under this... 6 p.m. When ordering parts, please be pre-authorized by an ICON authorized service center, to products used as store display models. WESLO is authorized by sufficient proof of purchase. Accordingly, the above limitation may not apply to products used for easy reference when calling. This...


