
English Manual
Page 1
... through direct assistance from our factory. MST CAUTION Read all precautions and instructions in this manual before using this manual for future reference. If you . As a manufacturer, we are missing or damaged parts, we will provide immediate assistance, free of charge to you have questions, or if there are committed to providing complete customer satisfaction. Model No. USER'S MANUAL Serial Number Decal...
... through direct assistance from our factory. MST CAUTION Read all precautions and instructions in this manual before using this manual for future reference. If you . As a manufacturer, we are missing or damaged parts, we will provide immediate assistance, free of charge to you have questions, or if there are committed to providing complete customer satisfaction. Model No. USER'S MANUAL Serial Number Decal...
English Manual
Page 2
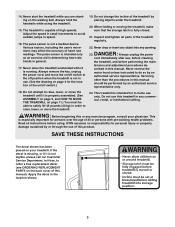
... and women. Do not operate the treadmill where aerosol products are attached in sandals. 10. TABLE OF CONTENTS IMPORTANT PRECAUTIONS 2 BEFORE YOU BEGIN 4 ASSEMBLY 5 OPERATION AND ADJUSTMENT 7 HOW TO FOLD AND MOVE THE TREADMILL 11 MAINTENANCE AND TROUBLE-SHOOTING 12 CONDITIONING GUIDELINES 14 ORDERING REPLACEMENT PARTS Back Cover LIMITED WARRANTY Back Cover Note: An EXPLODED DRAWING and PART LIST are used by persons weighing more than one person...
... and women. Do not operate the treadmill where aerosol products are attached in sandals. 10. TABLE OF CONTENTS IMPORTANT PRECAUTIONS 2 BEFORE YOU BEGIN 4 ASSEMBLY 5 OPERATION AND ADJUSTMENT 7 HOW TO FOLD AND MOVE THE TREADMILL 11 MAINTENANCE AND TROUBLE-SHOOTING 12 CONDITIONING GUIDELINES 14 ORDERING REPLACEMENT PARTS Back Cover LIMITED WARRANTY Back Cover Note: An EXPLODED DRAWING and PART LIST are used by persons weighing more than one person...
English Manual
Page 3
... motor hood unless instructed to raise, lower, or move the treadmill until it is intended only as an exercise aid in determining heart rate trends in any commercial, rental, or institutional setting. This is not in this manual should be able to safely lift 45 pounds (20 kg) in order to order a free replacement decal (see ORDERING REPLACEMENT PARTS on the walking belt. Always remove the key, unplug the power cord...
... motor hood unless instructed to raise, lower, or move the treadmill until it is intended only as an exercise aid in determining heart rate trends in any commercial, rental, or institutional setting. This is not in this manual should be able to safely lift 45 pounds (20 kg) in order to order a free replacement decal (see ORDERING REPLACEMENT PARTS on the walking belt. Always remove the key, unplug the power cord...

English Manual
Page 4
... the location). please call our Customer Service Department toll-free at 1-800-999-3756, Monday through Friday, 6 a.m. The model number of your benefit, read this manual for selecting the WESLO¨ CADENCE LS30 treadmill. Water Bottle Holder (Bottle not included) Handrail Storage Latch Book Holder Key/Clip Accessory Tray Console Handrail LEFT SIDE Walking Belt Foot Rails RIGHT SIDE On/Off Switch Circuit Breaker Front Wheel Rear Roller Adjustment Bolts Power Cord 4
... the location). please call our Customer Service Department toll-free at 1-800-999-3756, Monday through Friday, 6 a.m. The model number of your benefit, read this manual for selecting the WESLO¨ CADENCE LS30 treadmill. Water Bottle Holder (Bottle not included) Handrail Storage Latch Book Holder Key/Clip Accessory Tray Console Handrail LEFT SIDE Walking Belt Foot Rails RIGHT SIDE On/Off Switch Circuit Breaker Front Wheel Rear Roller Adjustment Bolts Power Cord 4

English Manual
Page 5
.... Using the Allen Wrench (102), tighten an Extension Leg Screw (57) into one side of the Left Handrail (60). Follow the instructions in the upper end of the Base (32). Attach the Latch to the left Upright with a Handrail Washer (108) into the left Upright and the Left Handrail. Cut the plastic tie holding the cage nut in step 2 to...
.... Using the Allen Wrench (102), tighten an Extension Leg Screw (57) into one side of the Left Handrail (60). Follow the instructions in the upper end of the Base (32). Attach the Latch to the left Upright with a Handrail Washer (108) into the left Upright and the Left Handrail. Cut the plastic tie holding the cage nut in step 2 to...

English Manual
Page 6
...) with a Screw (33). The latch on a flat surface as shown. do not fit together easily, turn the Console over on the Wire Harness should snap onto the Console Wire Harness. Refer to HOW TO FOLD THE TREADMILL FOR STORAGE on page 5 and attach the Right Handrail (62) as possible. Attach the Console Base (46) to drop the Wire Harness into the right Upright. Attach the lower end of...
...) with a Screw (33). The latch on a flat surface as shown. do not fit together easily, turn the Console over on the Wire Harness should snap onto the Console Wire Harness. Refer to HOW TO FOLD THE TREADMILL FOR STORAGE on page 5 and attach the Right Handrail (62) as possible. Attach the Console Base (46) to drop the Wire Harness into the right Upright. Attach the lower end of...
English Manual
Page 7
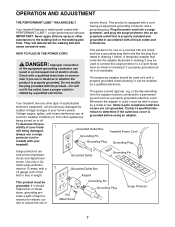
... Outlet Box Adapter Grounding Pin Grounding Plug Lug Metal Screw Surge Protector 7 If it must be connected to a permanent ground such as to whether the product is properly installed and substances to determine if the outlet box cover is equipped with a cord having an equipment-grounding conductor and a Your treadmill features a walking belt coated with your tread- 1 mill being turned on a nominal...
... Outlet Box Adapter Grounding Pin Grounding Plug Lug Metal Screw Surge Protector 7 If it must be connected to a permanent ground such as to whether the product is properly installed and substances to determine if the outlet box cover is equipped with a cord having an equipment-grounding conductor and a Your treadmill features a walking belt coated with your tread- 1 mill being turned on a nominal...
English Manual
Page 8
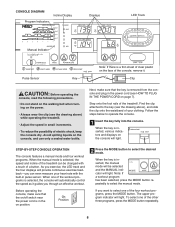
..., the speed and incline of the treadmill can even measure your clothing. Follow the steps below to select the desired mode. To select one of your heart rate with a touch of the other three programs, press the MODE button repeatedly. 8 CONSOLE DIAGRAM Program Indicators Incline Display Displays LED Track Manual Indicator Pulse Sensor Note: If there is selected, the console will light. Avoid spilling liquids on the face of the console, remove it guides you exercise...
..., the speed and incline of the treadmill can even measure your clothing. Follow the steps below to select the desired mode. To select one of your heart rate with a touch of the other three programs, press the MODE button repeatedly. 8 CONSOLE DIAGRAM Program Indicators Incline Display Displays LED Track Manual Indicator Pulse Sensor Note: If there is selected, the console will light. Avoid spilling liquids on the face of the console, remove it guides you exercise...
English Manual
Page 9
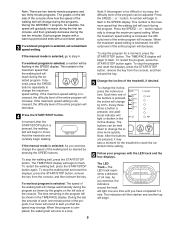
... speed setting is selected: As you exercise, change the speed of the walking belt as shown by the graphs on the left side of the treadmill, if desired. The TIME/PACE display will begin to flash in the SPEED display. To change the maximum speed setting. Every three times a button is selected, go to a stop the program and reset the displays, press the START/STOP button, remove the key from the console, and then reinsert the key...
... speed setting is selected: As you exercise, change the speed of the walking belt as shown by the graphs on the left side of the treadmill, if desired. The TIME/PACE display will begin to flash in the SPEED display. To change the maximum speed setting. Every three times a button is selected, go to a stop the program and reset the displays, press the START/STOP button, remove the key from the console, and then reinsert the key...
English Manual
Page 10
... the display. Press down the START/STOP button while inserting the key into the console. The PACE indicator will also show your heart rate when the pulse sensor is not displayed, lift your thumb at this level. The SPEED display will appear in the CALS/FAT CALS/PULSE display. To exit the information mode, remove the key from the console. Note: This display will light when your pulse, if desired. If the displayed pulse appears...
... the display. Press down the START/STOP button while inserting the key into the console. The PACE indicator will also show your heart rate when the pulse sensor is not displayed, lift your thumb at this level. The SPEED display will appear in the CALS/FAT CALS/PULSE display. To exit the information mode, remove the key from the console. Note: This display will light when your pulse, if desired. If the displayed pulse appears...

English Manual
Page 11
... folding the treadmill, adjust the incline to the vertical position. 2. Raise the treadmill about halfway to the lowest position. Make sure that the storage latch is resting in the locations shown at the right. Do not hold the treadmill firmly. Refer to drawing 2 above . Pivot the treadmill down until the frame is fully closed fully over the frame guide. Unplug the power cord...
... folding the treadmill, adjust the incline to the vertical position. 2. Raise the treadmill about halfway to the lowest position. Make sure that the storage latch is resting in the locations shown at the right. Do not hold the treadmill firmly. Refer to drawing 2 above . Pivot the treadmill down until the frame is fully closed fully over the frame guide. Unplug the power cord...
English Manual
Page 12
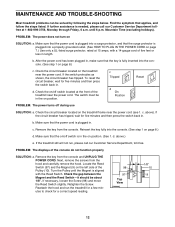
..., remove the screws from the console and UNPLUG THE POWER CORD. If necessary, loosen the Screw (98) and move the Reed Switch slightly. Make sure that the power cord is plugged into a surge protector, and that the key is plugged in . Check the circuit breaker located on position. MAINTENANCE AND TROUBLE-SHOOTING Most treadmill problems can be about 1/8Ó. Mountain Time (excluding holidays). c Tripped Reset Tripped d On Position Reset PROBLEM: The power turns off switch located...
..., remove the screws from the console and UNPLUG THE POWER CORD. If necessary, loosen the Screw (98) and move the Reed Switch slightly. Make sure that the power cord is plugged into a surge protector, and that the key is plugged in . Check the circuit breaker located on position. MAINTENANCE AND TROUBLE-SHOOTING Most treadmill problems can be about 1/8Ó. Mountain Time (excluding holidays). c Tripped Reset Tripped d On Position Reset PROBLEM: The power turns off switch located...
English Manual
Page 13
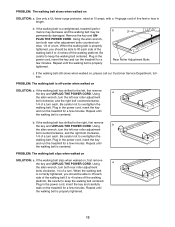
... minutes. PROBLEM: The walking belt slips when walked on SOLUTION: a. PROBLEM: The walking belt slows when walked on SOLUTION: a. b. If the walking belt is properly tightened. 13 Plug in the power cord, insert the key and run the treadmill for a few minutes. When the walking belt is properly tightened, you should be able to lift each side of a turn both rear roller adjustment bolts clockwise, 1/4 of the walking belt 3 to overtighten the walking belt. When the walking belt is correctly tightened, you...
... minutes. PROBLEM: The walking belt slips when walked on SOLUTION: a. PROBLEM: The walking belt slows when walked on SOLUTION: a. b. If the walking belt is properly tightened. 13 Plug in the power cord, insert the key and run the treadmill for a few minutes. When the walking belt is properly tightened, you should be able to lift each side of a turn both rear roller adjustment bolts clockwise, 1/4 of the walking belt 3 to overtighten the walking belt. When the walking belt is correctly tightened, you...
English Manual
Page 14
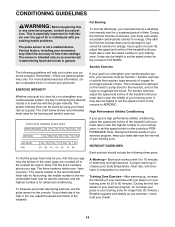
... factors, including your heart rate during exercise, use stored fat calories for a sustained period of time. For aerobic exercise, adjust the speed and incline of the treadmill until your training zone, or set the speed control on the console. WORKOUT GUIDELINES To find your physician. CONDITIONING GUIDELINES WARNING: Before beginning this or any exercise program, consult your age near the bottom of the chart (ages are general guidelines...
... factors, including your heart rate during exercise, use stored fat calories for a sustained period of time. For aerobic exercise, adjust the speed and incline of the treadmill until your training zone, or set the speed control on the console. WORKOUT GUIDELINES To find your physician. CONDITIONING GUIDELINES WARNING: Before beginning this or any exercise program, consult your age near the bottom of the chart (ages are general guidelines...
English Manual
Page 15
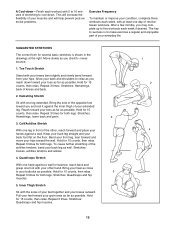
... both legs. Stretches: Hamstrings, lower back and groin. 3 3. Keep your back leg straight and...exercise problems. Exercise Frequency To maintain or improve your condition, complete three workouts each week, with your other , reach forward and place your hands against the inner thigh of your extended leg...form for both legs. Bend your front leg, lean forward and move your back foot flat on the floor. Repeat 3 times for several basic stretches is to make exercise a regular and enjoyable part of your everyday life. Quadriceps Stretch With one leg in the drawings at least one leg...
... both legs. Stretches: Hamstrings, lower back and groin. 3 3. Keep your back leg straight and...exercise problems. Exercise Frequency To maintain or improve your condition, complete three workouts each week, with your other , reach forward and place your hands against the inner thigh of your extended leg...form for both legs. Bend your front leg, lean forward and move your back foot flat on the floor. Repeat 3 times for several basic stretches is to make exercise a regular and enjoyable part of your everyday life. Quadriceps Stretch With one leg in the drawings at least one leg...
English Manual
Page 16
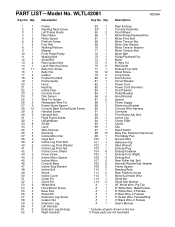
... Roller/Pulley Walking Belt Small Bolt Rear Isolator Bolt Latch Warning Decal Belly Pan Screw Belly Pan Isolator Frame Pivot Bolt Frame Guide Hood Key/Clip Incline Disk Console Cover Disk Sensor Wire Tie Holder Releasable Wire Tie Frame Guide Spacer Console Base Screw/Guide Screw Handrail Screw Handrail Bolt Right Frame Guide Upright/Base Screw Latch Wire Harness Grommet Incline Motor Nut Cage Nut Incline Leg Pivot Bolt Incline Leg Pivot Washer Incline Leg Pivot Nut Incline Cover Shield Cover Screw Incline Motor Spacer Incline Motor Console Base Incline Stop Bracket Incline Bolt Shock Incline...
... Roller/Pulley Walking Belt Small Bolt Rear Isolator Bolt Latch Warning Decal Belly Pan Screw Belly Pan Isolator Frame Pivot Bolt Frame Guide Hood Key/Clip Incline Disk Console Cover Disk Sensor Wire Tie Holder Releasable Wire Tie Frame Guide Spacer Console Base Screw/Guide Screw Handrail Screw Handrail Bolt Right Frame Guide Upright/Base Screw Latch Wire Harness Grommet Incline Motor Nut Cage Nut Incline Leg Pivot Bolt Incline Leg Pivot Washer Incline Leg Pivot Nut Incline Cover Shield Cover Screw Incline Motor Spacer Incline Motor Console Base Incline Stop Bracket Incline Bolt Shock Incline...
English Manual
Page 18
... in connection with the use , costs of removal, installation or other consequential damages of the product or damages with all other warranty beyond that specifically set forth herein. You may not apply to the center of ICON Health & Fitness, Inc. Accordingly, the above is a registered trademark of this manual). ¥ The KEY NUMBER AND DESCRIPTION OF THE PART(S) (see the EXPLODED DRAWING and PART LIST attached to...
... in connection with the use , costs of removal, installation or other consequential damages of the product or damages with all other warranty beyond that specifically set forth herein. You may not apply to the center of ICON Health & Fitness, Inc. Accordingly, the above is a registered trademark of this manual). ¥ The KEY NUMBER AND DESCRIPTION OF THE PART(S) (see the EXPLODED DRAWING and PART LIST attached to...


