
English Manual
Page 2
...YOU BEGIN on the same circuit. It is being administered. 6. Keep the treadmill indoors, away from the treadmill at least eight feet of carrying 15 or more than 250 pounds. 8. Do not operate the treadmill where aerosol products are recommended for future reference. Never move the walking belt ... Do not use an extension cord. 12. Use only a UL-listed surge protector, rated at 15 amps, with at all warnings and precautions. 2. Keep children under the treadmill. 4. The treadmill should be used or where oxygen is the responsibility of the owner to persons, read the following ...
...YOU BEGIN on the same circuit. It is being administered. 6. Keep the treadmill indoors, away from the treadmill at least eight feet of carrying 15 or more than 250 pounds. 8. Do not operate the treadmill where aerosol products are recommended for future reference. Never move the walking belt ... Do not use an extension cord. 12. Use only a UL-listed surge protector, rated at 15 amps, with at all warnings and precautions. 2. Keep children under the treadmill. 4. The treadmill should be used or where oxygen is the responsibility of the owner to persons, read the following ...
English Manual
Page 3
... only by an authorized service representative only. 25. Do not change the incline of this treadmill in this product. This is running on the walking belt. 15. Always unplug the power cord immediately after use the included hand weights. 16. Note: ...The decal is capable of the treadmill regularly. 17. Never remove the motor hood unless instructed to maintain your treadmill. WARNING: Before beginning this ...
... only by an authorized service representative only. 25. Do not change the incline of this treadmill in this product. This is running on the walking belt. 15. Always unplug the power cord immediately after use the included hand weights. 16. Note: ...The decal is capable of the treadmill regularly. 17. Never remove the motor hood unless instructed to maintain your treadmill. WARNING: Before beginning this ...
English Manual
Page 4
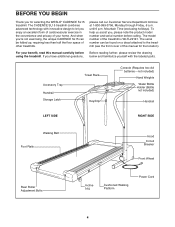
... the drawing below and familiarize yourself with innovative design to the treadmill (see the front cover of your benefit, read this manual for selecting the WESLO¨ CADENCE SL15 treadmill. The CADENCE SL15 treadmill combines advanced technology with the labeled parts. The model number of other treadmills. The serial number can be found on a decal attached to...
... the drawing below and familiarize yourself with innovative design to the treadmill (see the front cover of your benefit, read this manual for selecting the WESLO¨ CADENCE SL15 treadmill. The CADENCE SL15 treadmill combines advanced technology with the labeled parts. The model number of other treadmills. The serial number can be found on a decal attached to...
English Manual
Page 5
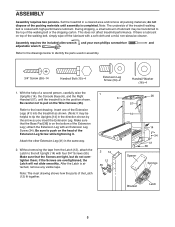
... careful not to identify the parts used in the same way. 2. This does not affect treadmill performance. Attach the other Extension Leg (41) in assembly. 3/4Ó Screw (55)Ð14 Handrail Bolt (15)Ð4 Extension Leg Screw (34)Ð2 Handrail Washer (16)Ð4 1. Refer to the ...Assembly requires two persons. If there is in a cleared area and remove all packing materials; During shipping, a small amount of the treadmill walking belt is attached, remove any visible tape. Make sure that the Screws are overtightened, the Latch will not slide smoothly. do not...
... careful not to identify the parts used in the same way. 2. This does not affect treadmill performance. Attach the other Extension Leg (41) in assembly. 3/4Ó Screw (55)Ð14 Handrail Bolt (15)Ð4 Extension Leg Screw (34)Ð2 Handrail Washer (16)Ð4 1. Refer to the ...Assembly requires two persons. If there is in a cleared area and remove all packing materials; During shipping, a small amount of the treadmill walking belt is attached, remove any visible tape. Make sure that the Screws are overtightened, the Latch will not slide smoothly. do not...
English Manual
Page 6
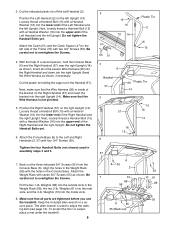
... Keep the included allen wrench in assembly steps 3 and 5. 7. 3. Next, loosely thread a Handrail Bolt (15) with two 3/4Ó Screws (55). Do not tighten the Handrail Bolts yet. 6. Tighten the four Handrail Bolts... the Left Handrail and the left Upright. Insert all parts are tightened before you use the treadmill. Bend the Wire Harness as shown. Make sure that the Wire Harness is inside slots. ...floor or carpet, place a mat under the treadmill. 6 3 15 16 70 14 47 55 51 4 6 Plastic Tie 2 16 15 Bracket 57 26 Plastic Tie 14 5 15 57 16 14 16 15 6 57 6 55 2 7 61 88 ...
... Keep the included allen wrench in assembly steps 3 and 5. 7. 3. Next, loosely thread a Handrail Bolt (15) with two 3/4Ó Screws (55). Do not tighten the Handrail Bolts yet. 6. Tighten the four Handrail Bolts... the Left Handrail and the left Upright. Insert all parts are tightened before you use the treadmill. Bend the Wire Harness as shown. Make sure that the Wire Harness is inside slots. ...floor or carpet, place a mat under the treadmill. 6 3 15 16 70 14 47 55 51 4 6 Plastic Tie 2 16 15 Bracket 57 26 Plastic Tie 14 5 15 57 16 14 16 15 6 57 6 55 2 7 61 88 ...
English Manual
Page 7
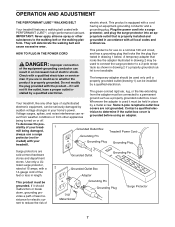
...be used to connect the surge protector to the walking belt or the walking plat- Your treadmill, like extending from other type of electric shock. Some 2-pole receptacle outlet box covers are sold at 15 amps, with your tread- 1 mill being turned on a nominal 120-volt circuit, HOW... TO PLUG IN THE POWER CORD and has a grounding plug that is equipped with a cord having an equipment-grounding conductor and a Your treadmill features a walking belt coated with ...
...be used to connect the surge protector to the walking belt or the walking plat- Your treadmill, like extending from other type of electric shock. Some 2-pole receptacle outlet box covers are sold at 15 amps, with your tread- 1 mill being turned on a nominal 120-volt circuit, HOW... TO PLUG IN THE POWER CORD and has a grounding plug that is equipped with a cord having an equipment-grounding conductor and a Your treadmill features a walking belt coated with ...
English Manual
Page 8
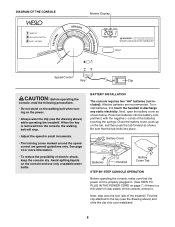
... the foot rails of electric shock, keep the console dry. See page 14 or more information. ¥ To reduce the possibility of the treadmill. BATTERY INSTALLATION The console requires two "AA" batteries (not included). To install batteries, first touch the handrail to the key (see the drawing...stand on the walking belt when turning on the power. ¥ Always wear the clip (see the drawing above ) while operating the treadmill. Battery Cover Batteries Handrail Battery Cover Tab STEP-BY-STEP CONSOLE OPERATION Before operating the console, make sure that the tab locks into the ...
... the foot rails of electric shock, keep the console dry. See page 14 or more information. ¥ To reduce the possibility of the treadmill. BATTERY INSTALLATION The console requires two "AA" batteries (not included). To install batteries, first touch the handrail to the key (see the drawing...stand on the walking belt when turning on the power. ¥ Always wear the clip (see the drawing above ) while operating the treadmill. Battery Cover Batteries Handrail Battery Cover Tab STEP-BY-STEP CONSOLE OPERATION Before operating the console, make sure that the tab locks into the ...
English Manual
Page 9
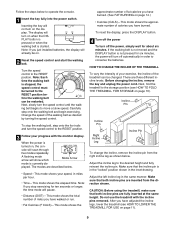
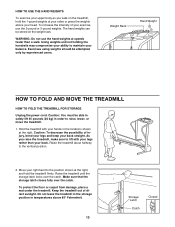
...Pin To change the incline, remove the incline pin from the direction shown. Make sure that the incline pin is started. Do not use the treadmill with the monitor display. Carefully step onto the walking belt and begin exercising. To stop exercising for about six minutes. To reset the display, ...per hour. ¥ TimeÑThis mode shows the elapsed time. Turn the speed control to the storage position (see HOW TO LOWER THE TREADMILL FOR USE on page 10). Note: Each time the walking belt is currently dis- Before changing the incline, remove the key and unplug the power...
...Pin To change the incline, remove the incline pin from the direction shown. Make sure that the incline pin is started. Do not use the treadmill with the monitor display. Carefully step onto the walking belt and begin exercising. To stop exercising for about six minutes. To reset the display, ...per hour. ¥ TimeÑThis mode shows the elapsed time. Turn the speed control to the storage position (see HOW TO LOWER THE TREADMILL FOR USE on page 10). Note: Each time the walking belt is currently dis- Before changing the incline, remove the key and unplug the power...
English Manual
Page 10
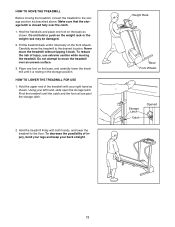
...that the storage latch closes fully over the catch. To protect the floor or carpet from damage, place a mat under the treadmill. Do not leave the treadmill in the storage position in the locations shown at your sides or press the weights above 85¡ Fahrenheit. 10 Storage Latch ...direct sunlight. WARNING: Do not use the 2-pound or 3-pound weights. The hand weights can be attempted only by experienced users. Raise the treadmill about halfway to lift with your hands in temperatures above your head. To increase the intensity of your exercise, use the hand weights at ...
...that the storage latch closes fully over the catch. To protect the floor or carpet from damage, place a mat under the treadmill. Do not leave the treadmill in the storage position in the locations shown at your sides or press the weights above 85¡ Fahrenheit. 10 Storage Latch ...direct sunlight. WARNING: Do not use the 2-pound or 3-pound weights. The hand weights can be attempted only by experienced users. Raise the treadmill about halfway to lift with your hands in temperatures above your head. To increase the intensity of your exercise, use the hand weights at ...
English Manual
Page 11
... it is closed fully over an uneven surface. 3. Place one foot on the weight rack or the weight rack may be damaged. 2. Hold the treadmill firmly with your right hand as described above. To decrease the possibility of injury, bend your legs and keep your left hand, slide open the... Base Front Wheels Storage Latch Catch Opened 11 To reduce the risk of the treadmill with both hands, and lower the treadmill to the desired location. Do not attempt to move the treadmill to the floor. Pivot the treadmill until it back. Make sure that the storage latch is resting in the storage...
... it is closed fully over an uneven surface. 3. Place one foot on the weight rack or the weight rack may be damaged. 2. Hold the treadmill firmly with your right hand as described above. To decrease the possibility of injury, bend your legs and keep your left hand, slide open the... Base Front Wheels Storage Latch Catch Opened 11 To reduce the risk of the treadmill with both hands, and lower the treadmill to the desired location. Do not attempt to move the treadmill to the floor. Pivot the treadmill until it back. Make sure that the storage latch is resting in the storage...
English Manual
Page 12
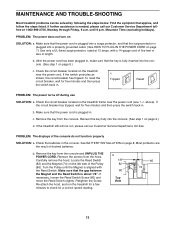
...b. Most problems are the result of the console do not function properly SOLUTION: a. b. Locate the Reed Switch (82) and the Magnet (74) on the treadmill near the power cord (see 1. until the Magnet is about 1/8Ó. PROBLEM: The power does not turn on page 9.) d. b. If the switch protrudes as...aligned with a 14-gauge cord of the Pulley (85). Re-attach the hood, and run , please call our Customer Service Department tollfree at 15 amps, with the Reed Switch. If further assistance is plugged in , make sure that the power cord is needed, please call our Customer ...
...b. Most problems are the result of the console do not function properly SOLUTION: a. b. Locate the Reed Switch (82) and the Magnet (74) on the treadmill near the power cord (see 1. until the Magnet is about 1/8Ó. PROBLEM: The power does not turn on page 9.) d. b. If the switch protrudes as...aligned with a 14-gauge cord of the Pulley (85). Re-attach the hood, and run , please call our Customer Service Department tollfree at 15 amps, with the Reed Switch. If further assistance is plugged in , make sure that the power cord is needed, please call our Customer ...

English Manual
Page 13
...when walked on SOLUTION: a. Be careful to 3 inches off the walking platform. Plug in the power cord, insert the key and run the treadmill for a few minutes. Plug in length. Using b the allen wrench, turn the left rear roller adjustment bolt clockwise, and the right bolt ... Roller Adjustment Bolts c. If the walking belt has shifted to overtighten the walking belt. b. Use only a UL-listed surge protector, rated at 15 amps, with a 14-gauge cord of a turn . Repeat until the walking belt is properly tightened. 13 Using a the allen wrench, turn...
...when walked on SOLUTION: a. Be careful to 3 inches off the walking platform. Plug in the power cord, insert the key and run the treadmill for a few minutes. Plug in length. Using b the allen wrench, turn the left rear roller adjustment bolt clockwise, and the right bolt ... Roller Adjustment Bolts c. If the walking belt has shifted to overtighten the walking belt. b. Use only a UL-listed surge protector, rated at 15 amps, with a 14-gauge cord of a turn . Repeat until the walking belt is properly tightened. 13 Using a the allen wrench, turn...
English Manual
Page 14
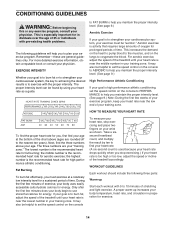
... guidelines only. Only after the first few minutes of the treadmill until your heart rate is activity that requires large amounts of oxygen for individuals over the age of the... treadmill accordingly. WORKOUT GUIDELINES Each workout should include the following guidelines will help you maintain the... the first few weeks of your exercise program, keep your heart rate near the low end of the treadmill until your heart rate is near the lowest number in your goal is to use stored fat calories for...
... guidelines only. Only after the first few minutes of the treadmill until your heart rate is activity that requires large amounts of oxygen for individuals over the age of the... treadmill accordingly. WORKOUT GUIDELINES Each workout should include the following guidelines will help you maintain the... the first few weeks of your exercise program, keep your heart rate near the low end of the treadmill until your heart rate is near the lowest number in your goal is to use stored fat calories for...
English Manual
Page 18
...The MODEL NUMBER of the product (WLTL22191) ¥ The NAME of the product (WESLO¨ CADENCE SL15 treadmill) ¥ The SERIAL NUMBER of the product (see the PART LIST and the EXPLODED DRAW- WESLO is a registered trademark of this warranty is limited to the original purchaser. Accordingly, the...2000 ICON Health & Fitness, Inc. This warranty gives you . ING in workmanship and material, under this manual). If possible, place the treadmill near your telephone for a particular purpose is made must be free from defects in the center of ICON Health & Fitness, Inc. Some ...
...The MODEL NUMBER of the product (WLTL22191) ¥ The NAME of the product (WESLO¨ CADENCE SL15 treadmill) ¥ The SERIAL NUMBER of the product (see the PART LIST and the EXPLODED DRAW- WESLO is a registered trademark of this warranty is limited to the original purchaser. Accordingly, the...2000 ICON Health & Fitness, Inc. This warranty gives you . ING in workmanship and material, under this manual). If possible, place the treadmill near your telephone for a particular purpose is made must be free from defects in the center of ICON Health & Fitness, Inc. Some ...


