

English Manual
Page 1
...., 6 a.m.Ð6 p.m. MST CAUTION Read all precautions and instructions in this manual before using this manual for future reference. USER'S MANUAL Visit our website at www.weslo.com new products, prizes, fitness tips, and much more! ¨ Model No. TO AVOID UNNECESSARY DELAYS, PLEASE CALL DIRECT TO OUR TOLL-FREE CUSTOMER HOT LINE. The trained technicians on our Customer Hot Line will guarantee...
...., 6 a.m.Ð6 p.m. MST CAUTION Read all precautions and instructions in this manual before using this manual for future reference. USER'S MANUAL Visit our website at www.weslo.com new products, prizes, fitness tips, and much more! ¨ Model No. TO AVOID UNNECESSARY DELAYS, PLEASE CALL DIRECT TO OUR TOLL-FREE CUSTOMER HOT LINE. The trained technicians on our Customer Hot Line will guarantee...
English Manual
Page 2
... the owner to persons, read the following important precautions and information before operating the treadmill. 1. The treadmill should be used or where oxygen is turned off. TABLE OF CONTENTS IMPORTANT PRECAUTIONS 2 BEFORE YOU BEGIN 4 ASSEMBLY 5 OPERATION AND ADJUSTMENT 7 HOW TO FOLD AND MOVE THE TREADMILL 10 MAINTENANCE AND TROUBLE-SHOOTING 12 CONDITIONING GUIDELINES 14 ORDERING REPLACEMENT PARTS Back Cover LIMITED WARRANTY Back Cover Note: An EXPLODED DRAWING and a PART LIST are attached...
... the owner to persons, read the following important precautions and information before operating the treadmill. 1. The treadmill should be used or where oxygen is turned off. TABLE OF CONTENTS IMPORTANT PRECAUTIONS 2 BEFORE YOU BEGIN 4 ASSEMBLY 5 OPERATION AND ADJUSTMENT 7 HOW TO FOLD AND MOVE THE TREADMILL 10 MAINTENANCE AND TROUBLE-SHOOTING 12 CONDITIONING GUIDELINES 14 ORDERING REPLACEMENT PARTS Back Cover LIMITED WARRANTY Back Cover Note: An EXPLODED DRAWING and a PART LIST are attached...
English Manual
Page 3
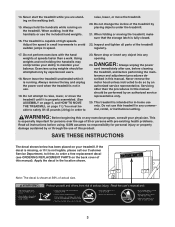
When folding or moving the treadmill, make sure that the storage latch is capable of this manual. Always remove the key and unplug the power cord when the treadmill is not in use the included hand weights. 16. Do not attempt to raise, lower, or move the treadmill. 20. DANGER: 24. Never remove the motor hood unless instructed to maintain your treadmill. Do not use of high speeds. WARNING: Before beginning this treadmill in this...
When folding or moving the treadmill, make sure that the storage latch is capable of this manual. Always remove the key and unplug the power cord when the treadmill is not in use the included hand weights. 16. Do not attempt to raise, lower, or move the treadmill. 20. DANGER: 24. Never remove the motor hood unless instructed to maintain your treadmill. Do not use of high speeds. WARNING: Before beginning this treadmill in this...
English Manual
Page 4
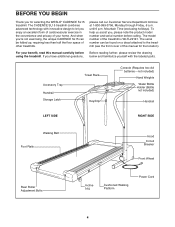
... 6 p.m. The model number of the treadmill is WLTL22191. please call our Customer Service Department toll-free at 1-800-999-3756, Monday through Friday, 6 a.m. Accessory Tray Handrail Storage Latch Towel Rack Key/Clip Console (Requires two AA batteriesÑnot included) Hand Weights Water Bottle Holder (Bottle not included) Handrail LEFT SIDE RIGHT SIDE Walking Belt Foot Rails Hood Circuit Breaker Front Wheel Rear Roller Adjustment Bolts Incline Leg Cushioned Walking Platform Power Cord 4
... 6 p.m. The model number of the treadmill is WLTL22191. please call our Customer Service Department toll-free at 1-800-999-3756, Monday through Friday, 6 a.m. Accessory Tray Handrail Storage Latch Towel Rack Key/Clip Console (Requires two AA batteriesÑnot included) Hand Weights Water Bottle Holder (Bottle not included) Handrail LEFT SIDE RIGHT SIDE Walking Belt Foot Rails Hood Circuit Breaker Front Wheel Rear Roller Adjustment Bolts Incline Leg Cushioned Walking Platform Power Cord 4
English Manual
Page 5
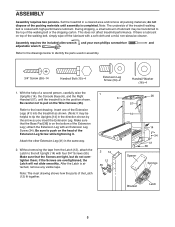
... the parts of the Extension Leg Screw while tightening it. Assembly requires the included allen wrench and your own phillips screwdriver and adjustable wrench . do not overtighten them; Note: The underside of the walking belt, simply wipe off the lubricant with high-performance lubricant. Refer to push on top of the treadmill walking belt is attached, remove any visible tape. ASSEMBLY Assembly requires two persons. Set the treadmill in...
... the parts of the Extension Leg Screw while tightening it. Assembly requires the included allen wrench and your own phillips screwdriver and adjustable wrench . do not overtighten them; Note: The underside of the walking belt, simply wipe off the lubricant with high-performance lubricant. Refer to push on top of the treadmill walking belt is attached, remove any visible tape. ASSEMBLY Assembly requires two persons. Set the treadmill in...
English Manual
Page 6
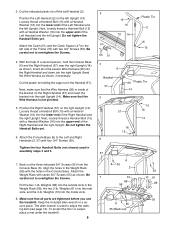
... overtighten the Screws. 4. Attach the Console Base (6) to adjust the walking belt (see page 13). Put the two 1-lb. Do not tighten the Handrail Bolts yet. Bend the Wire Harness as shown. Next, make sure that all of the Left Handrail and the left Upright. Weights (88)...lb. Weights (61) into the right Upright. Cut the indicated plastic tie off the Left Handrail (2). Insert all parts are tightened before you use the treadmill. Do not tighten the Handrail Bolts yet. 6. Loosely thread a Handrail Bolt (15) with a Handrail Washer (16) into the outside slots in assembly steps 3...
... overtighten the Screws. 4. Attach the Console Base (6) to adjust the walking belt (see page 13). Put the two 1-lb. Do not tighten the Handrail Bolts yet. Bend the Wire Harness as shown. Next, make sure that all of the Left Handrail and the left Upright. Weights (88)...lb. Weights (61) into the right Upright. Cut the indicated plastic tie off the Left Handrail (2). Insert all parts are tightened before you use the treadmill. Do not tighten the Handrail Bolts yet. 6. Loosely thread a Handrail Bolt (15) with a Handrail Washer (16) into the outside slots in assembly steps 3...
English Manual
Page 7
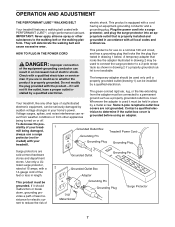
... and a Your treadmill features a walking belt coated with a 14-gauge cord of your treadmill. Grounding Plug Grounding Plug Surge protectors are not grounded. used only until a properly grounded outlet (drawing 1) can result in accordance with your tread- 1 mill being turned on a nominal 120-volt circuit, HOW TO PLUG IN THE POWER CORD and has a grounding plug that looks like the adapter illustrated in drawing...
... and a Your treadmill features a walking belt coated with a 14-gauge cord of your treadmill. Grounding Plug Grounding Plug Surge protectors are not grounded. used only until a properly grounded outlet (drawing 1) can result in accordance with your tread- 1 mill being turned on a nominal 120-volt circuit, HOW TO PLUG IN THE POWER CORD and has a grounding plug that looks like the adapter illustrated in drawing...
English Manual
Page 8
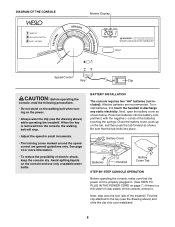
... the tab forward as shown below. Next, open the battery cover as shown. Find the clip attached to discharge any static electricity. When the key is removed from the console, the walking belt will stop. ¥ Adjust the speed in . (See HOW TO PLUG IN THE POWER CORD on the console, remove it. BATTERY INSTALLATION The console requires two "AA" batteries (not included). Next, step onto the foot rails of clear plastic...
... the tab forward as shown below. Next, open the battery cover as shown. Find the clip attached to discharge any static electricity. When the key is removed from the console, the walking belt will stop. ¥ Adjust the speed in . (See HOW TO PLUG IN THE POWER CORD on the console, remove it. BATTERY INSTALLATION The console requires two "AA" batteries (not included). Next, step onto the foot rails of clear plastic...
English Manual
Page 9
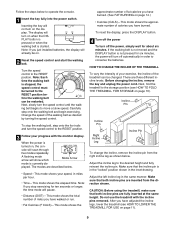
...; Distance (DIST)ÑThis mode shows the total number of miles you stop the walking belt, step onto the foot rails and turn on the display. Inserting the key will turn on when the DISPLAY button is pressed or when the walking belt is not pressed for about six minutes. Adjust the left incline leg in the inset drawing. Incline Pin Incline Pin Right Incline Leg Incline Pin To change the incline, remove the incline pin from the direction shown. Do not use the treadmill with the monitor display...
...; Distance (DIST)ÑThis mode shows the total number of miles you stop the walking belt, step onto the foot rails and turn on the display. Inserting the key will turn on when the DISPLAY button is pressed or when the walking belt is not pressed for about six minutes. Adjust the left incline leg in the inset drawing. Incline Pin Incline Pin Right Incline Leg Incline Pin To change the incline, remove the incline pin from the direction shown. Do not use the treadmill with the monitor display...
English Manual
Page 10
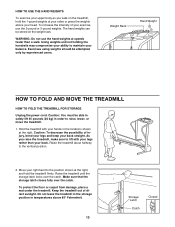
... your hands in the locations shown at your sides or press the weights above 85¡ Fahrenheit. 10 Storage Latch Catch Closed To increase the intensity of your exercise, use the hand weights at the right, and hold the 1-pound weights at the right. Weight Rack Hand Weight HOW TO FOLD AND MOVE THE TREADMILL HOW TO FOLD THE TREADMILL FOR STORAGE Unplug the power cord. Caution: You must...
... your hands in the locations shown at your sides or press the weights above 85¡ Fahrenheit. 10 Storage Latch Catch Closed To increase the intensity of your exercise, use the hand weights at the right, and hold the 1-pound weights at the right. Weight Rack Hand Weight HOW TO FOLD AND MOVE THE TREADMILL HOW TO FOLD THE TREADMILL FOR STORAGE Unplug the power cord. Caution: You must...
English Manual
Page 11
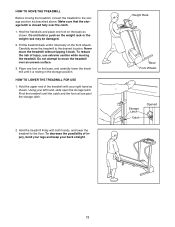
... LOWER THE TREADMILL FOR USE 1. Weight Rack Base Front Wheels Storage Latch Catch Opened 11 To reduce the risk of the treadmill with both hands, and lower the treadmill to the desired location. Place one foot on the weight rack or the weight rack may be damaged. 2. Using your back straight. Never move the treadmill to the floor. To decrease the possibility of injury, bend your legs...
... LOWER THE TREADMILL FOR USE 1. Weight Rack Base Front Wheels Storage Latch Catch Opened 11 To reduce the risk of the treadmill with both hands, and lower the treadmill to the desired location. Place one foot on the weight rack or the weight rack may be damaged. 2. Using your back straight. Never move the treadmill to the floor. To decrease the possibility of injury, bend your legs...
English Manual
Page 12
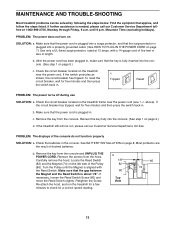
... THE POWER CORD on page 9.) d. b. c Tripped Reset Tripped Reset PROBLEM: The power turns off during use SOLUTION: a. c. PROBLEM: The displays of the Pulley (85). Remove the key from the hood. Remove the screws from the console and UNPLUG THE POWER CORD. MAINTENANCE AND TROUBLE-SHOOTING Most treadmill problems can be solved by following the steps below. Find the symptom that the power cord is needed, please call our Customer Service Department, toll-free. If further assistance is plugged in . To reset...
... THE POWER CORD on page 9.) d. b. c Tripped Reset Tripped Reset PROBLEM: The power turns off during use SOLUTION: a. c. PROBLEM: The displays of the Pulley (85). Remove the key from the hood. Remove the screws from the console and UNPLUG THE POWER CORD. MAINTENANCE AND TROUBLE-SHOOTING Most treadmill problems can be solved by following the steps below. Find the symptom that the power cord is needed, please call our Customer Service Department, toll-free. If further assistance is plugged in . To reset...

English Manual
Page 13
... -center SOLUTION: a. Plug in length. Use only a UL-listed surge protector, rated at 15 amps, with a 14-gauge cord of a turn the left , first remove a the key and UNPLUG THE POWER CORD. b. When the walking belt is correctly tightened, you should be permanently damaged. Using a the allen wrench, turn both rear roller adjustment bolts counterclockwise, 1/4 of a turn . Using the allen wrench, turn both rear roller adjustment bolts clockwise, 1/4 of a turn . Using the allen wrench, turn each . If the walking belt has shifted...
... -center SOLUTION: a. Plug in length. Use only a UL-listed surge protector, rated at 15 amps, with a 14-gauge cord of a turn the left , first remove a the key and UNPLUG THE POWER CORD. b. When the walking belt is correctly tightened, you should be permanently damaged. Using a the allen wrench, turn both rear roller adjustment bolts counterclockwise, 1/4 of a turn . Using the allen wrench, turn both rear roller adjustment bolts clockwise, 1/4 of a turn . Using the allen wrench, turn each . If the walking belt has shifted...
English Manual
Page 14
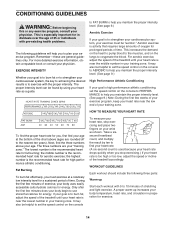
... goal is high performance athletic conditioning, set the speed control on the console To measure your heart rate, stop exercising.) If your cardiovascular system, the key to achieving the desired results is near the low end of time. A proper warm-up Start each workout with pre-existing health problems. The following three parts: Warm-up increases your body begin to the nearest ten years). Only...
... goal is high performance athletic conditioning, set the speed control on the console To measure your heart rate, stop exercising.) If your cardiovascular system, the key to achieving the desired results is near the low end of time. A proper warm-up Start each workout with pre-existing health problems. The following three parts: Warm-up increases your body begin to the nearest ten years). Only...
English Manual
Page 15
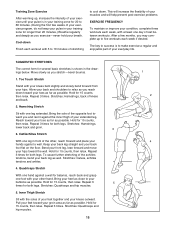
...post-exercise problems. EXERCISE FREQUENCY To maintain or improve your condition, complete three workouts each week, with one day of rest between workouts. Repeat 3 times. Hamstring Stretch Sit with at least one leg extended. Hold for 15 counts, then relax. Stretches: Hamstrings, lower back and groin. 3 3. Hold for 15 counts...of your exercise until your pulse is in your training zone for 20 to 60 minutes. (During the first few months, you and rest it against a wall. Keep your back leg straight and your everyday life. Bend your front leg, lean forward and move your ...
...post-exercise problems. EXERCISE FREQUENCY To maintain or improve your condition, complete three workouts each week, with one day of rest between workouts. Repeat 3 times. Hamstring Stretch Sit with at least one leg extended. Hold for 15 counts, then relax. Stretches: Hamstrings, lower back and groin. 3 3. Hold for 15 counts...of your exercise until your pulse is in your training zone for 20 to 60 minutes. (During the first few months, you and rest it against a wall. Keep your back leg straight and your everyday life. Bend your front leg, lean forward and move your ...
English Manual
Page 16
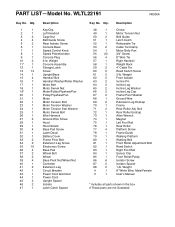
... illustrated Weight Console Assembly Storage Latch Screw Upright/Base Handrail Bolt Handrail Washer/Roller Washer Motor Belt Motor Swivel Nut Motor/Pulley/Flywheel/Fan Pulley/Flywheel/Fan Motor Motor Tension Bolt Motor Tension Washer Motor Tension Star Washer Motor Swivel Bolt Wire Harness Ground Wire Screw Hood Hood Shield Base Pad Screw Latch Decal Battery Cover Frame Pivot Bolt Extension Leg Screw Electronics Screw Base Pad Wheel Bolt Wheel Base Pivot Nut/Wheel Nut Controller Extension Leg Circuit Breaker Power Cord Grommet Power Cord Upright Spacer Isolator Latch Catch Spacer Key No...
... illustrated Weight Console Assembly Storage Latch Screw Upright/Base Handrail Bolt Handrail Washer/Roller Washer Motor Belt Motor Swivel Nut Motor/Pulley/Flywheel/Fan Pulley/Flywheel/Fan Motor Motor Tension Bolt Motor Tension Washer Motor Tension Star Washer Motor Swivel Bolt Wire Harness Ground Wire Screw Hood Hood Shield Base Pad Screw Latch Decal Battery Cover Frame Pivot Bolt Extension Leg Screw Electronics Screw Base Pad Wheel Bolt Wheel Base Pivot Nut/Wheel Nut Controller Extension Leg Circuit Breaker Power Cord Grommet Power Cord Upright Spacer Isolator Latch Catch Spacer Key No...
English Manual
Page 18
... desired part(s) (see the PART LIST and the EXPLODED DRAW- This warranty extends only to give the following information: ¥ The MODEL NUMBER of the product (WLTL22191) ¥ The NAME of the product (WESLO¨ CADENCE SL15 treadmill) ¥ The SERIAL NUMBER of the product (see the front cover of this manual) ¥ The KEY NUMBER and DESCRIPTION of this warranty is limited in connection with the use and service conditions...
... desired part(s) (see the PART LIST and the EXPLODED DRAW- This warranty extends only to give the following information: ¥ The MODEL NUMBER of the product (WLTL22191) ¥ The NAME of the product (WESLO¨ CADENCE SL15 treadmill) ¥ The SERIAL NUMBER of the product (see the front cover of this manual) ¥ The KEY NUMBER and DESCRIPTION of this warranty is limited in connection with the use and service conditions...


