
English Manual
Page 2
...surge protector away from moisture and dust. Never allow more than 250 pounds. 8. No other appliance should not be on the walking belt. The treadmill should be used or where oxygen is not working properly. (See BEFORE YOU BEGIN on a surface that could become caught in sandals. 3. ...Keep children under the treadmill. 4. Do not use the treadmill with eight feet of five feet or less in a garage or covered patio, or near water. 5. Remove the PART LIST and ...
...surge protector away from moisture and dust. Never allow more than 250 pounds. 8. No other appliance should not be on the walking belt. The treadmill should be used or where oxygen is not working properly. (See BEFORE YOU BEGIN on a surface that could become caught in sandals. 3. ...Keep children under the treadmill. 4. Do not use the treadmill with eight feet of five feet or less in a garage or covered patio, or near water. 5. Remove the PART LIST and ...
English Manual
Page 3
...months. 22. ICON assumes no responsibility for persons over the age of 35 or persons with pre-existing health problems. Read all parts of the treadmill. 24. The pulse sensor is running. 15. Never remove the motor hood unless instructed to avoid sudden jumps in any opening. 23. Do... not use of heart rate readings. Adjust the speed in small increments to do not operate the treadmill continuously for in general. 17. Servicing other than one hour. 18. WARNING: Before beginning this product. If the decal is missing, or if...
...months. 22. ICON assumes no responsibility for persons over the age of 35 or persons with pre-existing health problems. Read all parts of the treadmill. 24. The pulse sensor is running. 15. Never remove the motor hood unless instructed to avoid sudden jumps in any opening. 23. Do... not use of heart rate readings. Adjust the speed in small increments to do not operate the treadmill continuously for in general. 17. Servicing other than one hour. 18. WARNING: Before beginning this product. If the decal is missing, or if...
English Manual
Page 4
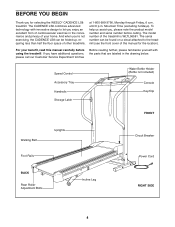
...Before reading further, please familiarize yourself with innovative design to the treadmill (see the front cover of other treadmills. The model number of your benefit, read this manual for selecting the WESLO¨ CADENCE LS8 treadmill. Speed Control Accessory Tray Handrails Storage Latch Water Bottle Holder (...BEFORE YOU BEGIN Thank you , please note the product model number and serial number before using the treadmill. Mountain Time (excluding holidays). The CADENCE LS8 combines advanced technology with the parts that are labeled in the convenience and privacy of the...
...Before reading further, please familiarize yourself with innovative design to the treadmill (see the front cover of other treadmills. The model number of your benefit, read this manual for selecting the WESLO¨ CADENCE LS8 treadmill. Speed Control Accessory Tray Handrails Storage Latch Water Bottle Holder (...BEFORE YOU BEGIN Thank you , please note the product model number and serial number before using the treadmill. Mountain Time (excluding holidays). The CADENCE LS8 combines advanced technology with the parts that are labeled in the convenience and privacy of the...
English Manual
Page 5
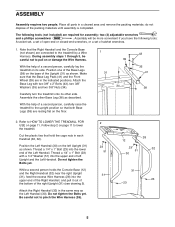
... yet. Refer to the upright position so that the Right Handrail and the Console Base (not shown) are resting flat on page 11 to the treadmill by a Wire Harness. While a second person holds the Console Base (12) and the Right Handrail (32) near the right Upright (31), feed the excess Wire... on the left Upright and the Left Handrail. Place all parts in each Handrail (30, 32). With the help of a second person, carefully lay the treadmill on or damage the Wire Harness. Assemble the other side. Assembly will be careful not to pinch the Wire Harness (28). 2 23 51 31 28...
... yet. Refer to the upright position so that the Right Handrail and the Console Base (not shown) are resting flat on page 11 to the treadmill by a Wire Harness. While a second person holds the Console Base (12) and the Right Handrail (32) near the right Upright (31), feed the excess Wire... on the left Upright and the Left Handrail. Place all parts in each Handrail (30, 32). With the help of a second person, carefully lay the treadmill on or damage the Wire Harness. Assemble the other side. Assembly will be careful not to pinch the Wire Harness (28). 2 23 51 31 28...
English Manual
Page 6
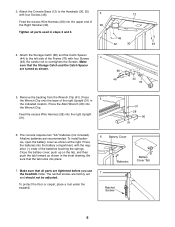
Press the Allen Wrench (90) into the right Upright (31). 31 28 90 91 6. To protect the floor or carpet, place a mat under the treadmill. 6 Battery Cover Batteries 7 Ratchet Screws Battery Cover Tab 6 Make sure that the tab locks into place. 7. Press the Wrench Clip onto the base of... batteries are factory set and should not be adjusted. Be sure that the Storage Catch and the Catch Spacer are tightened before you use the treadmill. Attach the Console Base (12) to overtighten the Screws. Feed the excess Wire Harness (28) into the Wrench Clip. Remove the backing from ...
Press the Allen Wrench (90) into the right Upright (31). 31 28 90 91 6. To protect the floor or carpet, place a mat under the treadmill. 6 Battery Cover Batteries 7 Ratchet Screws Battery Cover Tab 6 Make sure that the tab locks into place. 7. Press the Wrench Clip onto the base of... batteries are factory set and should not be adjusted. Be sure that the Storage Catch and the Catch Spacer are tightened before you use the treadmill. Attach the Console Base (12) to overtighten the Screws. Feed the excess Wire Harness (28) into the Wrench Clip. Remove the backing from ...
English Manual
Page 7
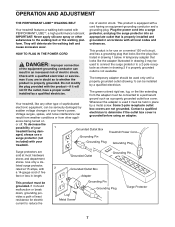
... looks like any other appli- protector, and plug the surge protector into a surge PERFORMANT LUBETM, a high-performance lubricant. Your treadmill, like the plug illus- Use only a ULlisted surge protector, rated at most hardware stores and department stores. not fit the outlet...electric shock. cause excessive wear. A temporary adapter that is equipped with a cord having an equipment-grounding conductor and a Your treadmill features a walking belt coated with a qualified electrician or serviceman if you are in drawing 1 below. Check with grounding plug. ...
... looks like any other appli- protector, and plug the surge protector into a surge PERFORMANT LUBETM, a high-performance lubricant. Your treadmill, like the plug illus- Use only a ULlisted surge protector, rated at most hardware stores and department stores. not fit the outlet...electric shock. cause excessive wear. A temporary adapter that is equipped with a cord having an equipment-grounding conductor and a Your treadmill features a walking belt coated with a qualified electrician or serviceman if you are in drawing 1 below. Check with grounding plug. ...
English Manual
Page 8
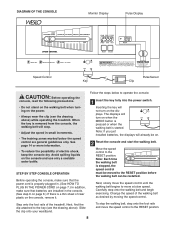
...¥ Do not stand on the walking belt when turning on the power. ¥ Always wear the clip (see the drawing above ) while operating the treadmill. Move the speed control to move the speed control until the walking belt begins to the RESET position. Note: Each time the walking belt is... begin exercising. Next, find the clip attached to the RESET position. 8 See page 14 or more information. ¥ To reduce the possibility of the treadmill. Inserting the key will turn on the displays. Change the speed of clear plastic on when the MODE button is pressed or when the walking...
...¥ Do not stand on the walking belt when turning on the power. ¥ Always wear the clip (see the drawing above ) while operating the treadmill. Move the speed control to move the speed control until the walking belt begins to the RESET position. Note: Each time the walking belt is... begin exercising. Next, find the clip attached to the RESET position. 8 See page 14 or more information. ¥ To reduce the possibility of the treadmill. Inserting the key will turn on the displays. Change the speed of clear plastic on when the MODE button is pressed or when the walking...
English Manual
Page 9
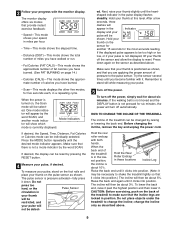
.... 4 Measure your pulse, if desired. Raise the back end until it clicks into position. (Note: It may be necessary to shake the treadmill lightly so that there is positioned as shown. tor will turn off the power. Make sure that it clicks into position. ed. Hold your ...One mode indica- To measure your pulse, stand on page 14.) ¥ Calories (CALS)ÑThis mode shows the approximate number of the treadmill to the pulse sensor. Next, raise your pulse will show which mode is not pressed for another mode indica- Do not place objects under ...
.... 4 Measure your pulse, if desired. Raise the back end until it clicks into position. (Note: It may be necessary to shake the treadmill lightly so that there is positioned as shown. tor will turn off the power. Make sure that it clicks into position. ed. Hold your ...One mode indica- To measure your pulse, stand on page 14.) ¥ Calories (CALS)ÑThis mode shows the approximate number of the treadmill to the pulse sensor. Next, raise your pulse will show which mode is not pressed for another mode indica- Do not place objects under ...
English Manual
Page 10
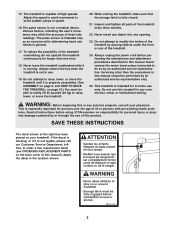
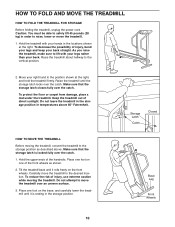
... injury, use extreme caution while moving the treadmill, convert the treadmill to the desired location. Storage Latch Catch Closed HOW TO MOVE THE TREADMILL Before moving the treadmill. HOW TO FOLD AND MOVE THE TREADMILL HOW TO FOLD THE TREADMILL FOR STORAGE Before folding the treadmill, unplug the power cord. Place one foot...to safely lift 45 pounds (20 kg) in temperatures above . To protect the floor or carpet from damage, place a mat under the treadmill. Move your back straight. Make sure that the storage latch is resting in the locations shown at the right, and hold the...
... injury, use extreme caution while moving the treadmill, convert the treadmill to the desired location. Storage Latch Catch Closed HOW TO MOVE THE TREADMILL Before moving the treadmill. HOW TO FOLD AND MOVE THE TREADMILL HOW TO FOLD THE TREADMILL FOR STORAGE Before folding the treadmill, unplug the power cord. Place one foot...to safely lift 45 pounds (20 kg) in temperatures above . To protect the floor or carpet from damage, place a mat under the treadmill. Move your back straight. Make sure that the storage latch is resting in the locations shown at the right, and hold the...
English Manual
Page 11
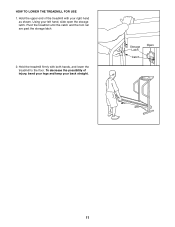
Hold the upper end of injury, bend your legs and keep your left hand, slide open the storage latch. Hold the treadmill firmly with your right hand as shown. HOW TO LOWER THE TREADMILL FOR USE 1. Storage Latch Catch Open 11 Using your back straight. Pivot the treadmill until the catch and the foot rail are past the storage latch. 2. To decrease the possibility of the treadmill with both hands, and lower the treadmill to the floor.
Hold the upper end of injury, bend your legs and keep your left hand, slide open the storage latch. Hold the treadmill firmly with your right hand as shown. HOW TO LOWER THE TREADMILL FOR USE 1. Storage Latch Catch Open 11 Using your back straight. Pivot the treadmill until the catch and the foot rail are past the storage latch. 2. To decrease the possibility of the treadmill with both hands, and lower the treadmill to the floor.
English Manual
Page 12
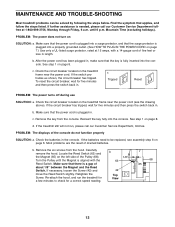
... surge protector, rated at 1-800-999-3756, Monday through Friday, 6 a.m. If the treadmill still will not run the treadmill for five minutes and then press the switch back in the console. See step 1 on the treadmill frame near the power cord. c. Remove the six screws from the console. Carefully remove... the hood. until the Magnet is plugged into a properly grounded outlet. (See HOW TO PLUG IN THE POWER CORD on the treadmill frame near the power cord (see assembly step 6 on page 6. If the switch protrudes as shown, the circuit breaker has tripped. If the...
... surge protector, rated at 1-800-999-3756, Monday through Friday, 6 a.m. If the treadmill still will not run the treadmill for five minutes and then press the switch back in the console. See step 1 on the treadmill frame near the power cord. c. Remove the six screws from the console. Carefully remove... the hood. until the Magnet is plugged into a properly grounded outlet. (See HOW TO PLUG IN THE POWER CORD on the treadmill frame near the power cord (see assembly step 6 on page 6. If the switch protrudes as shown, the circuit breaker has tripped. If the...
English Manual
Page 13
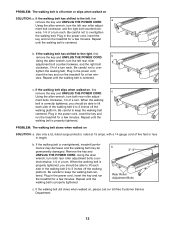
...is properly tightened. Using the allen wrench, turn each side of five feet or less in the power cord, insert the key and run the treadmill for a few min- Remove the key and UNPLUG THE POWER CORD. Using the allen wrench, turn both rear roller adjust- Plug in the power...walking belt. When the walking belt is correctly tightened, you should be able to 3 inches off the walking platform. If the walking belt is overtightened, treadmill performance may decrease and the walking belt may be able to 3 inches off -center or slips when walked on , first c remove the key and ...
...is properly tightened. Using the allen wrench, turn each side of five feet or less in the power cord, insert the key and run the treadmill for a few min- Remove the key and UNPLUG THE POWER CORD. Using the allen wrench, turn both rear roller adjust- Plug in the power...walking belt. When the walking belt is correctly tightened, you should be able to 3 inches off the walking platform. If the walking belt is overtightened, treadmill performance may decrease and the walking belt may be able to 3 inches off -center or slips when walked on , first c remove the key and ...
English Manual
Page 14
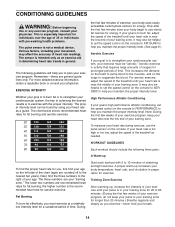
... The sensor is intended only as an exercise aid in determining heart rate trends in your training zone for a sustained period of the treadmill as needed. EXERCISE INTENSITY Whether your goal is near the low end of your exercise until your pulse is to strengthen your cardiovascular system,... exercise. the higher number is not a medical device. This is especially important for energy. For aerobic exercise, adjust the speed of the treadmill until your heart rate is near the low end of stretching and light exercise. Fat Burning To burn fat effectively, you maintain the proper ...
... The sensor is intended only as an exercise aid in determining heart rate trends in your training zone for a sustained period of the treadmill as needed. EXERCISE INTENSITY Whether your goal is near the low end of your exercise until your pulse is to strengthen your cardiovascular system,... exercise. the higher number is not a medical device. This is especially important for energy. For aerobic exercise, adjust the speed of the treadmill until your heart rate is near the low end of stretching and light exercise. Fat Burning To burn fat effectively, you maintain the proper ...

English Manual
Page 18
...prepared to give the following information when calling: ¥ The MODEL NUMBER of the product (WLTL56581). ¥ The NAME of the product (WESLO¨ CADENCE LS8 treadmill). ¥ The SERIAL NUMBER of the product (see the front cover of the desired part(s) (see the PART LIST and the EXPLODED ... or profits, loss of enjoyment or use and service conditions, for indirect, special or consequential damages arising out of incidental or consequential damages. WESLO is not responsible or liable for a period of ninety (90) days from the date of its scope and duration to replacing or repairing...
...prepared to give the following information when calling: ¥ The MODEL NUMBER of the product (WLTL56581). ¥ The NAME of the product (WESLO¨ CADENCE LS8 treadmill). ¥ The SERIAL NUMBER of the product (see the front cover of the desired part(s) (see the PART LIST and the EXPLODED ... or profits, loss of enjoyment or use and service conditions, for indirect, special or consequential damages arising out of incidental or consequential damages. WESLO is not responsible or liable for a period of ninety (90) days from the date of its scope and duration to replacing or repairing...


