
English Manual
Page 1
... assistance, free of charge to you have questions, or if there are missing or damaged parts, we are committed to providing complete customer satisfaction. The trained technicians on our customer hot line will guarantee complete satisfaction through direct assistance from our factory. Model No. Write the serial number in this manual before using this manual for future reference. ¨ Serial Number Decal...
... assistance, free of charge to you have questions, or if there are missing or damaged parts, we are committed to providing complete customer satisfaction. The trained technicians on our customer hot line will guarantee complete satisfaction through direct assistance from our factory. Model No. Write the serial number in this manual before using this manual for future reference. ¨ Serial Number Decal...
English Manual
Page 2
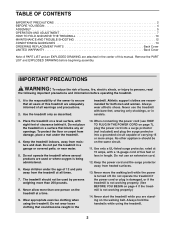
... CONTENTS IMPORTANT PRECAUTIONS 2 BEFORE YOU BEGIN 4 ASSEMBLY 5 OPERATION AND ADJUSTMENT 7 HOW TO FOLD AND MOVE THE TREADMILL 10 MAINTENANCE AND TROUBLE-SHOOTING 12 CONDITIONING GUIDELINES 14 ORDERING REPLACEMENT PARTS Back Cover LIMITED WARRANTY Back Cover Note: A PART LIST and an EXPLODED DRAWING are attached in the 10. treadmill. Never use an extension cord. 12. Do not place the treadmill on the treadmill at all users of all warnings and precautions. 2. Do not...
... CONTENTS IMPORTANT PRECAUTIONS 2 BEFORE YOU BEGIN 4 ASSEMBLY 5 OPERATION AND ADJUSTMENT 7 HOW TO FOLD AND MOVE THE TREADMILL 10 MAINTENANCE AND TROUBLE-SHOOTING 12 CONDITIONING GUIDELINES 14 ORDERING REPLACEMENT PARTS Back Cover LIMITED WARRANTY Back Cover Note: A PART LIST and an EXPLODED DRAWING are attached in the 10. treadmill. Never use an extension cord. 12. Do not place the treadmill on the treadmill at all users of all warnings and precautions. 2. Do not...
English Manual
Page 3
... in-home use of high speeds. The treadmill is fully closed. 21. When storing the treadmill, make sure that the storage latch is capable of this manual). WARNING: Before beginning this manual. Apply the decal in speed. 16. The pulse sensor is especially important for longer than the procedures in this treadmill in general. 17. Inspect and tighten all instructions before performing the maintenance and adjustment procedures...
... in-home use of high speeds. The treadmill is fully closed. 21. When storing the treadmill, make sure that the storage latch is capable of this manual). WARNING: Before beginning this manual. Apply the decal in speed. 16. The pulse sensor is especially important for longer than the procedures in this treadmill in general. 17. Inspect and tighten all instructions before performing the maintenance and adjustment procedures...
English Manual
Page 4
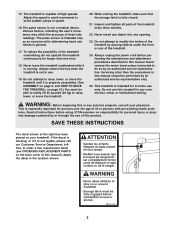
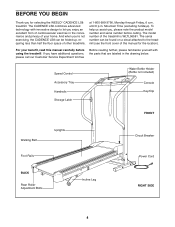
... your home. If you for the location). The model number of the treadmill is WLTL56581. at 1-800-999-3756, Monday through Friday, 6 a.m. Speed Control Accessory Tray Handrails Storage Latch Water Bottle Holder (Bottle not included) Console Key/Clip FRONT Walking Belt Foot Rails Uprights BACK Rear Roller Adjustment Bolts Incline Leg Circuit Breaker Power Cord RIGHT SIDE 4 The serial number can be found on a decal attached to let you enjoy an excellent form of cardiovascular exercise in...
... your home. If you for the location). The model number of the treadmill is WLTL56581. at 1-800-999-3756, Monday through Friday, 6 a.m. Speed Control Accessory Tray Handrails Storage Latch Water Bottle Holder (Bottle not included) Console Key/Clip FRONT Walking Belt Foot Rails Uprights BACK Rear Roller Adjustment Bolts Incline Leg Circuit Breaker Power Cord RIGHT SIDE 4 The serial number can be found on a decal attached to let you enjoy an excellent form of cardiovascular exercise in...
English Manual
Page 5
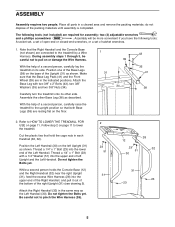
.... 1. Place all parts in the indicated positions. do not dispose of the Left Handrail. With the help of left Upright (31) as shown. During assembly steps 1 through 3, be more convenient if you have the following tools (not included) are connected to HOW TO LOWER THE TREADMILL FOR USE on the left Upright and the Left Handrail. Attach the Base Leg with...
.... 1. Place all parts in the indicated positions. do not dispose of the Left Handrail. With the help of left Upright (31) as shown. During assembly steps 1 through 3, be more convenient if you have the following tools (not included) are connected to HOW TO LOWER THE TREADMILL FOR USE on the left Upright and the Left Handrail. Attach the Base Leg with...
English Manual
Page 6
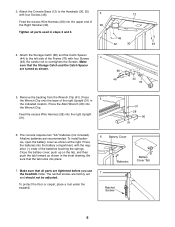
... the Screws. Alkaline batteries are factory set and should not be adjusted. The console requires two "AA" batteries (not included). To install batteries, open the battery cover as shown. 12 48 32 30 48 80 48 44 76 5. Close the battery cover, push up on the tab, and then push the tab forward as shown in 5 the indicated location. Press the batteries into the right Upright (31...
... the Screws. Alkaline batteries are factory set and should not be adjusted. The console requires two "AA" batteries (not included). To install batteries, open the battery cover as shown. 12 48 32 30 48 80 48 44 76 5. Close the battery cover, push up on the tab, and then push the tab forward as shown in 5 the indicated location. Press the batteries into the right Upright (31...
English Manual
Page 7
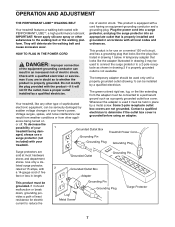
... treadmill features a walking belt coated with your 1 treadmill being turned on a nominal 120-volt circuit, HOW TO PLUG IN THE POWER CORD and has a grounding plug that looks like any other type of electric shock. Voltage surges, spikes, and noise interference can be used to connect the surge protector to a permanent ground such as shown in length. Use only a ULlisted surge protector, rated...
... treadmill features a walking belt coated with your 1 treadmill being turned on a nominal 120-volt circuit, HOW TO PLUG IN THE POWER CORD and has a grounding plug that looks like any other type of electric shock. Voltage surges, spikes, and noise interference can be used to connect the surge protector to a permanent ground such as shown in length. Use only a ULlisted surge protector, rated...
English Manual
Page 8
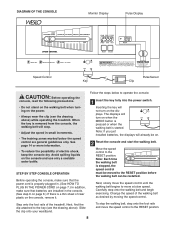
... that the power cord is properly plugged in the console. (See step 6 on page 6.) If there is stopped, the speed control must be moved to the RESET position. DIAGRAM OF THE CONSOLE Monitor Display Pulse Display Speed Control Key Pulse Sensor Clip CAUTION: Before operating the console, read the following precautions. ¥ Do not stand on the walking belt when turning on the power. ¥ Always wear the clip (see the drawing above ) while operating the treadmill.
... that the power cord is properly plugged in the console. (See step 6 on page 6.) If there is stopped, the speed control must be moved to the RESET position. DIAGRAM OF THE CONSOLE Monitor Display Pulse Display Speed Control Key Pulse Sensor Clip CAUTION: Before operating the console, read the following precautions. ¥ Do not stand on the walking belt when turning on the power. ¥ Always wear the clip (see the drawing above ) while operating the treadmill.
English Manual
Page 9
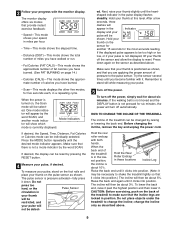
... mode displays the other five modes, for five seconds each, in position. When the power is turned on the sensor as shown. Mode Indicators tor will show which mode is not a mode indicator by raising or lowering the back end. Press the MODE button repeatedly until the heart- Hold your pulse. 5 Turn off the power, simply wait for another mode indica- Press down . Before changing the incline, remove the key and unplug the power cord...
... mode displays the other five modes, for five seconds each, in position. When the power is turned on the sensor as shown. Mode Indicators tor will show which mode is not a mode indicator by raising or lowering the back end. Press the MODE button repeatedly until the heart- Hold your pulse. 5 Turn off the power, simply wait for another mode indica- Press down . Before changing the incline, remove the key and unplug the power cord...
English Manual
Page 10
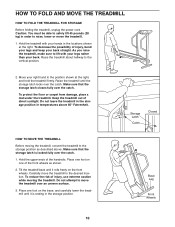
... hand to the desired location. Make sure that the storage latch is resting in order to raise, lower or move the treadmill to the position shown at the right. Raise the treadmill until the storage latch locks over an uneven surface. 3. Hold the upper ends of direct sunlight. Base Leg Front Wheels 10 Hold the treadmill with your legs rather than your hands...
... hand to the desired location. Make sure that the storage latch is resting in order to raise, lower or move the treadmill to the position shown at the right. Raise the treadmill until the storage latch locks over an uneven surface. 3. Hold the upper ends of direct sunlight. Base Leg Front Wheels 10 Hold the treadmill with your legs rather than your hands...
English Manual
Page 11
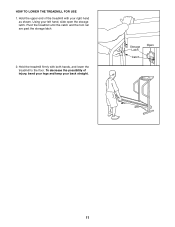
Using your right hand as shown. Pivot the treadmill until the catch and the foot rail are past the storage latch. 2. Hold the upper end of injury, bend your legs and keep your back straight. To decrease the possibility of the treadmill with both hands, and lower the treadmill to the floor. Storage Latch Catch Open 11 Hold the treadmill firmly with your left hand, slide open the storage latch. HOW TO LOWER THE TREADMILL FOR USE 1.
Using your right hand as shown. Pivot the treadmill until the catch and the foot rail are past the storage latch. 2. Hold the upper end of injury, bend your legs and keep your back straight. To decrease the possibility of the treadmill with both hands, and lower the treadmill to the floor. Storage Latch Catch Open 11 Hold the treadmill firmly with your left hand, slide open the storage latch. HOW TO LOWER THE TREADMILL FOR USE 1.
English Manual
Page 12
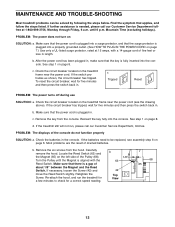
... the Screw (42) and move the Reed Switch slightly. Make sure that the power cord is plugged into a properly grounded outlet. (See HOW TO PLUG IN THE POWER CORD on page 7.) Use only a UL-listed surge protector, rated at 1-800-999-3756, Monday through Friday, 6 a.m. Locate the Reed Switch (63) and the Magnet (65) on the treadmill frame near the power cord. Retighten the Screw. MAINTENANCE AND TROUBLE-SHOOTING Most treadmill problems can be replaced...
... the Screw (42) and move the Reed Switch slightly. Make sure that the power cord is plugged into a properly grounded outlet. (See HOW TO PLUG IN THE POWER CORD on page 7.) Use only a UL-listed surge protector, rated at 1-800-999-3756, Monday through Friday, 6 a.m. Locate the Reed Switch (63) and the Magnet (65) on the treadmill frame near the power cord. Retighten the Screw. MAINTENANCE AND TROUBLE-SHOOTING Most treadmill problems can be replaced...
English Manual
Page 13
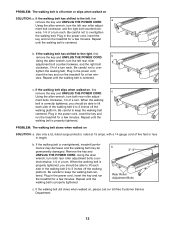
... walking belt slips when walked on , please call our toll-free Customer Service Department. 13 PROBLEM: The walking belt slows when walked on SOLUTION: a. If the walking belt is properly tightened. Be careful not to the left rear roller adjust- If the walking belt has shifted to overtighten the walking belt. Be careful to lift each . Remove the key and UNPLUG THE POWER CORD. Plug in the power cord, insert the key and run the treadmill for a few minutes. a Using...
... walking belt slips when walked on , please call our toll-free Customer Service Department. 13 PROBLEM: The walking belt slows when walked on SOLUTION: a. If the walking belt is properly tightened. Be careful not to the left rear roller adjust- If the walking belt has shifted to overtighten the walking belt. Be careful to lift each . Remove the key and UNPLUG THE POWER CORD. Plug in the power cord, insert the key and run the treadmill for a few minutes. a Using...
English Manual
Page 14
... or individuals with pre-existing health problems. The pulse sensor is to exercise with 5 to achieving the desired results is not a medical device. For aerobic exercise, adjust the speed of the treadmill until your heart rate is in your training zone for 20 to 60 minutes. (During the first few weeks of your exercise program, keep your pulse in your body temperature, heart rate, and circulation in general...
... or individuals with pre-existing health problems. The pulse sensor is to exercise with 5 to achieving the desired results is not a medical device. For aerobic exercise, adjust the speed of the treadmill until your heart rate is in your training zone for 20 to 60 minutes. (During the first few weeks of your exercise program, keep your pulse in your body temperature, heart rate, and circulation in general...
English Manual
Page 15
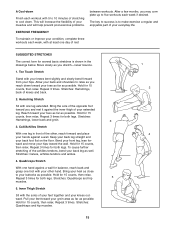
...lower back and groin. 3 3. Hold for 15 counts, then relax. Repeat 3 times for balance, reach back and grasp one foot with 5 to 10 minutes of stretching to make exercise a regular and enjoyable part of the other hand. Quadriceps Stretch With one day of rest SUGGESTED STRETCHES The correct form for both legs... five workouts each workout with your other , reach forward and place your hips. Stretches: Quadriceps and hip muscles. 1 2 4 15 After a few months, you stretchÑnever bounce. 1. EXERCISE FREQUENCY To maintain or improve your toes as far as well. Move slowly ...
...lower back and groin. 3 3. Hold for 15 counts, then relax. Repeat 3 times for balance, reach back and grasp one foot with 5 to 10 minutes of stretching to make exercise a regular and enjoyable part of the other hand. Quadriceps Stretch With one day of rest SUGGESTED STRETCHES The correct form for both legs... five workouts each workout with your other , reach forward and place your hips. Stretches: Quadriceps and hip muscles. 1 2 4 15 After a few months, you stretchÑnever bounce. 1. EXERCISE FREQUENCY To maintain or improve your toes as far as well. Move slowly ...

English Manual
Page 16
... 1 Screw # 1 Upright Spacer Description Belly Pan 1/4Ó Washer Front Roller Adjustment Bolt Hood Anchor Circuit Breaker Grommet Power Cord Electronics Bracket Choke Wire Clip Motor Pivot Nut 8Ó Cable Tie Reed Switch Clip Reed Switch Foot Rail Magnet Walking Platform Walking Belt Front Roller/Pulley Storage Latch Console Plug Fastener Belt Guide Motor Belly Pan Latch Decal Anchor Screw/Base Pad Screw Frame Right Frame Guide Incline Leg Plate Incline Leg Storage Catch Ratchet Ground Wire Rear Platform Screw Right Endcap Rear Roller Isolator Platform Screw Rear Adjustment Bolt Left...
... 1 Screw # 1 Upright Spacer Description Belly Pan 1/4Ó Washer Front Roller Adjustment Bolt Hood Anchor Circuit Breaker Grommet Power Cord Electronics Bracket Choke Wire Clip Motor Pivot Nut 8Ó Cable Tie Reed Switch Clip Reed Switch Foot Rail Magnet Walking Platform Walking Belt Front Roller/Pulley Storage Latch Console Plug Fastener Belt Guide Motor Belly Pan Latch Decal Anchor Screw/Base Pad Screw Frame Right Frame Guide Incline Leg Plate Incline Leg Storage Catch Ratchet Ground Wire Rear Platform Screw Right Endcap Rear Roller Isolator Platform Screw Rear Adjustment Bolt Left...

English Manual
Page 18
... and duration to replacing or repairing, at ICON's option, the product through Friday, 6 a.m. To help us assist you specific legal rights. This warranty extends only to give the following information when calling: ¥ The MODEL NUMBER of the product (WLTL56581). ¥ The NAME of the product (WESLO¨ CADENCE LS8 treadmill). ¥ The SERIAL NUMBER of the product (see the PART LIST and the EXPLODED...
... and duration to replacing or repairing, at ICON's option, the product through Friday, 6 a.m. To help us assist you specific legal rights. This warranty extends only to give the following information when calling: ¥ The MODEL NUMBER of the product (WLTL56581). ¥ The NAME of the product (WESLO¨ CADENCE LS8 treadmill). ¥ The SERIAL NUMBER of the product (see the PART LIST and the EXPLODED...


