
English Manual
Page 2
...and dust. Athletic support clothes are adequately informed of all times. 7. Always wear athletic shoes. Do not place the treadmill on the treadmill at all warnings and precautions. When connecting the power cord (see page 7), plug the power cord into a surge protector...women. TABLE OF CONTENTS IMPORTANT PRECAUTIONS 2 BEFORE YOU BEGIN 4 ASSEMBLY 5 OPERATION AND ADJUSTMENT 7 HOW TO FOLD AND MOVE THE TREADMILL 10 MAINTENANCE AND TROUBLE-SHOOTING 12 CONDITIONING GUIDELINES 14 ORDERING REPLACEMENT PARTS Back Cover LIMITED WARRANTY Back Cover Note: An EXPLODED DRAWING and...
...and dust. Athletic support clothes are adequately informed of all times. 7. Always wear athletic shoes. Do not place the treadmill on the treadmill at all warnings and precautions. When connecting the power cord (see page 7), plug the power cord into a surge protector...women. TABLE OF CONTENTS IMPORTANT PRECAUTIONS 2 BEFORE YOU BEGIN 4 ASSEMBLY 5 OPERATION AND ADJUSTMENT 7 HOW TO FOLD AND MOVE THE TREADMILL 10 MAINTENANCE AND TROUBLE-SHOOTING 12 CONDITIONING GUIDELINES 14 ORDERING REPLACEMENT PARTS Back Cover LIMITED WARRANTY Back Cover Note: An EXPLODED DRAWING and...
English Manual
Page 3
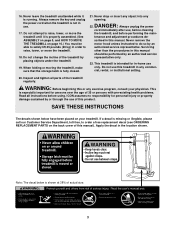
...pounds (20 kg) in any opening. Inspect and tighten all instructions before performing the main- Do not change the incline of this treadmill in order to order a free replacement decal (see ORDERING REPLACEMENT PARTS on your physician. Always unplug the power cord immediately after use ...shown below is intended for personal injury or property damage sustained by an authorized service representative only. 23. This treadmill is shown at 38% of the treadmill regularly. This is running. tenance and adjustment procedures de- Do not attempt to do so by placing objects ...
...pounds (20 kg) in any opening. Inspect and tighten all instructions before performing the main- Do not change the incline of this treadmill in order to order a free replacement decal (see ORDERING REPLACEMENT PARTS on your physician. Always unplug the power cord immediately after use ...shown below is intended for personal injury or property damage sustained by an authorized service representative only. 23. This treadmill is shown at 38% of the treadmill regularly. This is running. tenance and adjustment procedures de- Do not attempt to do so by placing objects ...
English Manual
Page 4
...in the convenience and privacy of the treadmill is WLTL10091. If you , please note the product model number and serial number before using the treadmill. And when you're not exercising, the unique CADENCE EX12 can be folded up, requiring less ...and familiarize yourself with innovative design to the treadmill (see the front cover of other treadmills. The model number of your benefit, read this manual for selecting the WESLO® CADENCE EX12 treadmill. Mountain Time (excluding holidays). The CADENCE EX12 treadmill combines advanced technology with the labeled parts....
...in the convenience and privacy of the treadmill is WLTL10091. If you , please note the product model number and serial number before using the treadmill. And when you're not exercising, the unique CADENCE EX12 can be folded up, requiring less ...and familiarize yourself with innovative design to the treadmill (see the front cover of other treadmills. The model number of your benefit, read this manual for selecting the WESLO® CADENCE EX12 treadmill. Mountain Time (excluding holidays). The CADENCE EX12 treadmill combines advanced technology with the labeled parts....
English Manual
Page 5
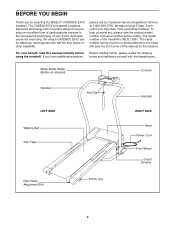
...tread- Do not overtighten the Wheel Bolts; During shipping, a small amount of the treadmill as shown. Make sure the Wheels (15) are toward the front of lubricant may be transferred to the position shown. 1 7 6 2. Tip the treadmill back to the Right Handrail (6) with the two Wheel Bolts (14) and the ...two Wheel Nuts (29) as shown. This does not affect treadmill performance. With the help of a second person, carefully raise the Right and Left Handrails (6, 7) to the top of the walking belt, simply wipe ...
...tread- Do not overtighten the Wheel Bolts; During shipping, a small amount of the treadmill as shown. Make sure the Wheels (15) are toward the front of lubricant may be transferred to the position shown. 1 7 6 2. Tip the treadmill back to the Right Handrail (6) with the two Wheel Bolts (14) and the ...two Wheel Nuts (29) as shown. This does not affect treadmill performance. With the help of a second person, carefully raise the Right and Left Handrails (6, 7) to the top of the walking belt, simply wipe ...

English Manual
Page 6
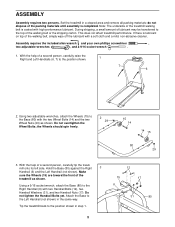
... the Latch Pin into place. Make sure that the tab locks into the hole as shown. Alkaline batteries are tightened before you raise the treadmill, make sure to adjust the walking belt (see page 13). Push the Right and Left Handrails (6, 7) inward as shown in a secure... place. Batteries Battery Cover Tab 8. To install batteries, 7 8 first touch the Handrail (6) to do this step. As you use the treadmill. Do not fully tighten the Screws yet. Then, tighten the three Screws. 55 77 77 78 5 Hole 78 7 7. Be sure that the Latch Pin ...
... the Latch Pin into place. Make sure that the tab locks into the hole as shown. Alkaline batteries are tightened before you raise the treadmill, make sure to adjust the walking belt (see page 13). Push the Right and Left Handrails (6, 7) inward as shown in a secure... place. Batteries Battery Cover Tab 8. To install batteries, 7 8 first touch the Handrail (6) to do this step. As you use the treadmill. Do not fully tighten the Screws yet. Then, tighten the three Screws. 55 77 77 78 5 Hole 78 7 7. Be sure that the Latch Pin ...
English Manual
Page 7
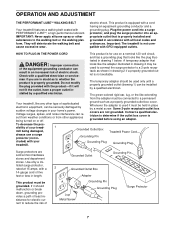
...1) can result in an increased risk of five feet or less in place by a qualified electrician. man if you are in your treadmill. Whenever the adapter is not compatible with your home's power. sibility of Grounded Outlet Grounding Pin 2 Grounded Outlet Box Adapter Grounding Pin... that is properly installed and grounded in drawing 2 if a properly grounded outlet is properly grounded. ground such as to a permanent Your treadmill, like the adapter illustrated in - electric shock. HOW TO PLUG IN THE POWER CORD This product is grounded before using an adapter. looks...
...1) can result in an increased risk of five feet or less in place by a qualified electrician. man if you are in your treadmill. Whenever the adapter is not compatible with your home's power. sibility of Grounded Outlet Grounding Pin 2 Grounded Outlet Box Adapter Grounding Pin... that is properly installed and grounded in drawing 2 if a properly grounded outlet is properly grounded. ground such as to a permanent Your treadmill, like the adapter illustrated in - electric shock. HOW TO PLUG IN THE POWER CORD This product is grounded before using an adapter. looks...
English Manual
Page 8
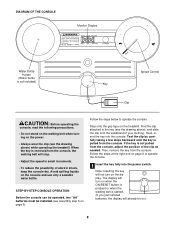
Avoid spilling liquids on the treadmill. Step onto the grip tape on the console and use only a sealable water bottle. Test the clip by carefully taking a few steps backward until the .... Follow the steps at the right and on the display. Note: Inserting the key will already be installed (see the drawing above ) while operating the treadmill. The display will turn on when the ON/RESET button is pressed or when the walking belt is started. (If you just installed batteries, the...
Avoid spilling liquids on the treadmill. Step onto the grip tape on the console and use only a sealable water bottle. Test the clip by carefully taking a few steps backward until the .... Follow the steps at the right and on the display. Note: Inserting the key will already be installed (see the drawing above ) while operating the treadmill. The display will turn on when the ON/RESET button is pressed or when the walking belt is started. (If you just installed batteries, the...

English Manual
Page 9
... on, the con- 2 Reset the console and start the walking belt. The displays will automatically turn the speed control until it rests against the treadmill frame. 3 Follow your progress with the monitor modes When the power is not pressed for ten seconds or longer, the time mode will pause. ... walking belt and remove the key. Note: If you have burned. • Fat Calories (FAT CALS)-This mode shows the approximate number of the treadmill can be turned to conserve the batteries any time that the frame is stopped, the speed control must be restarted. 4 When you have burned. ...
... on, the con- 2 Reset the console and start the walking belt. The displays will automatically turn the speed control until it rests against the treadmill frame. 3 Follow your progress with the monitor modes When the power is not pressed for ten seconds or longer, the time mode will pause. ... walking belt and remove the key. Note: If you have burned. • Fat Calories (FAT CALS)-This mode shows the approximate number of the treadmill can be turned to conserve the batteries any time that the frame is stopped, the speed control must be restarted. 4 When you have burned. ...
English Manual
Page 10
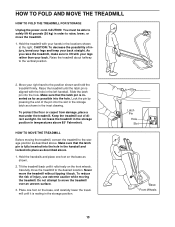
...aligned with the hole in the storage position. Lock the pin by pressing the end of direct sunlight. HOW TO MOVE THE TREADMILL Before moving the treadmill. Carefully move the treadmill without tipping it is inserted as far as shown in the storage latch as possible into place as described above. HOW TO... FOLD AND MOVE THE TREADMILL HOW TO FOLD THE TREADMILL FOR STORAGE Unplug the power cord. Make sure that the latch pin is resting in the left handrail. Never move the...
...aligned with the hole in the storage position. Lock the pin by pressing the end of direct sunlight. HOW TO MOVE THE TREADMILL Before moving the treadmill. Carefully move the treadmill without tipping it is inserted as far as shown in the storage latch as possible into place as described above. HOW TO... FOLD AND MOVE THE TREADMILL HOW TO FOLD THE TREADMILL FOR STORAGE Unplug the power cord. Make sure that the latch pin is resting in the left handrail. Never move the...

English Manual
Page 11
Lock the pin in place by pressing the end of the pin into the slot in the storage latch as shown. To decrease the possibility of the treadmill with both hands, and lower the treadmill to the right. HOW TO LOWER THE TREADMILL FOR USE 1. Hold the upper end of injury, bend your legs and keep your right hand as shown in the inset drawing. 2. Hold the treadmill firmly with your back straight. Lock Pin Slot 11 Using your left hand, slide the latch pin to the floor.
Lock the pin in place by pressing the end of the pin into the slot in the storage latch as shown. To decrease the possibility of the treadmill with both hands, and lower the treadmill to the right. HOW TO LOWER THE TREADMILL FOR USE 1. Hold the upper end of injury, bend your legs and keep your right hand as shown in the inset drawing. 2. Hold the treadmill firmly with your back straight. Lock Pin Slot 11 Using your left hand, slide the latch pin to the floor.
English Manual
Page 12
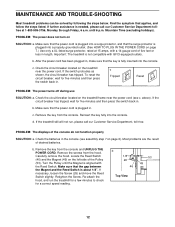
... displays of drained batteries. Locate the Reed Switch (46) and the Magnet (49) on SOLUTION: a. MAINTENANCE AND TROUBLE-SHOOTING Most treadmill problems can be solved by following the steps below. c. Make sure that the surge protector is aligned with the Reed Switch. Check ...the console. Remove the key from the console. Carefully remove the hood. Make sure that applies, and follow the steps listed. Important: The treadmill is about 1/8". b. b. If necessary, loosen the Screw (26) and move the Reed Switch slightly. Retighten the Screw. c Tripped Reset Tripped...
... displays of drained batteries. Locate the Reed Switch (46) and the Magnet (49) on SOLUTION: a. MAINTENANCE AND TROUBLE-SHOOTING Most treadmill problems can be solved by following the steps below. c. Make sure that the surge protector is aligned with the Reed Switch. Check ...the console. Remove the key from the console. Carefully remove the hood. Make sure that applies, and follow the steps listed. Important: The treadmill is about 1/8". b. b. If necessary, loosen the Screw (26) and move the Reed Switch slightly. Retighten the Screw. c Tripped Reset Tripped...
English Manual
Page 13
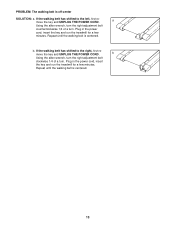
... the key and UNPLUG THE POWER CORD. Repeat until the walking belt is centered. Plug in the power cord, insert the key and run the treadmill for a few minutes. b. Using the allen wrench, turn the right adjustment bolt counterclockwise 1/4 of a turn . If the walking belt has shifted to the left, first... adjustment bolt clockwise 1/4 of a turn . Repeat until the walking belt is off-center SOLUTION: a. Plug in the power cord, insert the key and run the treadmill for a few minutes.
... the key and UNPLUG THE POWER CORD. Repeat until the walking belt is centered. Plug in the power cord, insert the key and run the treadmill for a few minutes. b. Using the allen wrench, turn the right adjustment bolt counterclockwise 1/4 of a turn . If the walking belt has shifted to the left, first... adjustment bolt clockwise 1/4 of a turn . Repeat until the walking belt is off-center SOLUTION: a. Plug in the power cord, insert the key and run the treadmill for a few minutes.
English Manual
Page 16
... only to give the following information: • The MODEL NUMBER of the product (WLTL10091) • The NAME of the product (WESLO® CADENCE EX12 treadmill) • The SERIAL NUMBER of the product (see the front cover of this warranty is a registered trademark of incidental or consequential ...fitness for easy reference when calling. LIMITED WARRANTY ICON Health & Fitness, Inc. (ICON), warrants this manual) If possible, place the treadmill near your telephone for a particular purpose is made must be free from defects in workmanship and material, under this manual) • The...
... only to give the following information: • The MODEL NUMBER of the product (WLTL10091) • The NAME of the product (WESLO® CADENCE EX12 treadmill) • The SERIAL NUMBER of the product (see the front cover of this warranty is a registered trademark of incidental or consequential ...fitness for easy reference when calling. LIMITED WARRANTY ICON Health & Fitness, Inc. (ICON), warrants this manual) If possible, place the treadmill near your telephone for a particular purpose is made must be free from defects in workmanship and material, under this manual) • The...


