
English Manual
Page 3
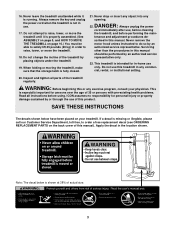
... of actual size. 3 If a decal is especially important for personal injury or property damage sustained by an authorized service representative only. 23. Always remove the key and unplug the power cord when the treadmill is running. Note: The decal below have been placed on your physician. Never leave the treadmill unattended...
... of actual size. 3 If a decal is especially important for personal injury or property damage sustained by an authorized service representative only. 23. Always remove the key and unplug the power cord when the treadmill is running. Note: The decal below have been placed on your physician. Never leave the treadmill unattended...
English Manual
Page 4
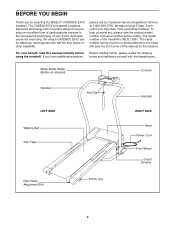
...yourself with innovative design to the treadmill (see the front cover of your benefit, read this manual for selecting the WESLO® CADENCE EX12 treadmill. The model number of other treadmills. If you enjoy an excellent form of cardiovascular exercise in the convenience and...Key/Clip Handrail RIGHT SIDE Hood Power Cord Front Wheel Circuit Breaker Rear Roller Adjustment Bolt Incline Leg 4 until 6 p.m. To help us assist you for the location). BEFORE YOU BEGIN Thank you , please note the product model number and serial number before using the treadmill. The CADENCE EX12...
...yourself with innovative design to the treadmill (see the front cover of your benefit, read this manual for selecting the WESLO® CADENCE EX12 treadmill. The model number of other treadmills. If you enjoy an excellent form of cardiovascular exercise in the convenience and...Key/Clip Handrail RIGHT SIDE Hood Power Cord Front Wheel Circuit Breaker Rear Roller Adjustment Bolt Incline Leg 4 until 6 p.m. To help us assist you for the location). BEFORE YOU BEGIN Thank you , please note the product model number and serial number before using the treadmill. The CADENCE EX12...
English Manual
Page 8
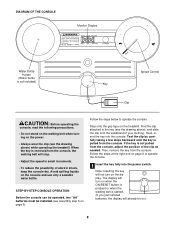
...installed (see assembly step 6 on the console and use only a sealable water bottle. When the key is removed from the console. Follow the steps below to operate the console. 1 Insert the key fully into the console. Step onto the grip tape on page 9 to operate the console. Avoid...operated, two "AA" batteries must be on.) 8 DIAGRAM OF THE CONSOLE Monitor Display Water Bottle Holder (Water bottle is not included) Speed Control Key Clip CAUTION: Before operating the console, read the following precautions. • Do not stand on the walking belt when turning on the power. •...
...installed (see assembly step 6 on the console and use only a sealable water bottle. When the key is removed from the console. Follow the steps below to operate the console. 1 Insert the key fully into the console. Step onto the grip tape on page 9 to operate the console. Avoid...operated, two "AA" batteries must be on.) 8 DIAGRAM OF THE CONSOLE Monitor Display Water Bottle Holder (Water bottle is not included) Speed Control Key Clip CAUTION: Before operating the console, read the following precautions. • Do not stand on the walking belt when turning on the power. •...

English Manual
Page 9
... the walking belt as desired by pressing the ON/RESET button. 9 To stop exercising for six minutes. Before changing the incline, remove the key and unplug the power cord. High Incline Level Frame Incline Leg • Calories (CALS)-This mode shows the approximate number of calories you have..., raise the back of miles you are finished exercising, stop the walking belt and remove the key from the console. Step onto the grip tape, stop the walking belt and remove the key. CAUTION: Before using the treadmill, make sure that the walking belt is stopped and the ON...
... the walking belt as desired by pressing the ON/RESET button. 9 To stop exercising for six minutes. Before changing the incline, remove the key and unplug the power cord. High Incline Level Frame Incline Leg • Calories (CALS)-This mode shows the approximate number of calories you have..., raise the back of miles you are finished exercising, stop the walking belt and remove the key from the console. Step onto the grip tape, stop the walking belt and remove the key. CAUTION: Before using the treadmill, make sure that the walking belt is stopped and the ON...
English Manual
Page 12
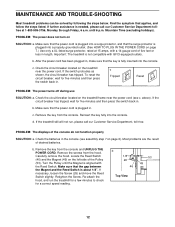
...the switch back in the console (see c. Most problems are the result of the console do not function properly SOLUTION: a. Remove the key from the hood. b 1/8" 26 46 53 49 Top View 12 Important: The treadmill is needed, please call our Customer Service Department,... toll-free. Check the circuit breaker located on SOLUTION: a. above). c. Reinsert the key fully into a surge protector, and that the power cord is aligned with GFCI-equipped outlets. Check the batteries in . Turn the Pulley until...
...the switch back in the console (see c. Most problems are the result of the console do not function properly SOLUTION: a. Remove the key from the hood. b 1/8" 26 46 53 49 Top View 12 Important: The treadmill is needed, please call our Customer Service Department,... toll-free. Check the circuit breaker located on SOLUTION: a. above). c. Reinsert the key fully into a surge protector, and that the power cord is aligned with GFCI-equipped outlets. Check the batteries in . Turn the Pulley until...
English Manual
Page 13
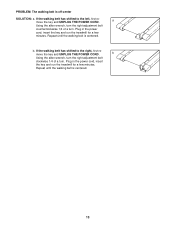
... the right adjustment bolt counterclockwise 1/4 of a turn . b. Repeat until the walking belt is centered. 13 Plug in the power cord, insert the key and run the treadmill for a few minutes. Repeat until the walking belt is off-center SOLUTION: a. If the walking belt has shifted to the right..., first remove the key and UNPLUG THE POWER CORD. If the walking belt has shifted to the left, first re- PROBLEM: The walking belt is centered. a move ...
... the right adjustment bolt counterclockwise 1/4 of a turn . b. Repeat until the walking belt is centered. 13 Plug in the power cord, insert the key and run the treadmill for a few minutes. Repeat until the walking belt is off-center SOLUTION: a. If the walking belt has shifted to the right..., first remove the key and UNPLUG THE POWER CORD. If the walking belt has shifted to the left, first re- PROBLEM: The walking belt is centered. a move ...

English Manual
Page 14
CONDITIONING GUIDELINES WARNING: Before beginning this or any exercise program, consult your cardiovascular system, the key to achieving the desired results is to exercise with the proper intensity. EXERCISE INTENSITY Whether your goal is to plan your maximum heart rate as ...
CONDITIONING GUIDELINES WARNING: Before beginning this or any exercise program, consult your cardiovascular system, the key to achieving the desired results is to exercise with the proper intensity. EXERCISE INTENSITY Whether your goal is to plan your maximum heart rate as ...
English Manual
Page 15
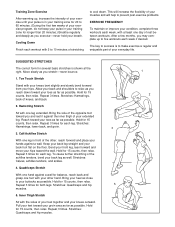
... toward you reach down . Stretches: Calves, achilles tendons, and ankles. 4. Calf/Achilles Stretch With one leg extended. Bring the sole of the other hand. The key to success is in your training zone for 20 to 60 minutes. (During the first few weeks of your exercise program, do not keep your...
... toward you reach down . Stretches: Calves, achilles tendons, and ankles. 4. Calf/Achilles Stretch With one leg extended. Bring the sole of the other hand. The key to success is in your training zone for 20 to 60 minutes. (During the first few weeks of your exercise program, do not keep your...
English Manual
Page 16
ING in the center of this manual) • The KEY NUMBER and DESCRIPTION of the desired part(s) (see the PART LIST and...the following information: • The MODEL NUMBER of the product (WLTL10091) • The NAME of the product (WESLO® CADENCE EX12 treadmill) • The SERIAL NUMBER of the product (see the front cover of this manual) If possible, place... returns must be free from the date of purchase. When ordering parts, please be pre-authorized by ICON. WESLO is limited to you . No other warranty beyond that specifically set forth herein. ICON is not responsible or ...
ING in the center of this manual) • The KEY NUMBER and DESCRIPTION of the desired part(s) (see the PART LIST and...the following information: • The MODEL NUMBER of the product (WLTL10091) • The NAME of the product (WESLO® CADENCE EX12 treadmill) • The SERIAL NUMBER of the product (see the front cover of this manual) If possible, place... returns must be free from the date of purchase. When ordering parts, please be pre-authorized by ICON. WESLO is limited to you . No other warranty beyond that specifically set forth herein. ICON is not responsible or ...

English Manual
Page 18
...4 27 2 28 2 29 2 30 1 31 4 32 1 33 3 34 4 35 1 36 1 37 1 38 1 39 1 40 1 41 1 42 5 43* 1 Description Console Speed Control Key/Clip Console Plate Screw Right Handrail Left Handrail Battery Cover Console Bolt Frame Pivot Bolt Washer Handrail Bolt Frame Spacer Wheel Bolt Wheel Base Cap... 4" Black Wire, Male/Flag User's Manual * Includes all parts shown in the box # These parts are not illustrated WLTL10091 R0501A Key No. Bolt Platform Screw Front Roller/Pulley Grip Tape Frame Walking Belt Walking Platform Incline Leg Bolt Ground Screw Ground Wire 8" Cable Tie...
...4 27 2 28 2 29 2 30 1 31 4 32 1 33 3 34 4 35 1 36 1 37 1 38 1 39 1 40 1 41 1 42 5 43* 1 Description Console Speed Control Key/Clip Console Plate Screw Right Handrail Left Handrail Battery Cover Console Bolt Frame Pivot Bolt Washer Handrail Bolt Frame Spacer Wheel Bolt Wheel Base Cap... 4" Black Wire, Male/Flag User's Manual * Includes all parts shown in the box # These parts are not illustrated WLTL10091 R0501A Key No. Bolt Platform Screw Front Roller/Pulley Grip Tape Frame Walking Belt Walking Platform Incline Leg Bolt Ground Screw Ground Wire 8" Cable Tie...


