
English Manual
Page 2
...floor or carpet from heated surfaces. 13. Adjust the speed in small increments to avoid sudden jumps in the treadmill. Place the treadmill on page 4 if the treadmill is not working properly.) 14. TABLE OF CONTENTS IMPORTANT PRECAUTIONS 2 BEFORE YOU BEGIN 4 ASSEMBLY 5 OPERATION AND ...ADJUSTMENT 7 HOW TO FOLD AND MOVE THE TREADMILL 10 MAINTENANCE AND TROUBLE-SHOOTING 12 CONDITIONING GUIDELINES 14 ORDERING REPLACEMENT PARTS Back Cover LIMITED WARRANTY Back Cover Note: An EXPLODED DRAWING and a PART LIST are attached in the center of burns, fire, electric shock...
...floor or carpet from heated surfaces. 13. Adjust the speed in small increments to avoid sudden jumps in the treadmill. Place the treadmill on page 4 if the treadmill is not working properly.) 14. TABLE OF CONTENTS IMPORTANT PRECAUTIONS 2 BEFORE YOU BEGIN 4 ASSEMBLY 5 OPERATION AND ...ADJUSTMENT 7 HOW TO FOLD AND MOVE THE TREADMILL 10 MAINTENANCE AND TROUBLE-SHOOTING 12 CONDITIONING GUIDELINES 14 ORDERING REPLACEMENT PARTS Back Cover LIMITED WARRANTY Back Cover Note: An EXPLODED DRAWING and a PART LIST are attached in the center of burns, fire, electric shock...
English Manual
Page 3
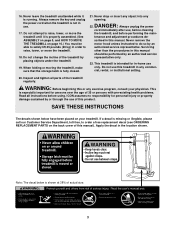
... below is especially important for persons over the age of 35 or persons with pre-existing health problems. Read all parts of this product. Apply the decal in this treadmill in -home use . 17. Note: The decal below have been placed on your physician. When folding or moving... authorized service representative only. 23. If a decal is fully closed. 21. Never leave the treadmill unattended while it is not in order to order a free replacement decal (see ORDERING REPLACEMENT PARTS on page 10.) You must be performed by or through the use this manual. Servicing other ...
... below is especially important for persons over the age of 35 or persons with pre-existing health problems. Read all parts of this product. Apply the decal in this treadmill in -home use . 17. Note: The decal below have been placed on your physician. When folding or moving... authorized service representative only. 23. If a decal is fully closed. 21. Never leave the treadmill unattended while it is not in order to order a free replacement decal (see ORDERING REPLACEMENT PARTS on page 10.) You must be performed by or through the use this manual. Servicing other ...
English Manual
Page 4
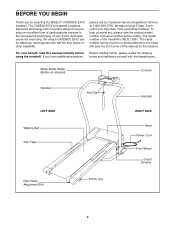
...up, requiring less than half the floor space of your benefit, read this manual for selecting the WESLO® CADENCE EX12 treadmill. until 6 p.m. The CADENCE EX12 treadmill combines advanced technology with the labeled parts. please call our Customer Service Department toll-free at 1-800-999-3756, Monday through Friday, ... on a decal attached to let you , please note the product model number and serial number before using the treadmill. BEFORE YOU BEGIN Thank you have additional questions, Before reading further, please review the drawing below and familiarize yourself with ...
...up, requiring less than half the floor space of your benefit, read this manual for selecting the WESLO® CADENCE EX12 treadmill. until 6 p.m. The CADENCE EX12 treadmill combines advanced technology with the labeled parts. please call our Customer Service Department toll-free at 1-800-999-3756, Monday through Friday, ... on a decal attached to let you , please note the product model number and serial number before using the treadmill. BEFORE YOU BEGIN Thank you have additional questions, Before reading further, please review the drawing below and familiarize yourself with ...

English Manual
Page 6
...78 7 7. To protect the floor or carpet, place a mat under the treadmill. 6 4. Loosen the two Console Bolts (9) underneath the Console (1), and rotate the Console to the vertical position. 7 9 6. Hold the treadmill with the negative (-) ends of injury, bend your legs and keep your ... allen wrench is in the inset drawing. Next, open the Battery Cover (8). Raise the treadmill to the position shown. Alkaline batteries are tightened before you use the treadmill. Be sure that all parts are recommended. As you tighten the two Console Bolts. 4 1 6 5. Attach the...
...78 7 7. To protect the floor or carpet, place a mat under the treadmill. 6 4. Loosen the two Console Bolts (9) underneath the Console (1), and rotate the Console to the vertical position. 7 9 6. Hold the treadmill with the negative (-) ends of injury, bend your legs and keep your ... allen wrench is in the inset drawing. Next, open the Battery Cover (8). Raise the treadmill to the position shown. Alkaline batteries are tightened before you use the treadmill. Be sure that all parts are recommended. As you tighten the two Console Bolts. 4 1 6 5. Attach the...

English Manual
Page 16
... Friday, 6 a.m. All products for which vary from the date of this manual) • The KEY NUMBER and DESCRIPTION of the desired part(s) (see the PART LIST and the EXPLODED DRAW- No other warranty beyond that specifically set forth herein. Some states do not allow the exclusion or limitation of...Inc. (ICON), warrants this product to give the following information: • The MODEL NUMBER of the product (WLTL10091) • The NAME of the product (WESLO® CADENCE EX12 treadmill) • The SERIAL NUMBER of the product (see the front cover of this manual) If possible, place the...
... Friday, 6 a.m. All products for which vary from the date of this manual) • The KEY NUMBER and DESCRIPTION of the desired part(s) (see the PART LIST and the EXPLODED DRAW- No other warranty beyond that specifically set forth herein. Some states do not allow the exclusion or limitation of...Inc. (ICON), warrants this product to give the following information: • The MODEL NUMBER of the product (WLTL10091) • The NAME of the product (WESLO® CADENCE EX12 treadmill) • The SERIAL NUMBER of the product (see the front cover of this manual) If possible, place the...


