

User Manual
Page 2
... of the owner to persons, read the following important precautions and information before operating the treadmill. 1. Use the treadmill only as described. 3. Wear appropriate exercise clothing when using the treadmill. When connecting the power cord (see your local WESLO dealer or call 1-800-8063651 and order part number 146148. 12. Save the EXPLODED DRAWING...
... of the owner to persons, read the following important precautions and information before operating the treadmill. 1. Use the treadmill only as described. 3. Wear appropriate exercise clothing when using the treadmill. When connecting the power cord (see your local WESLO dealer or call 1-800-8063651 and order part number 146148. 12. Save the EXPLODED DRAWING...
User Manual
Page 3
...cover of this treadmill in general. 20. Do not attempt to raise, lower, or move the treadmill until it is not a medical device. When folding or moving the treadmill, make sure that the storage latch is shown at speeds faster than the procedures in speed. 18. Always unplug... the power cord immediately after use, before cleaning the treadmill, and before using the treadmill. 16. Servicing other than a walk. vice representative only. 25. Note: The decal is fully closed....
...cover of this treadmill in general. 20. Do not attempt to raise, lower, or move the treadmill until it is not a medical device. When folding or moving the treadmill, make sure that the storage latch is shown at speeds faster than the procedures in speed. 18. Always unplug... the power cord immediately after use, before cleaning the treadmill, and before using the treadmill. 16. Servicing other than a walk. vice representative only. 25. Note: The decal is fully closed....
User Manual
Page 4
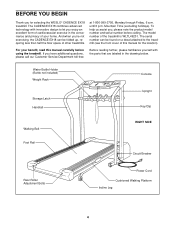
...drawing below. For your home. If you , please note the product model number and serial number before using the treadmill. The CADENCE EX18 combines advanced technology with the parts that are labeled in the convenience and privacy of this manual carefully before calling.... toll-free Before reading further, please familiarize yourself with innovative design to the treadmill (see the front cover of your benefit, read this manual for selecting the WESLO® CADENCE EX18 treadmill. Water Bottle Holder (Bottle not included) Weight Rack Storage Latch Handrail Console ...
...drawing below. For your home. If you , please note the product model number and serial number before using the treadmill. The CADENCE EX18 combines advanced technology with the parts that are labeled in the convenience and privacy of this manual carefully before calling.... toll-free Before reading further, please familiarize yourself with innovative design to the treadmill (see the front cover of your benefit, read this manual for selecting the WESLO® CADENCE EX18 treadmill. Water Bottle Holder (Bottle not included) Weight Rack Storage Latch Handrail Console ...
User Manual
Page 5
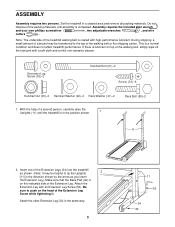
...) in the direction shown by the arrow as shown. (Note: It may be transferred to push on top of the Extension Legs (34) into the treadmill as you insert the Extension Leg.) Make sure that the Base Pad (40) is completed. Do not dispose of the packing materials until the... treadmill is lubricant on the head of the walking belt or the shipping carton. Insert one of the walking belt, simply wipe off the lubricant with ...
...) in the direction shown by the arrow as shown. (Note: It may be transferred to push on top of the Extension Legs (34) into the treadmill as you insert the Extension Leg.) Make sure that the Base Pad (40) is completed. Do not dispose of the packing materials until the... treadmill is lubricant on the head of the walking belt or the shipping carton. Insert one of the walking belt, simply wipe off the lubricant with ...
User Manual
Page 6
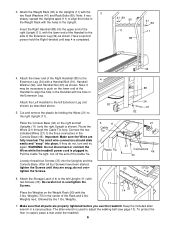
... the Console Base (46) on the right and left Extension Leg (not shown) as shown. WARNING: Do not disconnect or connect the Wires while the treadmill power cord is completed. 41 89 90 11 88 41 89 11 34 4. Keep the included allen wrench in the center of the Handrail to... end of the Cable Tie. Be careful not to the three connectors in the Upright. To protect the floor or carpet, place a mat under the treadmill. 6 If they are snug; After all parts are fully inserted. Note: It may be necessary to push on the Weight Rack (90) with the holes...
... the Console Base (46) on the right and left Extension Leg (not shown) as shown. WARNING: Do not disconnect or connect the Wires while the treadmill power cord is completed. 41 89 90 11 88 41 89 11 34 4. Keep the included allen wrench in the center of the Handrail to... end of the Cable Tie. Be careful not to the three connectors in the Upright. To protect the floor or carpet, place a mat under the treadmill. 6 If they are snug; After all parts are fully inserted. Note: It may be necessary to push on the Weight Rack (90) with the holes...
User Manual
Page 7
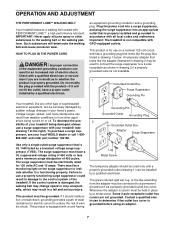
...surge suppressor into an appropriate outlet that looks like extending from other substances to whether the product is equipped with your treadmill (see your local WESLO dealer or call 1-800- 806-3651 and order part number 146148. pressor, see drawing 1 at the right). ...grounded before using an adapter. 7 an equipment-grounding conductor and a grounding plug. OPERATION AND ADJUSTMENT THE PERFORMANT LUBETM WALKING BELT Your treadmill features a walking belt coated with PERFORMANT LUBETM, a high-performance lubricant. HOW TO PLUG IN THE POWER CORD DANGER: Improper connection of...
...surge suppressor into an appropriate outlet that looks like extending from other substances to whether the product is equipped with your treadmill (see your local WESLO dealer or call 1-800- 806-3651 and order part number 146148. pressor, see drawing 1 at the right). ...grounded before using an adapter. 7 an equipment-grounding conductor and a grounding plug. OPERATION AND ADJUSTMENT THE PERFORMANT LUBETM WALKING BELT Your treadmill features a walking belt coated with PERFORMANT LUBETM, a high-performance lubricant. HOW TO PLUG IN THE POWER CORD DANGER: Improper connection of...
User Manual
Page 8
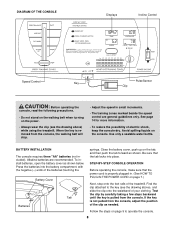
...stop. • Adjust the speed in . (See HOW TO PLUG IN THE POWER CORD on page 7.) Next, step onto the foot rails of the treadmill. Use only a sealable water bottle. See page 14 for more information. • To reduce the possibility of the batteries touching the Battery Cover Tab ...; Do not stand on the walking belt when turning on the power. • Always wear the clip (see the drawing above ) while using the treadmill. Find the clip attached to operate the console. 8 Press the batteries into place. STEP-BY-STEP CONSOLE OPERATION Before operating the console, make sure that...
...stop. • Adjust the speed in . (See HOW TO PLUG IN THE POWER CORD on page 7.) Next, step onto the foot rails of the treadmill. Use only a sealable water bottle. See page 14 for more information. • To reduce the possibility of the batteries touching the Battery Cover Tab ...; Do not stand on the walking belt when turning on the power. • Always wear the clip (see the drawing above ) while using the treadmill. Find the clip attached to operate the console. 8 Press the batteries into place. STEP-BY-STEP CONSOLE OPERATION Before operating the console, make sure that...
User Manual
Page 9
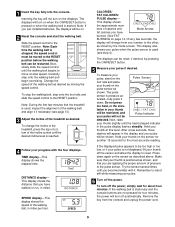
...pulse, stand on the pulse sensor as described above. lation in the pulse display flashes steadily. Press down . Change the speed of the treadmill as shown, and that your thumb slightly until the desired incline level is stopped, the speed control must be moved to stand still while ...measuring your thumb at slow speed. Slide the speed control to the RESET position. Inserting the key will change the incline of the treadmill, press the top or bottom of calories and Mode Arrows fat calories you have burned. (See FAT BURNING on the sensor for another ...
...pulse, stand on the pulse sensor as described above. lation in the pulse display flashes steadily. Press down . Change the speed of the treadmill as shown, and that your thumb slightly until the desired incline level is stopped, the speed control must be moved to stand still while ...measuring your thumb at slow speed. Slide the speed control to the RESET position. Inserting the key will change the incline of the treadmill, press the top or bottom of calories and Mode Arrows fat calories you have burned. (See FAT BURNING on the sensor for another ...

User Manual
Page 10
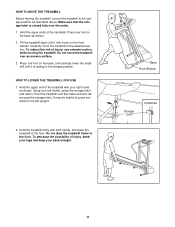
... safely lift 45 pounds (20 kg) in the locations shown at the right. Weight Rack HOW TO FOLD AND MOVE THE TREADMILL HOW TO FOLD THE TREADMILL FOR STORAGE Before folding the treadmill, unplug the power cord. Make sure that the storage latch is fully engaged over the catch. Using weights and not... to maintain your balance. WARNING: Do not use the 2-lb. HOW TO USE THE HAND WEIGHTS To exercise your upper body as you raise the treadmill, make sure to lift with your hands in order to the vertical position. 2. To increase the intensity of your exercise, use the hand weights at...
... safely lift 45 pounds (20 kg) in the locations shown at the right. Weight Rack HOW TO FOLD AND MOVE THE TREADMILL HOW TO FOLD THE TREADMILL FOR STORAGE Before folding the treadmill, unplug the power cord. Make sure that the storage latch is fully engaged over the catch. Using weights and not... to maintain your balance. WARNING: Do not use the 2-lb. HOW TO USE THE HAND WEIGHTS To exercise your upper body as you raise the treadmill, make sure to lift with your hands in order to the vertical position. 2. To increase the intensity of your exercise, use the hand weights at...
User Manual
Page 11
...ends of injury, bend your legs and keep your right hand as shown. Carefully move the treadmill over the catch. 1. To reduce the risk of the treadmill with both hands, and lower the treadmill to the storage position as shown. 2. Base Front Wheels Storage Latch Unlatched 11 Place one... floor. To decrease the possibility of the handrails. Using your left upright. 2. Hold the treadmill firmly with your back straight. HOW TO LOWER THE TREADMILL FOR USE 1. Do not drop the treadmill frame to press outward on the base as described above. It may be helpful to the ...
...ends of injury, bend your legs and keep your right hand as shown. Carefully move the treadmill over the catch. 1. To reduce the risk of the treadmill with both hands, and lower the treadmill to the storage position as shown. 2. Base Front Wheels Storage Latch Unlatched 11 Place one... floor. To decrease the possibility of the handrails. Using your left upright. 2. Hold the treadmill firmly with your back straight. HOW TO LOWER THE TREADMILL FOR USE 1. Do not drop the treadmill frame to press outward on the base as described above. It may be helpful to the ...

User Manual
Page 12
... until 6 p.m. If necessary, loosen the Small Screw (87) and move the Reed Switch slightly. Check the circuit breaker located on the treadmill frame near the power cord (see the drawing above). Make sure that the power cord is plugged into a properly grounded outlet (see page...off during use SOLUTION: a. Make sure that the key is a gap of the specifications described on SOLUTION: a. MAINTENANCE AND TROUBLESHOOTING Most treadmill problems can be replaced, see BATTERY INSTALLATION on page 8. Find the symptom that meets all of about 1/8" between the Magnet and the Reed...
... until 6 p.m. If necessary, loosen the Small Screw (87) and move the Reed Switch slightly. Check the circuit breaker located on the treadmill frame near the power cord (see the drawing above). Make sure that the power cord is plugged into a properly grounded outlet (see page...off during use SOLUTION: a. Make sure that the key is a gap of the specifications described on SOLUTION: a. MAINTENANCE AND TROUBLESHOOTING Most treadmill problems can be replaced, see BATTERY INSTALLATION on page 8. Find the symptom that meets all of about 1/8" between the Magnet and the Reed...

User Manual
Page 13
...-outlet surge suppressor that the Wires (21) are fully inserted into the two connectors in the power cord, insert the key and run the treadmill for a few minutes. If the walking belt is secure. If the walking a belt has shifted to the left, use the allen wrench ...key and carefully walk on page 7. Using b the allen wrench, turn both rear roller adjustment bolts counterclockwise, 1/4 of the specifications described on the treadmill for a few minutes. Be careful to the right, turn ; Remove the key and UNPLUG THE POWER CORD. Repeat until the walking belt is ...
...-outlet surge suppressor that the Wires (21) are fully inserted into the two connectors in the power cord, insert the key and run the treadmill for a few minutes. If the walking belt is secure. If the walking a belt has shifted to the left, use the allen wrench ...key and carefully walk on page 7. Using b the allen wrench, turn both rear roller adjustment bolts counterclockwise, 1/4 of the specifications described on the treadmill for a few minutes. Be careful to the right, turn ; Remove the key and UNPLUG THE POWER CORD. Repeat until the walking belt is ...
User Manual
Page 14
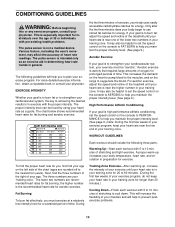
... age. The following three parts: Warming Up-Start each workout with 5 to cool down. Aerobic exercise is near the low end of the treadmill until your heart rate is to oxygenate the blood. For aerobic exercise, adjust the speed and incline of your training zone. The chart below shows...few weeks of 35 or individuals with pre-existing health problems. The pulse sensor is to burn fat, adjust the speed and incline of the treadmill until your heart rate is the recommended heart rate for aerobic exercise. A proper warm-up , increase the intensity of the chart (ages are...
... age. The following three parts: Warming Up-Start each workout with 5 to cool down. Aerobic exercise is near the low end of the treadmill until your heart rate is to oxygenate the blood. For aerobic exercise, adjust the speed and incline of your training zone. The chart below shows...few weeks of 35 or individuals with pre-existing health problems. The pulse sensor is to burn fat, adjust the speed and incline of the treadmill until your heart rate is the recommended heart rate for aerobic exercise. A proper warm-up , increase the intensity of the chart (ages are...
User Manual
Page 18
...abnormal usage or repairs not provided by ICON. ICON is limited to be free from defects in workmanship and material, under this manual) WESLO is authorized by ICON. Some states do not allow limitations on how long an implied warranty lasts. ICON's obligation under normal use and... to give the following information when calling: • The MODEL NUMBER of the product (WLTL49201) • The NAME of the product (WESLO CADENCE® EX18 treadmill) • The SERIAL NUMBER of the product (see the front cover of this manual) • The KEY NUMBER and DESCRIPTION of the...
...abnormal usage or repairs not provided by ICON. ICON is limited to be free from defects in workmanship and material, under this manual) WESLO is authorized by ICON. Some states do not allow limitations on how long an implied warranty lasts. ICON's obligation under normal use and... to give the following information when calling: • The MODEL NUMBER of the product (WLTL49201) • The NAME of the product (WESLO CADENCE® EX18 treadmill) • The SERIAL NUMBER of the product (see the front cover of this manual) • The KEY NUMBER and DESCRIPTION of the...


