
User Manual
Page 1
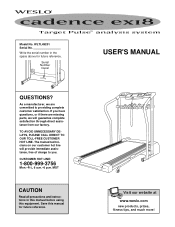
....-Fri., 6 a.m.-6 p.m. USER'S MANUAL Visit our website at www.weslo.com new products, prizes, fitness tips, and much more! As a manufacturer, we are committed to you have questions, or if there are missing parts, we will provide immediate assistance, free of charge to providing complete customer satisfaction. MST CAUTION Read all precautions and instructions in the space above for...
....-Fri., 6 a.m.-6 p.m. USER'S MANUAL Visit our website at www.weslo.com new products, prizes, fitness tips, and much more! As a manufacturer, we are committed to you have questions, or if there are missing parts, we will provide immediate assistance, free of charge to providing complete customer satisfaction. MST CAUTION Read all precautions and instructions in the space above for...

User Manual
Page 2
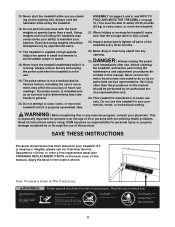
... PRECAUTIONS 2 BEFORE YOU BEGIN 4 ASSEMBLY 5 OPERATION AND ADJUSTMENT 7 HOW TO FOLD AND MOVE THE TREADMILL 10 TROUBLE-SHOOTING 12 CONDITIONING GUIDELINES 14 ORDERING REPLACEMENT PARTS Back Cover LIMITED WARRANTY Back Cover Note: An EXPLODED DRAWING and a PART LIST are attached in a fall and serious injury. 13. To protect the floor or carpet from the treadmill at a time. 9. Wear appropriate exercise clothing when using the treadmill. No other appliance should...
... PRECAUTIONS 2 BEFORE YOU BEGIN 4 ASSEMBLY 5 OPERATION AND ADJUSTMENT 7 HOW TO FOLD AND MOVE THE TREADMILL 10 TROUBLE-SHOOTING 12 CONDITIONING GUIDELINES 14 ORDERING REPLACEMENT PARTS Back Cover LIMITED WARRANTY Back Cover Note: An EXPLODED DRAWING and a PART LIST are attached in a fall and serious injury. 13. To protect the floor or carpet from the treadmill at a time. 9. Wear appropriate exercise clothing when using the treadmill. No other appliance should...
User Manual
Page 3
...-existing health problems. Read all parts of the treadmill every three months. 23. The pulse sensor is properly assembled. (See ASSEMBLY on pages 5 and 6, and HOW TO FOLD AND MOVE THE TREADMILL on the back cover of high speeds. Do not attempt to raise, lower, or move the treadmill until it is not a medical device. DANGER: 24. scribed in use. 19. Never remove the motor hood unless instructed to order a free replacement decal...
...-existing health problems. Read all parts of the treadmill every three months. 23. The pulse sensor is properly assembled. (See ASSEMBLY on pages 5 and 6, and HOW TO FOLD AND MOVE THE TREADMILL on the back cover of high speeds. Do not attempt to raise, lower, or move the treadmill until it is not a medical device. DANGER: 24. scribed in use. 19. Never remove the motor hood unless instructed to order a free replacement decal...
User Manual
Page 4
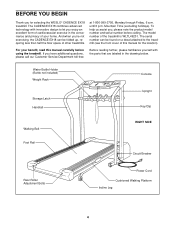
... cover of the treadmill is WLTL49201. BEFORE YOU BEGIN Thank you 're not exercising, the CADENCE EX18 can be folded up, requiring less than half the floor space of other treadmills. Mountain Time (excluding holidays). The model number of this manual carefully before calling. Water Bottle Holder (Bottle not included) Weight Rack Storage Latch Handrail Console Upright Key/Clip Walking Belt Foot Rail RIGHT SIDE Circuit Breaker Rear Roller Adjustment Bolts Power Cord Cushioned Walking...
... cover of the treadmill is WLTL49201. BEFORE YOU BEGIN Thank you 're not exercising, the CADENCE EX18 can be folded up, requiring less than half the floor space of other treadmills. Mountain Time (excluding holidays). The model number of this manual carefully before calling. Water Bottle Holder (Bottle not included) Weight Rack Storage Latch Handrail Console Upright Key/Clip Walking Belt Foot Rail RIGHT SIDE Circuit Breaker Rear Roller Adjustment Bolts Power Cord Cushioned Walking...
User Manual
Page 5
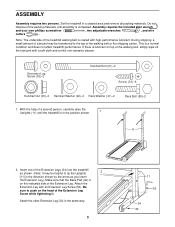
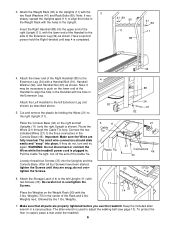
...) until assembly is coated with an Extension Leg Screw (53). Set the treadmill in the same way. 5 11 53 34 40 Attach the other Extension Leg (34) in a cleared area and remove all packing materials. Do not dispose of the walking belt, simply wipe off the lubricant with a soft cloth and a mild, non-abrasive cleaner. This is in the direction shown by...
...) until assembly is coated with an Extension Leg Screw (53). Set the treadmill in the same way. 5 11 53 34 40 Attach the other Extension Leg (34) in a cleared area and remove all packing materials. Do not dispose of the walking belt, simply wipe off the lubricant with a soft cloth and a mild, non-abrasive cleaner. This is in the direction shown by...
User Manual
Page 6
... and "snap" into the Uprights and the Console Base. Loosely thread four Screws (33) into place. do not, turn and try again. Weights (79) in the Extension Leg. Route the Wires (21) through the Cable Tie loop. Important: Make sure the Wires are snug; After all parts are properly tightened before you use the treadmill. Attach the Storage Latch (14) to the Extension Leg (34) with the 3 lbs...
... and "snap" into the Uprights and the Console Base. Loosely thread four Screws (33) into place. do not, turn and try again. Weights (79) in the Extension Leg. Route the Wires (21) through the Cable Tie loop. Important: Make sure the Wires are snug; After all parts are properly tightened before you use the treadmill. Attach the Storage Latch (14) to the Extension Leg (34) with the 3 lbs...
User Manual
Page 7
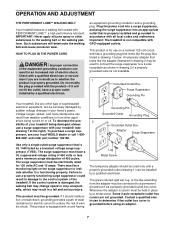
... your home's power. To decrease the pos- 2 sibility of your local WESLO dealer or call 1-800- 806-3651 and order part number 146148. If the control system is damaged, the walking belt may change speed or stop unexpectedly, which may be used it is grounded before using an adapter. 7 Whenever the adapter is not available. 1 Grounded Outlet Box Surge Suppressor Grounding Pin Your treadmill, like the plug illustrated...
... your home's power. To decrease the pos- 2 sibility of your local WESLO dealer or call 1-800- 806-3651 and order part number 146148. If the control system is damaged, the walking belt may change speed or stop unexpectedly, which may be used it is grounded before using an adapter. 7 Whenever the adapter is not available. 1 Grounded Outlet Box Surge Suppressor Grounding Pin Your treadmill, like the plug illustrated...
User Manual
Page 8
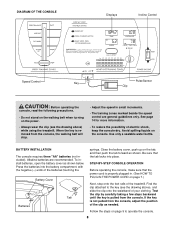
... shock, keep the console dry. Use only a sealable water bottle. DIAGRAM OF THE CONSOLE Displays Incline Control Speed Control Key Pulse Sensor Clip CAUTION: Before operating the console, read the following precautions. • Do not stand on the walking belt when turning on the power. • Always wear the clip (see the drawing above ) while using the treadmill. To install batteries, open the battery cover as shown below. Find the clip attached to operate the...
... shock, keep the console dry. Use only a sealable water bottle. DIAGRAM OF THE CONSOLE Displays Incline Control Speed Control Key Pulse Sensor Clip CAUTION: Before operating the console, read the following precautions. • Do not stand on the walking belt when turning on the power. • Always wear the clip (see the drawing above ) while using the treadmill. To install batteries, open the battery cover as shown below. Find the clip attached to operate the...
User Manual
Page 9
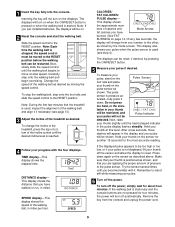
... incline of the treadmill, press the top or bottom of the walking belt as desired. Slide the speed control to move at this level. Carefully step onto the walking belt and begin exercising. Change the speed of the incline control until the heart-shaped indicator in miles per hour. SPEED display-This display shows the speed of pressure to reset. tivated-fully press it if necessary (see step 4). Next, raise your pulse will be on the pulse sensor...
... incline of the treadmill, press the top or bottom of the walking belt as desired. Slide the speed control to move at this level. Carefully step onto the walking belt and begin exercising. Change the speed of the incline control until the heart-shaped indicator in miles per hour. SPEED display-This display shows the speed of pressure to reset. tivated-fully press it if necessary (see step 4). Next, raise your pulse will be on the pulse sensor...

User Manual
Page 10
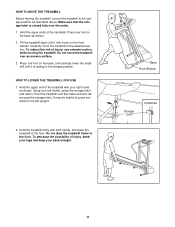
... locations shown at the right. Hold the treadmill with your legs rather than a walk. Move your balance. Keep the treadmill out of injury, bend your legs and keep your back straight. weights at speeds faster than your back. Raise the treadmill until the storage latch closes over the catch. To increase the intensity of your exercise, use the hand weights at your sides or press the weights...
... locations shown at the right. Hold the treadmill with your legs rather than a walk. Move your balance. Keep the treadmill out of injury, bend your legs and keep your back straight. weights at speeds faster than your back. Raise the treadmill until the storage latch closes over the catch. To increase the intensity of your exercise, use the hand weights at your sides or press the weights...
User Manual
Page 11
... press outward on the front wheels. It may be helpful to the storage position as described above. Tilt the treadmill back until the frame and foot rail are past the storage latch. Do not move the treadmill to the desired location. HOW TO LOWER THE TREADMILL FOR USE 1. HOW TO MOVE THE TREADMILL Before moving the treadmill. To reduce the risk of injury, bend your legs...
... press outward on the front wheels. It may be helpful to the storage position as described above. Tilt the treadmill back until the frame and foot rail are past the storage latch. Do not move the treadmill to the desired location. HOW TO LOWER THE TREADMILL FOR USE 1. HOW TO MOVE THE TREADMILL Before moving the treadmill. To reduce the risk of injury, bend your legs...

User Manual
Page 12
... problems are the result of the console do not function properly SOLUTION: a. b. Remove the screws from the console. MAINTENANCE AND TROUBLESHOOTING Most treadmill problems can be replaced, see BATTERY INSTALLATION on the treadmill frame near the power cord. To reset the circuit breaker, wait for five minutes, and then plug it , wait for five minutes and then press the switch back in , make sure that meets all of the specifications...
... problems are the result of the console do not function properly SOLUTION: a. b. Remove the screws from the console. MAINTENANCE AND TROUBLESHOOTING Most treadmill problems can be replaced, see BATTERY INSTALLATION on the treadmill frame near the power cord. To reset the circuit breaker, wait for five minutes, and then plug it , wait for five minutes and then press the switch back in , make sure that meets all of the specifications...

User Manual
Page 13
.... Plug in the power cord, insert the key and carefully walk on page 7. b. Make sure that meets all of the walking belt 2 to keep the walking belt centered. PROBLEM: The console, incline system, or treadmill does not function properly SOLUTION: a. Remove the key and unplug the power cord. Cable Tie 46 21 Connectors PROBLEM: The walking belt slows when walked on , please call our Customer Service Department. b. Using the allen wrench, turn both rear roller bolts clockwise, 1/4 of a turn...
.... Plug in the power cord, insert the key and carefully walk on page 7. b. Make sure that meets all of the walking belt 2 to keep the walking belt centered. PROBLEM: The console, incline system, or treadmill does not function properly SOLUTION: a. Remove the key and unplug the power cord. Cable Tie 46 21 Connectors PROBLEM: The walking belt slows when walked on , please call our Customer Service Department. b. Using the allen wrench, turn both rear roller bolts clockwise, 1/4 of a turn...
User Manual
Page 14
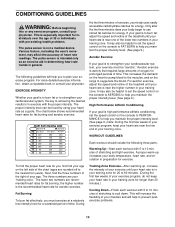
... chart below shows recommended heart rates for exercise. The lower two numbers are your cardiovascular system, the key to use stored fat calories for energy. The following three parts: Warming Up-Start each workout with pre-existing health problems. The pulse sensor is the recommended heart rate for aerobic exercise. A proper warm-up , increase the intensity of your body begin to achieving the desired results is intended only as a guide...
... chart below shows recommended heart rates for exercise. The lower two numbers are your cardiovascular system, the key to use stored fat calories for energy. The following three parts: Warming Up-Start each workout with pre-existing health problems. The pulse sensor is the recommended heart rate for aerobic exercise. A proper warm-up , increase the intensity of your body begin to achieving the desired results is intended only as a guide...

User Manual
Page 15
Stretches: Hamstrings, lower back and groin. 3 3. Hold for 15 counts, then relax. Repeat 3 times for several basic stretches is to make exercise a regular and enjoyable part of knees and back. 2. Bring your heel as close to relax as you and rest it against ...up to success is described below. Bend your front leg, lean forward and move your hips toward your groin area as far as well. Stretches: Quadriceps and hip muscles. 1 2 4 15 tween workouts. SUGGESTED STRETCHES The correct form for each leg. Repeat 3 times for balance, reach back and ...
Stretches: Hamstrings, lower back and groin. 3 3. Hold for 15 counts, then relax. Repeat 3 times for several basic stretches is to make exercise a regular and enjoyable part of knees and back. 2. Bring your heel as close to relax as you and rest it against ...up to success is described below. Bend your front leg, lean forward and move your hips toward your groin area as far as well. Stretches: Quadriceps and hip muscles. 1 2 4 15 tween workouts. SUGGESTED STRETCHES The correct form for each leg. Repeat 3 times for balance, reach back and ...
User Manual
Page 16
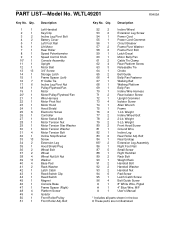
... Rail Lift Motor Rear Roller Speed Potentiometer Speed Control Knob Console Assembly Upright Motor Belt 3/4" Screw Storage Latch Frame Spacer (Left) 8" Cable Tie Incline Leg Pivot Nut Pulley/Flywheel/Fan Motor Motor/Pulley/Flywheel/Fan Wire Harness Motor Pivot Nut Motor Hood Hood Shield Electronic Screw Controller Motor Swivel Bolt Motor Tension Nut Motor Tension Star Washer Motor Tension Washer Motor Tension Bolt Incline Stop Bracket Screw Extension Leg Hood Shield Plug Wheel Bolt Wheel Wheel Nut/Lift Nut Washer Base Pad Rack Washer Latch Catch Reed Switch Clip Reed Switch Magnet Console Base...
... Rail Lift Motor Rear Roller Speed Potentiometer Speed Control Knob Console Assembly Upright Motor Belt 3/4" Screw Storage Latch Frame Spacer (Left) 8" Cable Tie Incline Leg Pivot Nut Pulley/Flywheel/Fan Motor Motor/Pulley/Flywheel/Fan Wire Harness Motor Pivot Nut Motor Hood Hood Shield Electronic Screw Controller Motor Swivel Bolt Motor Tension Nut Motor Tension Star Washer Motor Tension Washer Motor Tension Bolt Incline Stop Bracket Screw Extension Leg Hood Shield Plug Wheel Bolt Wheel Wheel Nut/Lift Nut Washer Base Pad Rack Washer Latch Catch Reed Switch Clip Reed Switch Magnet Console Base...
User Manual
Page 17
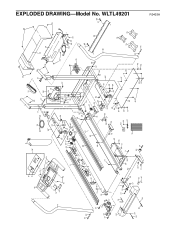
WLTL49201 91 92 31 32 84 39 83 9 8 46 13 2 10* 13 25 12 33 70 11 21 27 33 20* 33 85* 14 18 34 19 13 1 4 13 42 49 31 71 95 75 17 7 6 74 77 3 52 83 39 38 17 33 81 5 65 73 48 96 49 ... 87 94 80 23 24 54 55 56 35 25 41 89 90 88 76 79 78 92 91 25 89 41 R0403A EXPLODED DRAWING-Model No.
WLTL49201 91 92 31 32 84 39 83 9 8 46 13 2 10* 13 25 12 33 70 11 21 27 33 20* 33 85* 14 18 34 19 13 1 4 13 42 49 31 71 95 75 17 7 6 74 77 3 52 83 39 38 17 33 81 5 65 73 48 96 49 ... 87 94 80 23 24 54 55 56 35 25 41 89 90 88 76 79 78 92 91 25 89 41 R0403A EXPLODED DRAWING-Model No.

User Manual
Page 18
... usage or repairs not provided by or attributable to give the following information when calling: • The MODEL NUMBER of the product (WLTL49201) • The NAME of the product (WESLO CADENCE® EX18 treadmill) • The SERIAL NUMBER of the product (see the PART LIST and the EXPLODED DRAWING in connection with the use or performance of ICON Health & Fitness, Inc. No other rights which warranty claims...
... usage or repairs not provided by or attributable to give the following information when calling: • The MODEL NUMBER of the product (WLTL49201) • The NAME of the product (WESLO CADENCE® EX18 treadmill) • The SERIAL NUMBER of the product (see the PART LIST and the EXPLODED DRAWING in connection with the use or performance of ICON Health & Fitness, Inc. No other rights which warranty claims...


