
English Manual
Page 3
... the power cord when the treadmill is damaged, the walking belt may change the incline of burns, fire, electric shock, or injury to raise, lower, or move the treadmill until it is intended only as described. 3. Do not put the treadmill in sandals. 10. If the control system is not in general. 18. Adjust the speed in speed. 7. Use the treadmill only as an exercise aid in determining heart rate...
... the power cord when the treadmill is damaged, the walking belt may change the incline of burns, fire, electric shock, or injury to raise, lower, or move the treadmill until it is intended only as described. 3. Do not put the treadmill in sandals. 10. If the control system is not in general. 18. Adjust the speed in speed. 7. Use the treadmill only as an exercise aid in determining heart rate...
English Manual
Page 4
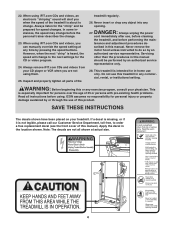
... by an authorized service representative only. 28. Never remove the motor hood unless instructed to order a free replacement decal (see the front cover of this manual. When using them. 25. In some instances, the speed may change . 23. Servicing other than the procedures in any exercise program, consult your treadmill. Always unplug the power cord immediately after use of this or any commercial, rental, or institutional setting. If a decal is...
... by an authorized service representative only. 28. Never remove the motor hood unless instructed to order a free replacement decal (see the front cover of this manual. When using them. 25. In some instances, the speed may change . 23. Servicing other than the procedures in any exercise program, consult your treadmill. Always unplug the power cord immediately after use of this or any commercial, rental, or institutional setting. If a decal is...
English Manual
Page 5
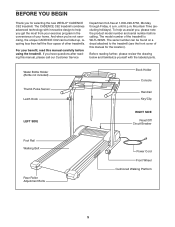
... the treadmill (see the front cover of other treadmills. The CADENCE C62 treadmill combines advanced technology with the labeled parts. The serial number can be found on a decal attached to help us assist you for the location). Water Bottle Holder (Bottle not included) Thumb Pulse Sensor Latch Knob Book Holder Console Handrail Key/Clip LEFT SIDE RIGHT SIDE Reset/Off Circuit Breaker Foot Rail Walking Belt Rear Roller Adjustment Bolts Power Cord Front Wheel Cushioned Walking Platform...
... the treadmill (see the front cover of other treadmills. The CADENCE C62 treadmill combines advanced technology with the labeled parts. The serial number can be found on a decal attached to help us assist you for the location). Water Bottle Holder (Bottle not included) Thumb Pulse Sensor Latch Knob Book Holder Console Handrail Key/Clip LEFT SIDE RIGHT SIDE Reset/Off Circuit Breaker Foot Rail Walking Belt Rear Roller Adjustment Bolts Power Cord Front Wheel Cushioned Walking Platform...
English Manual
Page 6
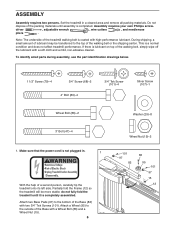
... lubricant. To identify small parts during assembly, use the part identification drawings below. 1 1/2" Screw (79)-4 3/4" Screw (68)-2 4" Bolt (89)-4 3/4" Tek Screw (101)-4 Silver Screw (107)-1 Wheel Bolt (86)-2 3" Bolt (47)-4 1. Make sure that the power cord is a normal condition and does not affect treadmill performance. Attach a Wheel (95) to the top of a second person, carefully tip the treadmill onto its left side. Assembly requires your own Phillips screw- driver , adjustable wrench , wire...
... lubricant. To identify small parts during assembly, use the part identification drawings below. 1 1/2" Screw (79)-4 3/4" Screw (68)-2 4" Bolt (89)-4 3/4" Tek Screw (101)-4 Silver Screw (107)-1 Wheel Bolt (86)-2 3" Bolt (47)-4 1. Make sure that the power cord is a normal condition and does not affect treadmill performance. Attach a Wheel (95) to the top of a second person, carefully tip the treadmill onto its left side. Assembly requires your own Phillips screw- driver , adjustable wrench , wire...
English Manual
Page 7
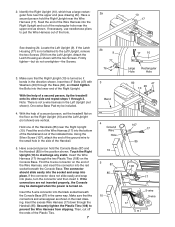
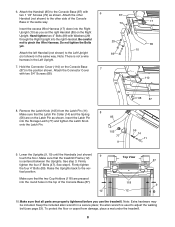
...Upright, remove the two Screws (76) from slipping. Have a second person hold the Console Base (87) and the Handrail (85) in the side of the Handrails (85) near the upper end as shown. If the Latch Housing (77) is turned so it . Attach the Latch Housing as shown in the direction shown. Note: There is turned on the Console... the treadmill onto its other side and repeat steps 1 through the Base (82), and hand tighten the Bolts into the black socket beneath the Console Base (87) in the Left Upright (not shown). Using the Silver Screw (107), attach the end of the ground wire to ...
...Upright, remove the two Screws (76) from slipping. Have a second person hold the Console Base (87) and the Handrail (85) in the side of the Handrails (85) near the upper end as shown. If the Latch Housing (77) is turned so it . Attach the Latch Housing as shown in the direction shown. Note: There is turned on the Console... the treadmill onto its other side and repeat steps 1 through the Base (82), and hand tighten the Bolts into the black socket beneath the Console Base (87) in the Left Upright (not shown). Using the Silver Screw (107), attach the end of the ground wire to ...
English Manual
Page 8
... the Console Base in the same way. Attach the left Handrail (not shown) to adjust the walking belt (see page 23). Lower the Uprights (9, 10) until the Handrails (not shown) 9 touch the floor. See step 6. Make sure that all parts are on the Latch Pin as shown. Hold the Connector Cover (110) on the Right Upright. tical position. Do not tighten the Bolts yet. Remove the Latch Knob...
... the Console Base in the same way. Attach the left Handrail (not shown) to adjust the walking belt (see page 23). Lower the Uprights (9, 10) until the Handrails (not shown) 9 touch the floor. See step 6. Make sure that all parts are on the Latch Pin as shown. Hold the Connector Cover (110) on the Right Upright. tical position. Do not tighten the Bolts yet. Remove the Latch Knob...
English Manual
Page 9
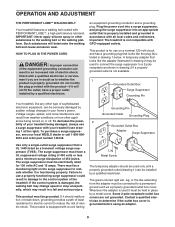
... adapter is not compatible with your home's power. Important: The treadmill is used only until a properly grounded outlet (drawing 1) can be connected to a permanent ground such as to whether the product is damaged, the walking belt may change speed or stop unexpectedly, which may be used to connect the surge suppressor to reduce the risk of electric shock. OPERATION AND ADJUSTMENT THE PERFORMANT LUBETM WALKING BELT...
... adapter is not compatible with your home's power. Important: The treadmill is used only until a properly grounded outlet (drawing 1) can be connected to a permanent ground such as to whether the product is damaged, the walking belt may change speed or stop unexpectedly, which may be used to connect the surge suppressor to reduce the risk of electric shock. OPERATION AND ADJUSTMENT THE PERFORMANT LUBETM WALKING BELT...
English Manual
Page 10
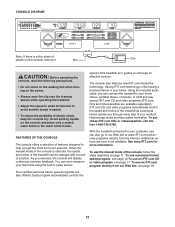
... manual mode of the console is selected, the speed and incline of plastic on the console, remove it guides you exercise, the console will display continuous exercise feedback. You can also go to your home stereo, portable stereo, computer, or VCR and play special iFIT.com CD and video programs (iFIT.com CDs and videocassettes are also offered. Having iFIT.com technology is a thin sheet of the treadmill can connect...
... manual mode of the console is selected, the speed and incline of plastic on the console, remove it guides you exercise, the console will display continuous exercise feedback. You can also go to your home stereo, portable stereo, computer, or VCR and play special iFIT.com CD and video programs (iFIT.com CDs and videocassettes are also offered. Having iFIT.com technology is a thin sheet of the treadmill can connect...
English Manual
Page 11
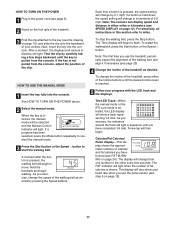
... attached to move. To change the speed of fat calories is shown. Calories/Fat Calories/ Pulse display-This display shows the approximate numbers of your heart rate when you use the treadmill, periodically inspect the alignment of the walking belt, and align it if necessary (see page 23). 4 Change the incline of the Incline buttons until you use the pulse sensor (see step 6 on page 12). HOW TO TURN ON THE POWER 1 Plug in the power cord...
... attached to move. To change the speed of fat calories is shown. Calories/Fat Calories/ Pulse display-This display shows the approximate numbers of your heart rate when you use the treadmill, periodically inspect the alignment of the walking belt, and align it if necessary (see page 23). 4 Change the incline of the Incline buttons until you use the pulse sensor (see step 6 on page 12). HOW TO TURN ON THE POWER 1 Plug in the power cord...
English Manual
Page 12
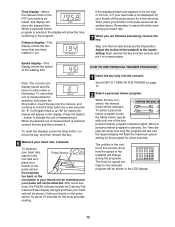
... a personal trainer program. Note: The console can display speed and distance in the center of measurement. To reset the displays, press the Stop button, remove the key, and then reinsert the key. 6 Measure your thumb off the pulse sensor for the selected program will show how the speed of the treadmill will change the unit of the console show the elapsed time. Distance display-This display shows the distance that you are finished exercising, remove the key. Remember...
... a personal trainer program. Note: The console can display speed and distance in the center of measurement. To reset the displays, press the Stop button, remove the key, and then reinsert the key. 6 Measure your thumb off the pulse sensor for the selected program will show how the speed of the treadmill will change the unit of the console show the elapsed time. Distance display-This display shows the distance that you are finished exercising, remove the key. Remember...
English Manual
Page 13
... stop . To end the program, press the Stop button, remove the key, and then reinsert the key. 4 Follow your heart rate, if desired. One speed setting is divided into several time periods of the LED display. The walking belt will be shown in the Time display. Hold the handrails and begin to a stop the program temporarily, press the Stop button. When the first period is pressed, the treadmill will automatically adjust to the first speed setting...
... stop . To end the program, press the Stop button, remove the key, and then reinsert the key. 4 Follow your heart rate, if desired. One speed setting is divided into several time periods of the LED display. The walking belt will be shown in the Time display. Hold the handrails and begin to a stop the program temporarily, press the Stop button. When the first period is pressed, the treadmill will automatically adjust to the first speed setting...
English Manual
Page 16
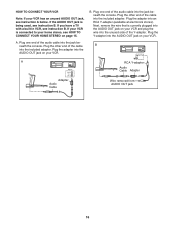
... TO CONNECT YOUR HOME STEREO on your VCR. Plug the other end of the cable into the AUDIO OUT jack on page 15. Plug one end of the Y-adapter. IN VIDEO AUDIO IN CH 34 OUT RF OUT AUDIO OUT RIGHT LEFT B C AUDIO OUT RIGHT LEFT 16 Next, remove the wire that is being used, see instruction A below. Plug the adapter into the jack beneath the console. IN VIDEO AUDIO...
... TO CONNECT YOUR HOME STEREO on your VCR. Plug the other end of the cable into the AUDIO OUT jack on page 15. Plug one end of the Y-adapter. IN VIDEO AUDIO IN CH 34 OUT RF OUT AUDIO OUT RIGHT LEFT B C AUDIO OUT RIGHT LEFT 16 Next, remove the wire that is being used, see instruction A below. Plug the adapter into the jack beneath the console. IN VIDEO AUDIO...
English Manual
Page 17
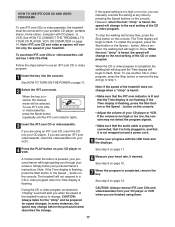
... TO USE IFIT.COM CD AND VIDEO PROGRAMS To use iFIT.com CDs or videocassettes, the treadmill must be connected to your CD player or VCR when you are finished using them. 17 When the key is completed, the walking belt will stop the walking belt at any time, press the Stop button on the console. • Adjust the volume of your VCR. To restart the program, press the Start button or the Speed L button. See step...
... TO USE IFIT.COM CD AND VIDEO PROGRAMS To use iFIT.com CDs or videocassettes, the treadmill must be connected to your CD player or VCR when you are finished using them. 17 When the key is completed, the walking belt will stop the walking belt at any time, press the Stop button on the console. • Adjust the volume of your VCR. To restart the program, press the Start button or the Speed L button. See step...
English Manual
Page 18
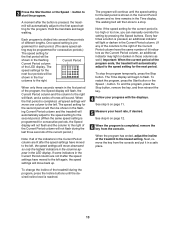
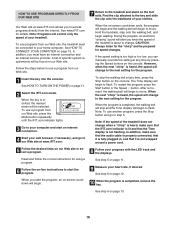
... console. A list of the treadmill is inserted, the manual mode will begin . 8 Follow your heart rate, if desired. When the key is about to change to our Web site at any time, press the Stop button on page 11. 9 Measure your progress with the LED track and the displays. HOW TO USE PROGRAMS DIRECTLY FROM OUR WEB SITE 7 Return to your treadmill. See www.iFIT.com for the program. To use...
... console. A list of the treadmill is inserted, the manual mode will begin . 8 Follow your heart rate, if desired. When the key is about to change to our Web site at any time, press the Stop button on page 11. 9 Measure your progress with the LED track and the displays. HOW TO USE PROGRAMS DIRECTLY FROM OUR WEB SITE 7 Return to your treadmill. See www.iFIT.com for the program. To use...
English Manual
Page 19
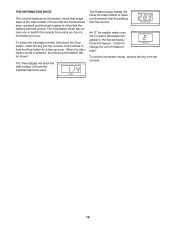
... information mode, remove the key from miles per hour to hold the Stop button for metric kilometers will appear in the Speed display. Press the Speed L button to switch the console from the console. 19 The information mode also allows you to change the unit of measurement. The Distance/Laps display will show the total number of miles (or kilometers) that the walking belt has moved. THE INFORMATION MODE The console features an information mode that keeps track of the total number...
... information mode, remove the key from miles per hour to hold the Stop button for metric kilometers will appear in the Speed display. Press the Speed L button to switch the console from the console. 19 The information mode also allows you to change the unit of measurement. The Distance/Laps display will show the total number of miles (or kilometers) that the walking belt has moved. THE INFORMATION MODE The console features an information mode that keeps track of the total number...

English Manual
Page 22
... a correct speed reading. 22 Remove the hood from the console. If necessary, loosen the 3/4" Screw (76) and move the Reed Switch slightly. Mountain Time (excluding holidays). Important: The treadmill is aligned 76 42 with GFCI-equipped outlets. Reset PROBLEM: The power turns off circuit breaker located on the treadmill frame near the power cord. above). until the Magnet is not compatible with the Reed Switch. c. Reinsert the key fully into...
... a correct speed reading. 22 Remove the hood from the console. If necessary, loosen the 3/4" Screw (76) and move the Reed Switch slightly. Mountain Time (excluding holidays). Important: The treadmill is aligned 76 42 with GFCI-equipped outlets. Reset PROBLEM: The power turns off circuit breaker located on the treadmill frame near the power cord. above). until the Magnet is not compatible with the Reed Switch. c. Reinsert the key fully into...
English Manual
Page 23
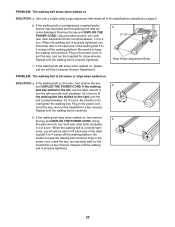
... wrench to overtighten the walking belt. b 3"-4" Rear Roller Adjustment Bolts PROBLEM: The walking belt is correctly tight- Using the allen wrench, turn both rear roller adjustment bolts counterclockwise, 1/4 of the specifications described on , first remove b the key and UNPLUG THE POWER CORD. PROBLEM: The walking belt slows when walked on SOLUTION: a. Plug in the power cord, insert the key, and carefully walk on , please call our toll-free Customer Service Department. c. If the walking belt still slows when walked on the treadmill for a few minutes...
... wrench to overtighten the walking belt. b 3"-4" Rear Roller Adjustment Bolts PROBLEM: The walking belt is correctly tight- Using the allen wrench, turn both rear roller adjustment bolts counterclockwise, 1/4 of the specifications described on , first remove b the key and UNPLUG THE POWER CORD. PROBLEM: The walking belt slows when walked on SOLUTION: a. Plug in the power cord, insert the key, and carefully walk on , please call our toll-free Customer Service Department. c. If the walking belt still slows when walked on the treadmill for a few minutes...
English Manual
Page 24
..., your body begin to use the pulse sensor. To measure your heart rate during exercise, use stored fat calories for you may affect the accuracy of your exercise program, do not keep your exercise program. The pulse sensor is to plan your pulse in general. Only after the first few weeks of heart rate readings. To find the three numbers above your condition, complete three workouts each workout with at...
..., your body begin to use the pulse sensor. To measure your heart rate during exercise, use stored fat calories for you may affect the accuracy of your exercise program, do not keep your exercise program. The pulse sensor is to plan your pulse in general. Only after the first few weeks of heart rate readings. To find the three numbers above your condition, complete three workouts each workout with at...
English Manual
Page 27
... Incline Motor Bolt Incline Motor Spacer Incline Motor Stop Bracket Left Upright Right Upright Latch Pin Frame Pin Clip Latch Pin Collar Wheel Nut/ Incline Motor Nut Belt Guide Screw Wire Harness Hood Bracket Front Hood Bracket Warning Decal Reed Switch Reed Switch Clip Power Board Controller Electronics Bracket Reset/Off Circuit Breaker Power Cord Power Cord Grommet Washer Latch Assembly Incline Frame Frame Pivot Bolt Frame Pivot Spacer Tension Bushing Front Roller Adj. Bolt Motor Latch Decal Console Screw Latch Catch Screw Latch Catch Walking Platform 8" Cable Tie Incline Bolt Motor Tension...
... Incline Motor Bolt Incline Motor Spacer Incline Motor Stop Bracket Left Upright Right Upright Latch Pin Frame Pin Clip Latch Pin Collar Wheel Nut/ Incline Motor Nut Belt Guide Screw Wire Harness Hood Bracket Front Hood Bracket Warning Decal Reed Switch Reed Switch Clip Power Board Controller Electronics Bracket Reset/Off Circuit Breaker Power Cord Power Cord Grommet Washer Latch Assembly Incline Frame Frame Pivot Bolt Frame Pivot Spacer Tension Bushing Front Roller Adj. Bolt Motor Latch Decal Console Screw Latch Catch Screw Latch Catch Walking Platform 8" Cable Tie Incline Bolt Motor Tension...

English Manual
Page 30
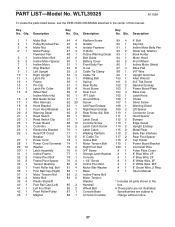
... MODEL NUMBER OF THE PRODUCT (WLTL39325) • The NAME OF THE PRODUCT (WESLO® CADENCE C62 treadmill) • The SERIAL NUMBER OF THE PRODUCT (see the front cover of this manual) • The KEY NUMBER AND DESCRIPTION OF THE PART(S) (see the EXPLODED DRAWING in the center of this manual and the PART LIST on how long an implied warranty lasts. This warranty extends only to the terms set...
... MODEL NUMBER OF THE PRODUCT (WLTL39325) • The NAME OF THE PRODUCT (WESLO® CADENCE C62 treadmill) • The SERIAL NUMBER OF THE PRODUCT (see the front cover of this manual) • The KEY NUMBER AND DESCRIPTION OF THE PART(S) (see the EXPLODED DRAWING in the center of this manual and the PART LIST on how long an implied warranty lasts. This warranty extends only to the terms set...


