
English Manual
Page 3
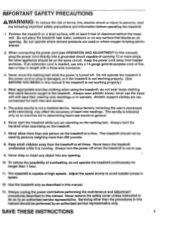
...persons, read the following important safety precautions and information before performing the maintenance and adjustment procedures described in this manual if the treadmill is not working properly.) 4. IMPORTANT SAFETY PRECAUTIONS AWARNING: To reduce the risk of burns, fire, electric shock or injury to... in sandals. SAVE THESE INSTRUCTIONS 3 No other than one person on the same circuit. Athletic support clothes are standing on the treadmill. 7. Never drop or Insert any object Into any surface that could become caught in this manual), plug the power cord directly...
...persons, read the following important safety precautions and information before performing the maintenance and adjustment procedures described in this manual if the treadmill is not working properly.) 4. IMPORTANT SAFETY PRECAUTIONS AWARNING: To reduce the risk of burns, fire, electric shock or injury to... in sandals. SAVE THESE INSTRUCTIONS 3 No other than one person on the same circuit. Athletic support clothes are standing on the treadmill. 7. Never drop or Insert any object Into any surface that could become caught in this manual), plug the power cord directly...
English Manual
Page 4
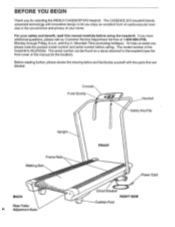
... serial number can be found on a decal attached to let you enjoy an excellent form of cardiovascular exercise in the convenience and privacy of the treadmill is WL970034. The model number of your safety and benefit, read this manual for selecting the WESLO CADENCES 970 treadmill. Mountain Time (excluding holidays).
... serial number can be found on a decal attached to let you enjoy an excellent form of cardiovascular exercise in the convenience and privacy of the treadmill is WL970034. The model number of your safety and benefit, read this manual for selecting the WESLO CADENCES 970 treadmill. Mountain Time (excluding holidays).
English Manual
Page 5
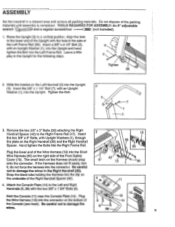
... 13 the Wire Harness (13) into the Short Wire Harness (60) on the bottom of the packing materials until assembly is completed. ASSEMBLY Set the treadmill in the Upright for the following steps. 1 3 1 Tighten 56 2. Do not dispose of 5 I 14 the Console (see inset). Snap the black tube holding the Harness...
... 13 the Wire Harness (13) into the Short Wire Harness (60) on the bottom of the packing materials until assembly is completed. ASSEMBLY Set the treadmill in the Upright for the following steps. 1 3 1 Tighten 56 2. Do not dispose of 5 I 14 the Console (see inset). Snap the black tube holding the Harness...

English Manual
Page 6
... Clip (84). The use of the Pulse Earclip is explained in the Right Handrail (38). Make sure that all parts are tightened before using the treadmill. . 0 78 84 83 6 Press the Allen Wrench (83) into the Wrench Clip. Attach the Console (11) to damage the wires in the LED DISPLAY OPERATION...
... Clip (84). The use of the Pulse Earclip is explained in the Right Handrail (38). Make sure that all parts are tightened before using the treadmill. . 0 78 84 83 6 Press the Allen Wrench (83) into the Wrench Clip. Attach the Console (11) to damage the wires in the LED DISPLAY OPERATION...
English Manual
Page 7
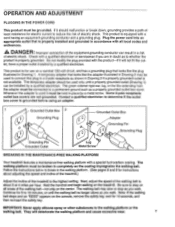
... Outlet Grounded Outlet Box 0 Adapter Grounding Pin 0 0 LI Grounding Plug Lug Metal Screw BREAKING IN THE MAINTENANCE-FREE WALKING PLATFORM Your treadmill features a maintenance-free walking platform with a special hydrocarbon coating. Contact a qualified electrician to the walking platform or the walking belt. ...all local codes and ordinances. The walking belt may be installed by a qualified electrician. Be sure to step on the treadmill. If it will deteriorate the walking platform and cause excessive wear. 7 Check with the product-if it should be used...
... Outlet Grounded Outlet Box 0 Adapter Grounding Pin 0 0 LI Grounding Plug Lug Metal Screw BREAKING IN THE MAINTENANCE-FREE WALKING PLATFORM Your treadmill features a maintenance-free walking platform with a special hydrocarbon coating. Contact a qualified electrician to the walking platform or the walking belt. ...all local codes and ordinances. The walking belt may be installed by a qualified electrician. Be sure to step on the treadmill. If it will deteriorate the walking platform and cause excessive wear. 7 Check with the product-if it should be used...
English Manual
Page 8
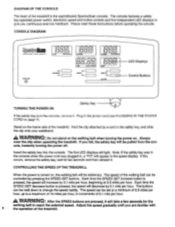
...can be pulled from the console, instantly turning the power off. WARNING: After the SPEED buttons are familiar with 8 the operation of the treadmill. The console features a safety key-operated power switch, electronic speed and incline controls and five independent LED displays to the safety key, ... miles per hour, in the power cord (see PLUGGING IN THE POWER CORD on page 7). Stand on . CONTROLLING THE SPEED OF THE TREADMILL When the power is pressed, the speed will decrease by 0.1 mile per hour. Adjust the speed gradually until you continuous exercise feedback. Please...
...can be pulled from the console, instantly turning the power off. WARNING: After the SPEED buttons are familiar with 8 the operation of the treadmill. The console features a safety key-operated power switch, electronic speed and incline controls and five independent LED displays to the safety key, ... miles per hour, in the power cord (see PLUGGING IN THE POWER CORD on page 7). Stand on . CONTROLLING THE SPEED OF THE TREADMILL When the power is pressed, the speed will decrease by 0.1 mile per hour. Adjust the speed gradually until you continuous exercise feedback. Please...

English Manual
Page 9
... time goals can be helpful to stand still while measuring your pulse will show the total distance you have walked or run for the treadmill to reach the selected incline. SPEED DISPLAY The speed display shows the selected speed of the console, plug the pulse earclip into the jack... of nutritional Calories you have burned. If your collar. The buttons can be stopped quickly, if desired, by pressing the SPEED SET buttons. If the treadmill is run , in a secure location. 9 As you exercise, the time will show the total number of 12%. The five displays will slow to...
... time goals can be helpful to stand still while measuring your pulse will show the total distance you have walked or run for the treadmill to reach the selected incline. SPEED DISPLAY The speed display shows the selected speed of the console, plug the pulse earclip into the jack... of nutritional Calories you have burned. If your collar. The buttons can be stopped quickly, if desired, by pressing the SPEED SET buttons. If the treadmill is run , in a secure location. 9 As you exercise, the time will show the total number of 12%. The five displays will slow to...

English Manual
Page 10
... protrude. (See the drawing above.) To reset the circuit breaker, wait for ten seconds and then reinsert the safety key. Rub your treadmill and follow the steps listed. If a console malfunction occurs, an error code ("PO' or TEEE") may affect the accuracy of five feet... medical device. Various indicators on the display. Attach the clothes clip to be solved by following the simple steps below. b. TROUBLE-SHOOTING Most treadmill problems can be cleaned. Make sure that the safety key is plugged fully into a properly grounded outlet. (See OPERATION AND ADJUSTMENT in this ...
... protrude. (See the drawing above.) To reset the circuit breaker, wait for ten seconds and then reinsert the safety key. Rub your treadmill and follow the steps listed. If a console malfunction occurs, an error code ("PO' or TEEE") may affect the accuracy of five feet... medical device. Various indicators on the display. Attach the clothes clip to be solved by following the simple steps below. b. TROUBLE-SHOOTING Most treadmill problems can be cleaned. Make sure that the safety key is plugged fully into a properly grounded outlet. (See OPERATION AND ADJUSTMENT in this ...
English Manual
Page 11
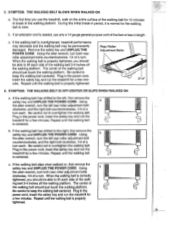
... has shifted to overtighten the walking belt. Repeat until the walking belt is centered. Repeat until the walking belt is needed, use the treadmill, walk on , first remove the safety key and UNPLUG THE POWER CORD. b. Using a the alien wrench, turn the left rear roller..., 1/4 of a turn each side of a turn . During this initial break-in the power cord, insert the safety key and run the treadmill for a few minutes. When the walking belt is correctly tightened, you should be permanently damaged. Repeat until the walking belt is properly tightened. ...
... has shifted to overtighten the walking belt. Repeat until the walking belt is centered. Repeat until the walking belt is needed, use the treadmill, walk on , first remove the safety key and UNPLUG THE POWER CORD. b. Using a the alien wrench, turn the left rear roller..., 1/4 of a turn each side of a turn . During this initial break-in the power cord, insert the safety key and run the treadmill for a few minutes. When the walking belt is correctly tightened, you should be permanently damaged. Repeat until the walking belt is properly tightened. ...
English Manual
Page 16
...of the part(s) from state to state. ACCORDINGLY, THE ABOVE LIMITATION MAY NOT APPLY TO YOU. The MODEL NUMBER of the product (WESLO CADENCES 970 treadmill). 3. This warranty does not extend to any product or damage to a product caused by or attributable to give the following information: 1.... at one of its authorized service c nters. until 6 p.m. No other rights which warranty claim is made must be received by WESLO at one of its authorized service centers with all freight and other transportation charges prepaid, accompanied by sufficient proof of this manual. 5....
...of the part(s) from state to state. ACCORDINGLY, THE ABOVE LIMITATION MAY NOT APPLY TO YOU. The MODEL NUMBER of the product (WESLO CADENCES 970 treadmill). 3. This warranty does not extend to any product or damage to a product caused by or attributable to give the following information: 1.... at one of its authorized service c nters. until 6 p.m. No other rights which warranty claim is made must be received by WESLO at one of its authorized service centers with all freight and other transportation charges prepaid, accompanied by sufficient proof of this manual. 5....


