

English Manual
Page 3
... of the owner to ensure that blocks any opening. 17. outdoore, or on page 4 if the treadmill is being administered. Keep-small:children and pets away from the treadmill at a time. • ' When Connecting the power cord (see HOW :TO PLUG IN THE POWER...only • as .describedirthis.:: .::S••AVEs..i.."TH" ESE" . 4.nms&A,3...,:kautt.Q.AWK 3 Always unplug the power cord before operating the treadmill. IMPORTANT PRECAUTIONS A WARNING: To reduce the risk of burns, fire, electric shock or injury to avoid sudden jumps in this manual. Always wear...
... of the owner to ensure that blocks any opening. 17. outdoore, or on page 4 if the treadmill is being administered. Keep-small:children and pets away from the treadmill at a time. • ' When Connecting the power cord (see HOW :TO PLUG IN THE POWER...only • as .describedirthis.:: .::S••AVEs..i.."TH" ESE" . 4.nms&A,3...,:kautt.Q.AWK 3 Always unplug the power cord before operating the treadmill. IMPORTANT PRECAUTIONS A WARNING: To reduce the risk of burns, fire, electric shock or injury to avoid sudden jumps in this manual. Always wear...
English Manual
Page 4
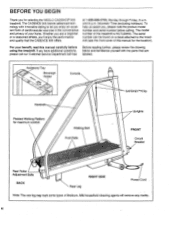
... Department toll-free Before reading further, please review the drawing below and familiarize yourself with innovative styling to the treadmill (see the front cover of your benefit, read this manual for selecting the WESLO CADENCES 905 treadmill. Whether you are a beginner or a seasoned athlete, you'll enjoy the performance and quality that are labeled. For...
... Department toll-free Before reading further, please review the drawing below and familiarize yourself with innovative styling to the treadmill (see the front cover of your benefit, read this manual for selecting the WESLO CADENCES 905 treadmill. Whether you are a beginner or a seasoned athlete, you'll enjoy the performance and quality that are labeled. For...

English Manual
Page 5
...Bushing (39)-4 \\\\\\\\ 3/8' x 3 1/2" Bolt (59)-2 \\\.\3\/\8\" x 1" Bolt (14)-2 _ Jnsert an Upright Bushing (39) into the hole in the left side of the treadmill Frame (54). Insert an Upright Bushing (39) into the right Upright and the Upright Spacer. Assembly re- Do not tighten the Bolt yet. Refer to... the drawings below to the Console with a 3/8" Wasner (15), into the indicated hole in the right side of the treadmill Frame (54). Insert a 3/8" x 3" Bolt (35), with a 3/8" x 1" Bolt (14) as shown. Assemble the left side of the Console ...
...Bushing (39)-4 \\\\\\\\ 3/8' x 3 1/2" Bolt (59)-2 \\\.\3\/\8\" x 1" Bolt (14)-2 _ Jnsert an Upright Bushing (39) into the hole in the left side of the treadmill Frame (54). Insert an Upright Bushing (39) into the right Upright and the Upright Spacer. Assembly re- Do not tighten the Bolt yet. Refer to... the drawings below to the Console with a 3/8" Wasner (15), into the indicated hole in the right side of the treadmill Frame (54). Insert a 3/8" x 3" Bolt (35), with a 3/8" x 1" Bolt (14) as shown. Assemble the left side of the Console ...

English Manual
Page 6
... the same manner (not shown). Remove the paper backing from the Wrench Clip (23). Tighten all parts are tightened before using the treadmill. Note: Cover the floor underneath the treadmill for protection. 6 70 69 6 Attach the lower end of the left Handrail to the Frame (54) with a 3/8" x 3 1/2" Bolt (59) and a 3/8" Washer (15...
... the same manner (not shown). Remove the paper backing from the Wrench Clip (23). Tighten all parts are tightened before using the treadmill. Note: Cover the floor underneath the treadmill for protection. 6 70 69 6 Attach the lower end of the left Handrail to the Frame (54) with a 3/8" x 3 1/2" Bolt (59) and a 3/8" Washer (15...

English Manual
Page 7
OPERATION AND ADJUSTMENT THE PERFORMANT LUBETM WALKING BELT Your treadmill features a walking belt coated with a cord having an equipment-grounding conductor and a grounding plug. Some 2-pole receptacle outlet box covers are recommended. Slide the battery ...
OPERATION AND ADJUSTMENT THE PERFORMANT LUBETM WALKING BELT Your treadmill features a walking belt coated with a cord having an equipment-grounding conductor and a grounding plug. Some 2-pole receptacle outlet box covers are recommended. Slide the battery ...

English Manual
Page 8
E l • c t r an i FAT SUN MORK PRFORAAANCE SPEED. DIAGRAM OF THE CONSOLE Speed Control Monitor Displays / Pulse Display F n ZONES s. WARMI. un SPEED Ct.I/ CLEAR 2 2 I TIME/ C4 103 THUMB PUtSE has Imam gash, oal fa pas rads. SAFEKEY Pulse Clip Sensor Incline Switch 04,-17Ra% Mer m tow e a ?u 04 orwp. POWER A INCUNE v Note: If there is a thin sheet of clear plastic on the face of the console, remove it. SET MN STEPtySTEP 0 OPERATION: O © INSERT SAFEKEY FUSS ON/CLEAR BUTTON RESET SPEED, Thiel SET TO DESIRED LEVEL 00 0 ON OFF JC F 7 CI CAL/ T CAL D. er# t&#...
E l • c t r an i FAT SUN MORK PRFORAAANCE SPEED. DIAGRAM OF THE CONSOLE Speed Control Monitor Displays / Pulse Display F n ZONES s. WARMI. un SPEED Ct.I/ CLEAR 2 2 I TIME/ C4 103 THUMB PUtSE has Imam gash, oal fa pas rads. SAFEKEY Pulse Clip Sensor Incline Switch 04,-17Ra% Mer m tow e a ?u 04 orwp. POWER A INCUNE v Note: If there is a thin sheet of clear plastic on the face of the console, remove it. SET MN STEPtySTEP 0 OPERATION: O © INSERT SAFEKEY FUSS ON/CLEAR BUTTON RESET SPEED, Thiel SET TO DESIRED LEVEL 00 0 ON OFF JC F 7 CI CAL/ T CAL D. er# t&#...
English Manual
Page 9
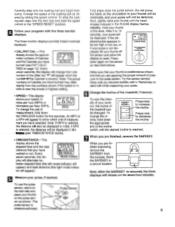
... 5 to stand still while measuring your pulse, if desired. Try the sensor several times until the heart- To vary the intensity of the treadmill, if desired. When you are finished, remove the SAFEKEY. The pulse sensor is near the lowest or highest setting. • SPEED-This ...display shows your workout, the incline of the treadmill can POWER A INCUNE v Press here to decrease cline, hold down the incline the appropriate end of pressure to the "SPEED RESET" position. ...
... 5 to stand still while measuring your pulse, if desired. Try the sensor several times until the heart- To vary the intensity of the treadmill, if desired. When you are finished, remove the SAFEKEY. The pulse sensor is near the lowest or highest setting. • SPEED-This ...display shows your workout, the incline of the treadmill can POWER A INCUNE v Press here to decrease cline, hold down the incline the appropriate end of pressure to the "SPEED RESET" position. ...

English Manual
Page 10
... cord is needed , use only a 14-gauge general-purpose cord of five feet or less in the power cord, insert the SAFEKEY and run the treadmill for a few minutes. b. Make sure that the SAFEKEY is plugged in . Tripped Reset 2. If the circuit breaker has tripped (see the drawing above... a.m. To reset the circuit breaker, wait for five minutes and then press the switch back in the power cord, insert the SAFEKEY and run the treadmill for a few minutes. Make sure that applies, and follow the steps listed. SYMPTOM: THE WALKING BELT SLOWS WHEN WALKED ON a. If the walking belt...
... cord is needed , use only a 14-gauge general-purpose cord of five feet or less in the power cord, insert the SAFEKEY and run the treadmill for a few minutes. b. Make sure that the SAFEKEY is plugged in . Tripped Reset 2. If the circuit breaker has tripped (see the drawing above... a.m. To reset the circuit breaker, wait for five minutes and then press the switch back in the power cord, insert the SAFEKEY and run the treadmill for a few minutes. Make sure that applies, and follow the steps listed. SYMPTOM: THE WALKING BELT SLOWS WHEN WALKED ON a. If the walking belt...

English Manual
Page 11
... bolts, washers and spacers from the lower ends of the left and right handrails (see drawing 1). Remove the bolts from the console and cover the treadmill during extended periods of storage. 2 Remove Loosen Remove 11 Keep the bolts, washers and spacers in the uprights. Loosen the other bolts in a safe place... bolts and washers in use. Remove the batteries from the upper ends of the left and right uprights. STORAGE Unplug the power cord when the treadmill is not in a safe place for future use. Lower the uprights and lay the console on the...
... bolts, washers and spacers from the lower ends of the left and right handrails (see drawing 1). Remove the bolts from the console and cover the treadmill during extended periods of storage. 2 Remove Loosen Remove 11 Keep the bolts, washers and spacers in the uprights. Loosen the other bolts in a safe place... bolts and washers in use. Remove the batteries from the upper ends of the left and right uprights. STORAGE Unplug the power cord when the treadmill is not in a safe place for future use. Lower the uprights and lay the console on the...

English Manual
Page 16
...ICON"), warrants this product to give the following information: • The MODEL NUMBER of the product (WLTL90551). • The NAME of the product (WESLO CADENCES 905 treadmill). • The SERIAL NUMBER of the product (see the front cover of this manual). • The KEY NUMBER of the part(s) from page ...above is limited to state. SOME STATES DO NOT ALLOW LIMITATIONS ON HOW LONG AN IMPLIED WARRANTY LASTS. If possible, place the treadmill near your telephone for products usedas store display models. ICON's obligation under normal use and service conditions, for which vary from ...
...ICON"), warrants this product to give the following information: • The MODEL NUMBER of the product (WLTL90551). • The NAME of the product (WESLO CADENCES 905 treadmill). • The SERIAL NUMBER of the product (see the front cover of this manual). • The KEY NUMBER of the part(s) from page ...above is limited to state. SOME STATES DO NOT ALLOW LIMITATIONS ON HOW LONG AN IMPLIED WARRANTY LASTS. If possible, place the treadmill near your telephone for products usedas store display models. ICON's obligation under normal use and service conditions, for which vary from ...


