

English Manual
Page 3
...8226; • • trends in:general. Athletic support clothes are standing on the walking belt Always hold the handrails while using the treadmill. Never start the treadmill while you are recom- f ?•• 14-40- 15, Never leave t•he treadmi unattended.while is -not a medical ...AVEs..i.."TH" ESE" . 4.nms&A,3...,:kautt.Q.AWK 3 Never remove the motor hood unless instructed to protect the floor or carpet. Place the treadmill on the treadmill at all times. mended for longer than one person on a level surface, with at least 8 feet of five feet or less in ...
...8226; • • trends in:general. Athletic support clothes are standing on the walking belt Always hold the handrails while using the treadmill. Never start the treadmill while you are recom- f ?•• 14-40- 15, Never leave t•he treadmi unattended.while is -not a medical ...AVEs..i.."TH" ESE" . 4.nms&A,3...,:kautt.Q.AWK 3 Never remove the motor hood unless instructed to protect the floor or carpet. Place the treadmill on the treadmill at all times. mended for longer than one person on a level surface, with at least 8 feet of five feet or less in ...
English Manual
Page 4
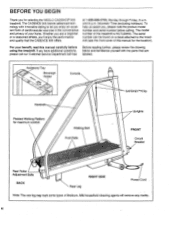
...YOU BEGIN Thank you 'll enjoy the performance and quality that are a beginner or a seasoned athlete, you for selecting the WESLO CADENCES 905 treadmill. Mild household cleaning agents will remove any marks. 4 If you , please note the product model number and serial number before using the... treadmill. For your home. The CADENCE 905 blends adVanced technology with the parts that the CADENCE 905 offers. To help us assist you have additional questions, please call our Customer Service Department ...
...YOU BEGIN Thank you 'll enjoy the performance and quality that are a beginner or a seasoned athlete, you for selecting the WESLO CADENCES 905 treadmill. Mild household cleaning agents will remove any marks. 4 If you , please note the product model number and serial number before using the... treadmill. For your home. The CADENCE 905 blends adVanced technology with the parts that the CADENCE 905 offers. To help us assist you have additional questions, please call our Customer Service Department ...

English Manual
Page 5
... Console (8). Insert a 3/8" x 3" Bolt (35), with a 3/8" x 1" Bolt (14) as shown. Insert an Upright Bushing into the hole in the left side of the treadmill Frame (not shown) in the same manner. 54 39 2. Insert an Upright Bushing into the hole in the left side of the... manner. 3 54 15 35 12 1st-- 39 54 4. Do not dispose of the right Upright. Raise the right Uprigiiin) and the left side of the treadmill Frame (54). Hold an Upright Spacer (12) inside the lower end of the packing materials until assembly is completed. O O \\\\\\\\ 3/8" x 3" Bolt (35)-2 Upright Spacer (...
... Console (8). Insert a 3/8" x 3" Bolt (35), with a 3/8" x 1" Bolt (14) as shown. Insert an Upright Bushing into the hole in the left side of the treadmill Frame (not shown) in the same manner. 54 39 2. Insert an Upright Bushing into the hole in the left side of the... manner. 3 54 15 35 12 1st-- 39 54 4. Do not dispose of the right Upright. Raise the right Uprigiiin) and the left side of the treadmill Frame (54). Hold an Upright Spacer (12) inside the lower end of the packing materials until assembly is completed. O O \\\\\\\\ 3/8" x 3" Bolt (35)-2 Upright Spacer (...

English Manual
Page 6
... Rear Endcap (70) in the same manner (not shown). Make sure that all Bolts used in steps 2 through 5. 5 54 6. Note: Cover the floor underneath the treadmill for protection. 6 70 69 6 5. Attach the lower end of the left Handrail to the Frame (54) with a 3/8" x 3 1/2" Bolt (59) and a 3/8" Washer (15) as shown. Attach... Handrail (4) to the Frame in the indicated location. Press the Allen Wrench (69) into the Wrench Clip. Tighten all parts are tightened before using the treadmill.
... Rear Endcap (70) in the same manner (not shown). Make sure that all Bolts used in steps 2 through 5. 5 54 6. Note: Cover the floor underneath the treadmill for protection. 6 70 69 6 5. Attach the lower end of the left Handrail to the Frame (54) with a 3/8" x 3 1/2" Bolt (59) and a 3/8" Washer (15) as shown. Attach... Handrail (4) to the Frame in the indicated location. Press the Allen Wrench (69) into the Wrench Clip. Tighten all parts are tightened before using the treadmill.

English Manual
Page 7
... BATTERIES IN THE CONSOLE The console requires three "AA" batteries (not included); Close the battery cover. OPERATION AND ADJUSTMENT THE PERFORMANT LUBETM WALKING BELT Your treadmill features a walking belt coated with the negative (-) ends of the batteries touching the springs. This product is grounded before using an adapter. tie eE 01e...
... BATTERIES IN THE CONSOLE The console requires three "AA" batteries (not included); Close the battery cover. OPERATION AND ADJUSTMENT THE PERFORMANT LUBETM WALKING BELT Your treadmill features a walking belt coated with the negative (-) ends of the batteries touching the springs. This product is grounded before using an adapter. tie eE 01e...

English Manual
Page 8
WARMI. E l • c t r an i FAT SUN MORK PRFORAAANCE SPEED. SET MN STEPtySTEP 0 OPERATION: O © INSERT SAFEKEY FUSS ON/CLEAR BUTTON RESET SPEED, Thiel SET TO DESIRED LEVEL 00 0 ON OFF JC F 7 CI CAL/ T CAL D. SAFEKEY Pulse Clip Sensor Incline Switch 04,-17Ra% Mer m tow e a ?u 04 orwp. er# t• DIAGRAM OF THE CONSOLE Speed Control Monitor Displays / Pulse Display F n ZONES s. un SPEED Ct.I/ CLEAR 2 2 I TIME/ C4 103 THUMB PUtSE has Imam gash, oal fa pas rads. POWER A INCUNE v Note: If there is a thin sheet of clear plastic on the face of the console, ...
WARMI. E l • c t r an i FAT SUN MORK PRFORAAANCE SPEED. SET MN STEPtySTEP 0 OPERATION: O © INSERT SAFEKEY FUSS ON/CLEAR BUTTON RESET SPEED, Thiel SET TO DESIRED LEVEL 00 0 ON OFF JC F 7 CI CAL/ T CAL D. SAFEKEY Pulse Clip Sensor Incline Switch 04,-17Ra% Mer m tow e a ?u 04 orwp. er# t• DIAGRAM OF THE CONSOLE Speed Control Monitor Displays / Pulse Display F n ZONES s. un SPEED Ct.I/ CLEAR 2 2 I TIME/ C4 103 THUMB PUtSE has Imam gash, oal fa pas rads. POWER A INCUNE v Note: If there is a thin sheet of clear plastic on the face of the console, ...
English Manual
Page 9
... the 0 SAFEKEY from one number to the other (an "F' will appear to 10 seconds, your pulse will appear). Change the speed of the treadmill, if desired. Every seven seconds, the dis- Fully press down again on for pass nulling the sensor and allow the display to stand still while.... Make sure that you have burned may differ slightly from the numbers shown if the speed or in kilo- To change the unit of the treadmill can POWER A INCUNE v Press here to the "SPEED RESET" position. Press here to the pulse sensor. The pulse sensor is not displayed, ...
... the 0 SAFEKEY from one number to the other (an "F' will appear to 10 seconds, your pulse will appear). Change the speed of the treadmill, if desired. Every seven seconds, the dis- Fully press down again on for pass nulling the sensor and allow the display to stand still while.... Make sure that you have burned may differ slightly from the numbers shown if the speed or in kilo- To change the unit of the treadmill can POWER A INCUNE v Press here to the "SPEED RESET" position. Press here to the pulse sensor. The pulse sensor is not displayed, ...

English Manual
Page 10
... a. b. If the walking belt has shifted to the left, first remove the SAFEKEY and UNPLUG THE POWER CORD. TROUBLE-SHOOTING AND STORAGE Most treadmill problems can be solved by following the simple steps below. Make sure that the SAFEKEY is fully inserted into the console. (See page 8.) ...rear roller adjustment bolt clockwise 1/4 of a turn . until 6 p.m. Mountain Time. 1. Plug in the power cord, insert the SAFEKEY and run the treadmill for a few minutes. To reset the circuit breaker, wait for five minutes and then press the switch back in . Tripped Reset 2. If the circuit ...
... a. b. If the walking belt has shifted to the left, first remove the SAFEKEY and UNPLUG THE POWER CORD. TROUBLE-SHOOTING AND STORAGE Most treadmill problems can be solved by following the simple steps below. Make sure that the SAFEKEY is fully inserted into the console. (See page 8.) ...rear roller adjustment bolt clockwise 1/4 of a turn . until 6 p.m. Mountain Time. 1. Plug in the power cord, insert the SAFEKEY and run the treadmill for a few minutes. To reset the circuit breaker, wait for five minutes and then press the switch back in . Tripped Reset 2. If the circuit ...

English Manual
Page 11
Remove the bolts and washers from the console and cover the treadmill during extended periods of the left and right handrails (see drawing 1). Loosen the other bolts in a safe place for future use. Remove the batteries from ... Remove 11 Keep the bolts, washers and spacers in the uprights. Keep all bolts and washers in use. STORAGE Unplug the power cord when the treadmill is not in a safe place for future use. Lower the uprights and lay the console on the...
Remove the bolts and washers from the console and cover the treadmill during extended periods of the left and right handrails (see drawing 1). Loosen the other bolts in a safe place for future use. Remove the batteries from ... Remove 11 Keep the bolts, washers and spacers in the uprights. Keep all bolts and washers in use. STORAGE Unplug the power cord when the treadmill is not in a safe place for future use. Lower the uprights and lay the console on the...

English Manual
Page 16
...retums must be prepared to give the following information: • The MODEL NUMBER of the product (WLTL90551). • The NAME of the product (WESLO CADENCES 905 treadmill). • The SERIAL NUMBER of the product (see the front cover of this manual). • The KEY NUMBER of the part(s) from page ...14 of this product to the original purchaser. No other transportation charges prepaid, accompanied by ICON. If possible, place the treadmill near your telephone for a period of ninety (90) days from the date of purchase. ICON IS NOT RESPONSIBLE OR LIABLE FOR INDIRECT, ...
...retums must be prepared to give the following information: • The MODEL NUMBER of the product (WLTL90551). • The NAME of the product (WESLO CADENCES 905 treadmill). • The SERIAL NUMBER of the product (see the front cover of this manual). • The KEY NUMBER of the part(s) from page ...14 of this product to the original purchaser. No other transportation charges prepaid, accompanied by ICON. If possible, place the treadmill near your telephone for a period of ninety (90) days from the date of purchase. ICON IS NOT RESPONSIBLE OR LIABLE FOR INDIRECT, ...


