
English Manual
Page 4
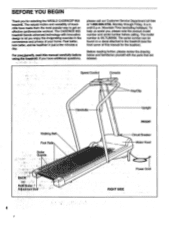
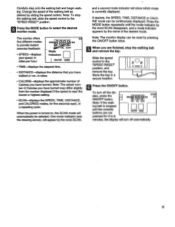
... before using the treadmill. The natural motion and versatility of this :manual carefully before calling. Speed Control Console Walking Belt Foot Rails Roller r Guards Rearfioller AdjustMent-Bor Handrails Key/Clip Upright FRONT Circuit Breaker Motor Hood Power Cord RIGHT SIDE...999-3756, Monday through Friday, 6 a.m. For youc,beneflt, read this .manual for selecting the WESLO CADENCE• 805 treadmill. BEFORE YOU BEGIN Thank you for the location). The CADENCE 805 treadmill blends advanced technology with the parts that are labeled. Mountain Time (excluding holidays).
... before using the treadmill. The natural motion and versatility of this :manual carefully before calling. Speed Control Console Walking Belt Foot Rails Roller r Guards Rearfioller AdjustMent-Bor Handrails Key/Clip Upright FRONT Circuit Breaker Motor Hood Power Cord RIGHT SIDE...999-3756, Monday through Friday, 6 a.m. For youc,beneflt, read this .manual for selecting the WESLO CADENCE• 805 treadmill. BEFORE YOU BEGIN Thank you for the location). The CADENCE 805 treadmill blends advanced technology with the parts that are labeled. Mountain Time (excluding holidays).
English Manual
Page 6
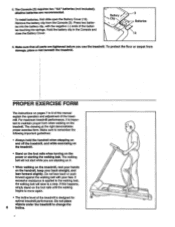
...the foot rails until the walking begins to change the 6 incline. Make sure to 9 of the batteries touching the springs. The walking belt will slow to maintain proper form when walking on the handrail, keep your back straight, and lean forward slightly. Make sure that all ...parts are tightened before you are recommended. If excessive resistance is applied to the walking belt, the walking belt will not start while you use the treadmill. alkaline batteries are standing on it is designed for optimal treadmill performance. To install ...
...the foot rails until the walking begins to change the 6 incline. Make sure to 9 of the batteries touching the springs. The walking belt will slow to maintain proper form when walking on the handrail, keep your back straight, and lean forward slightly. Make sure that all ...parts are tightened before you are recommended. If excessive resistance is applied to the walking belt, the walking belt will not start while you use the treadmill. alkaline batteries are standing on it is designed for optimal treadmill performance. To install ...
English Manual
Page 7
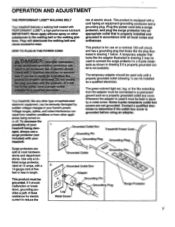
... by a qualified electrician. 'UN The green-colored rigid ear, lug, or the like the adapter illustrated in drawing 2 may be connected to the walking belt or the walking platform. Whenever the adapter is grounded before using an adapter. Some 2-pole receptacle outlet box covers are sold at 15 amps, with... such as shown in place by sudden voltage changes in accordance with all local codes and ordinances. OPERATION AND ADJUSTMENT THE PERFORMANT LUBETh WALKING BELT Your treadmill features a walking belt coated with a 2 14-gauge cord of five feet or less in drawing 1 below.
... by a qualified electrician. 'UN The green-colored rigid ear, lug, or the like the adapter illustrated in drawing 2 may be connected to the walking belt or the walking platform. Whenever the adapter is grounded before using an adapter. Some 2-pole receptacle outlet box covers are sold at 15 amps, with... such as shown in place by sudden voltage changes in accordance with all local codes and ordinances. OPERATION AND ADJUSTMENT THE PERFORMANT LUBETh WALKING BELT Your treadmill features a walking belt coated with a 2 14-gauge cord of five feet or less in drawing 1 below.
English Manual
Page 8
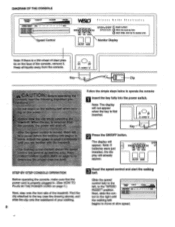
Keep all liquids away from the console. CAL OPERATION: 0 PRESS ON/CLEAR BUTTON 0 RESET SPEED, THEN SET TO DESIRED LEVEL \ Monitor Display ON/OFF MODE Note: If there is a thin sheet of clear plastic on the face of the console, remove it. ON OFF A SAFEKEY V Key Clip Follow the simple steps below to operate the console: Speed Control F i ta•ss Ould• E lect roni c s STEPbySiEP 0 INSERT SAFEKEY scAh, car. DIAGRAM OF THE CONSOLE TNRANINING WARMUP SPEED•RESET • FAT BUM • • MAX.
Keep all liquids away from the console. CAL OPERATION: 0 PRESS ON/CLEAR BUTTON 0 RESET SPEED, THEN SET TO DESIRED LEVEL \ Monitor Display ON/OFF MODE Note: If there is a thin sheet of clear plastic on the face of the console, remove it. ON OFF A SAFEKEY V Key Clip Follow the simple steps below to operate the console: Speed Control F i ta•ss Ould• E lect roni c s STEPbySiEP 0 INSERT SAFEKEY scAh, car. DIAGRAM OF THE CONSOLE TNRANINING WARMUP SPEED•RESET • FAT BUM • • MAX.
English Manual
Page 9
... from the number displayed if the speed is currently displayed. When the power is stopped and the console buttons are finished, stop the walking belt, slide the speed control to the •SPEED RESET" position. 4 Press the MODE button to 6 minutes, the display will show which... mode indicator (see the drawing above), will automatically be selected. Note: The monitor display can be reset by the name of the walking belt as desired by the word SCAN, and a second mode indicator will turn off automatically. 9 Press the MODE button repeatedly until the mode indicator...
... from the number displayed if the speed is currently displayed. When the power is stopped and the console buttons are finished, stop the walking belt, slide the speed control to the •SPEED RESET" position. 4 Press the MODE button to 6 minutes, the display will show which... mode indicator (see the drawing above), will automatically be selected. Note: The monitor display can be reset by the name of the walking belt as desired by the word SCAN, and a second mode indicator will turn off automatically. 9 Press the MODE button repeatedly until the mode indicator...
English Manual
Page 10
...c. b. Carefully remove 1/8" the hood. Locate the Reed Switch (73) and the Magnet (7) on the treadmill frame near the power cord. SYMPTOM: THE WALKING BELT SLOWS OR STOPS WHEN WALKED ON a. Make sure that the surge protector is fully inserted into a properly grounded outlet. (See HOW TO PLUG IN THE... with the Reed Switch. Make sure that applies to check for five minutes and then press the switch back in . 2. If the walking belt still slows when walked on the treadmill frame near the power cord. b. If the speed display does not show a correct reading, remove the...
...c. b. Carefully remove 1/8" the hood. Locate the Reed Switch (73) and the Magnet (7) on the treadmill frame near the power cord. SYMPTOM: THE WALKING BELT SLOWS OR STOPS WHEN WALKED ON a. Make sure that the surge protector is fully inserted into a properly grounded outlet. (See HOW TO PLUG IN THE... with the Reed Switch. Make sure that applies to check for five minutes and then press the switch back in . 2. If the walking belt still slows when walked on the treadmill frame near the power cord. b. If the speed display does not show a correct reading, remove the...
English Manual
Page 11
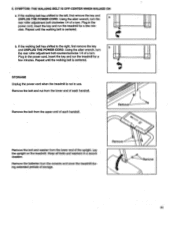
... turn . Remove the batteries from the upper end of a turn the rear roller adjustment bolt clockwise 1/4 of storage. b. If the walking belt has shifted to the left, first remove the key and UNPLUG THE POWER CORD. STORAGE Unplug the power cord when the treadmill is centered. Remove... bolt counterclockwise 1/4 of each handrail. Lay the upright on the treadmill. Using the allen wrench, turn . Repeat until the walking belt is centered. Keep allbolts and washers in the power cord, insert the key and run the treadmill for a few minutes. SYMPTOM: THE WALKING...
... turn . Remove the batteries from the upper end of a turn the rear roller adjustment bolt clockwise 1/4 of storage. b. If the walking belt has shifted to the left, first remove the key and UNPLUG THE POWER CORD. STORAGE Unplug the power cord when the treadmill is centered. Remove... bolt counterclockwise 1/4 of each handrail. Lay the upright on the treadmill. Using the allen wrench, turn . Repeat until the walking belt is centered. Keep allbolts and washers in the power cord, insert the key and run the treadmill for a few minutes. SYMPTOM: THE WALKING...
English Manual
Page 14
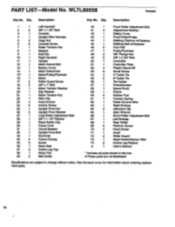
...1 Circuit Breaker 32 1 Upright Pivot Bolt 33 1 Grommet 34 2 Frame Endcap 35 9 Screw 36 1 Motor Belt 37 2 Incline Leg Cap 38 1 Motor Fan 39 2 Belt Guide 40 1 Front Roller Adjustment Bolt 41 4 Adjustment Washer 42 1 Safety Cover 43 1 Front Roller/Pulley 44... 1 Walking Platform w/Fastener 45 1 Walking Belt w/Fastener 46 2 Foot Rail 47 1 Pulley/Flywheel 48 2 3/8" Flange Nut 49 2 3/8" x 2 3/4" Bolt 50 1 Controller 51 1 Controller ...
...1 Circuit Breaker 32 1 Upright Pivot Bolt 33 1 Grommet 34 2 Frame Endcap 35 9 Screw 36 1 Motor Belt 37 2 Incline Leg Cap 38 1 Motor Fan 39 2 Belt Guide 40 1 Front Roller Adjustment Bolt 41 4 Adjustment Washer 42 1 Safety Cover 43 1 Front Roller/Pulley 44... 1 Walking Platform w/Fastener 45 1 Walking Belt w/Fastener 46 2 Foot Rail 47 1 Pulley/Flywheel 48 2 3/8" Flange Nut 49 2 3/8" x 2 3/4" Bolt 50 1 Controller 51 1 Controller ...


