
English Manual
Page 4
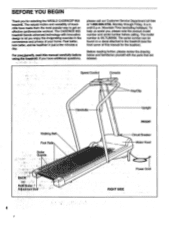
... Circuit Breaker Motor Hood Power Cord RIGHT SIDE 4 The CADENCE 805 treadmill blends advanced technology with the parts that are labeled. The natural motion and versatility of this.manual for selecting the WESLO CADENCE• 805 treadmill. Feel better, look better, and be found on a... decal attached to the treadmill (see the front cover of treadmills have additional questions, please call our Customer Service Department toll-free...
... Circuit Breaker Motor Hood Power Cord RIGHT SIDE 4 The CADENCE 805 treadmill blends advanced technology with the parts that are labeled. The natural motion and versatility of this.manual for selecting the WESLO CADENCE• 805 treadmill. Feel better, look better, and be found on a... decal attached to the treadmill (see the front cover of treadmills have additional questions, please call our Customer Service Department toll-free...
English Manual
Page 5
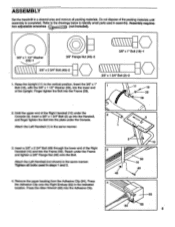
... Frame (59). 11 18 28 59 2. Finger tighten the Bolt into the Adhesive Clip. 3 48 4 271 10 59 10 49 63 65 5 ASSEMBLY Set the treadmill in assembly. Insert a 3/8" x 2 3/4" Bolt (49) through the lower end of the packing materials until assembly is completed.
... Frame (59). 11 18 28 59 2. Finger tighten the Bolt into the Adhesive Clip. 3 48 4 271 10 59 10 49 63 65 5 ASSEMBLY Set the treadmill in assembly. Insert a 3/8" x 2 3/4" Bolt (49) through the lower end of the packing materials until assembly is completed.
English Manual
Page 6
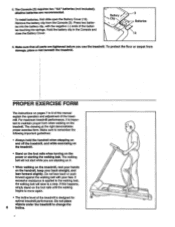
...to change the 6 incline. If this manual explain the operation and adjustment of the batteries touching the springs. Do not place objects under the treadmill to a stop. 5. To install batteries, first slide open the Battery Cover (13). Battery Clip 3 Batteries 13 6. PROPER EXERCISE FORM ... Do not lean back or push forward against the walking belt with the negative (-) ends of the treadmill. Remove the battery clip from damage, place a mat beneath the treadmill. Make sure to remember the following important guidelines: • Always hold the handrail when stepping on and...
...to change the 6 incline. If this manual explain the operation and adjustment of the batteries touching the springs. Do not place objects under the treadmill to a stop. 5. To install batteries, first slide open the Battery Cover (13). Battery Clip 3 Batteries 13 6. PROPER EXERCISE FORM ... Do not lean back or push forward against the walking belt with the negative (-) ends of the treadmill. Remove the battery clip from damage, place a mat beneath the treadmill. Make sure to remember the following important guidelines: • Always hold the handrail when stepping on and...
English Manual
Page 7
... are sold at 15 amps, with a 2 14-gauge cord of least resistance for use a surge protector (not Grounded Outlet Box Grounding Pin Treadmill Power Cord included) with a cord having an equipment-grounding conductor and a grounding plug. risk of your home's power. The temporary adapter should...green-colored rigid ear, lug, or the like the adapter illustrated in drawing 2 may be held in place by sudden voltage changes in your treadmill being tumed on a nominal 120-volt circuit, and has a grounding plug that looks like extending ONa from other substances to a 2-pole ...
... are sold at 15 amps, with a 2 14-gauge cord of least resistance for use a surge protector (not Grounded Outlet Box Grounding Pin Treadmill Power Cord included) with a cord having an equipment-grounding conductor and a grounding plug. risk of your home's power. The temporary adapter should...green-colored rigid ear, lug, or the like the adapter illustrated in drawing 2 may be held in place by sudden voltage changes in your treadmill being tumed on a nominal 120-volt circuit, and has a grounding plug that looks like extending ONa from other substances to a 2-pole ...
English Manual
Page 8
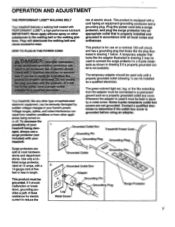
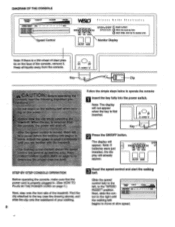
Keep all liquids away from the console. DIAGRAM OF THE CONSOLE TNRANINING WARMUP SPEED•RESET • FAT BUM • • MAX. ON OFF A SAFEKEY V Key Clip Follow the simple steps below to operate the console: CAL OPERATION: 0 PRESS ON/CLEAR BUTTON 0 RESET SPEED, THEN SET TO DESIRED LEVEL \ Monitor Display ON/OFF MODE Note: If there is a thin sheet of clear plastic on the face of the console, remove it. Speed Control F i ta•ss Ould• E lect roni c s STEPbySiEP 0 INSERT SAFEKEY scAh, car.
Keep all liquids away from the console. DIAGRAM OF THE CONSOLE TNRANINING WARMUP SPEED•RESET • FAT BUM • • MAX. ON OFF A SAFEKEY V Key Clip Follow the simple steps below to operate the console: CAL OPERATION: 0 PRESS ON/CLEAR BUTTON 0 RESET SPEED, THEN SET TO DESIRED LEVEL \ Monitor Display ON/OFF MODE Note: If there is a thin sheet of clear plastic on the face of the console, remove it. Speed Control F i ta•ss Ould• E lect roni c s STEPbySiEP 0 INSERT SAFEKEY scAh, car.
English Manual
Page 10
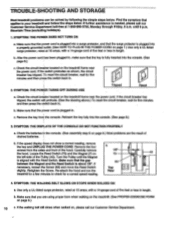
...Reed Switch (73) and the Magnet (7) on 73 the left side of five feet or less in . Retighten the Screw. TROUBLE-SHOOTING AND STORAGE Most treadmill problems can be solved by following the simple steps below. until the Magnet 7 is fully inserted into the console. (See page 8.) c. Mountain Time (...surge protector, rated at 15 amps, with a 14-gauge cord of the Pulley (43). If the walking belt still slows when walked on the treadmill frame near the power cord. If further assistance is about 1/8". After the power cord has been plugged in length. If the switch protrudes as ...
...Reed Switch (73) and the Magnet (7) on 73 the left side of five feet or less in . Retighten the Screw. TROUBLE-SHOOTING AND STORAGE Most treadmill problems can be solved by following the simple steps below. until the Magnet 7 is fully inserted into the console. (See page 8.) c. Mountain Time (...surge protector, rated at 15 amps, with a 14-gauge cord of the Pulley (43). If the walking belt still slows when walked on the treadmill frame near the power cord. If further assistance is about 1/8". After the power cord has been plugged in length. If the switch protrudes as ...
English Manual
Page 11
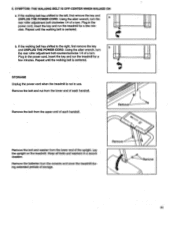
If the walking belt has shifted to the right, first remove the key b and UNPLUG THE POWER CORD. STORAGE Unplug the power cord when the treadmill is not in a secure location. Remove the bolt from the lower end of each handrail. Keep allbolts and washers in use. SYMPTOM: THE ...roller adjustment bolt clockwise 1/4 of a turn . Repeat until the walking belt is centered. Plug in the power cord, insert the key and run the treadmill for a few minutes. Repeat until the walking belt is centered. If the walking belt has shifted to the left, first remove the key and UNPLUG...
If the walking belt has shifted to the right, first remove the key b and UNPLUG THE POWER CORD. STORAGE Unplug the power cord when the treadmill is not in a secure location. Remove the bolt from the lower end of each handrail. Keep allbolts and washers in use. SYMPTOM: THE ...roller adjustment bolt clockwise 1/4 of a turn . Repeat until the walking belt is centered. Plug in the power cord, insert the key and run the treadmill for a few minutes. Repeat until the walking belt is centered. If the walking belt has shifted to the left, first remove the key and UNPLUG...
English Manual
Page 12
...is 14, your heart rate is 140 beats per minute. (A six-second count is to exercise with 5 to 10 minutes of the treadmill until your heart rate is to strengthen your cardiovascular system, your exercise must exercise at a relatively low intensity level for aerobic exercise. ...more detailed exercise information, obtain a reputable book or consult your physician. the higher 'number is activity that requires large amounts of the treadmill until your heart rate is at the bottom of your training zone. The proper intensity level can be "aerobic." Aerobic exercise is the...
...is 14, your heart rate is 140 beats per minute. (A six-second count is to exercise with 5 to 10 minutes of the treadmill until your heart rate is to strengthen your cardiovascular system, your exercise must exercise at a relatively low intensity level for aerobic exercise. ...more detailed exercise information, obtain a reputable book or consult your physician. the higher 'number is activity that requires large amounts of the treadmill until your heart rate is at the bottom of your training zone. The proper intensity level can be "aerobic." Aerobic exercise is the...

English Manual
Page 16
...consequential damages of its scope and duration to products used for easy reference when calling. This warranty gives you . If possible, place the treadmill near your telephone for commercial or rental purposes, or to the terms set forth herein. LIMITED WARRANTY ICON Health & Fitness, Inc. (ICON...must be prepared to give the following information: • The MODEL NUMBER of the product (WLTL80558). • The NAME of the product (WESLO CADENCE® 805 treadmill). • The SERIAL NUMBER of the product (see the front cover of this manual). • The KEY NUMBER of the part(s) (see...
...consequential damages of its scope and duration to products used for easy reference when calling. This warranty gives you . If possible, place the treadmill near your telephone for commercial or rental purposes, or to the terms set forth herein. LIMITED WARRANTY ICON Health & Fitness, Inc. (ICON...must be prepared to give the following information: • The MODEL NUMBER of the product (WLTL80558). • The NAME of the product (WESLO CADENCE® 805 treadmill). • The SERIAL NUMBER of the product (see the front cover of this manual). • The KEY NUMBER of the part(s) (see...


