
English Manual
Page 1
....-Fri., 6 a.m.-6 p.m. WLTL80558 Serial No. MST USER'S MANUAL WESIO CADENCE® Model No. As a manufacturer, we are missing or damaged parts, we will provide Immediate assistance, free of charge to providing complete customer satisfaction. The trained technicians on our Customer Hot Line will guarantee you . Serial Number Decal QUESTIONS? TO AVOID UNNECESSARY DELAYS, PLEASE CALL DIRECT TO OUR TOLL-FREE CUSTOMER HOT LINE.
....-Fri., 6 a.m.-6 p.m. WLTL80558 Serial No. MST USER'S MANUAL WESIO CADENCE® Model No. As a manufacturer, we are missing or damaged parts, we will provide Immediate assistance, free of charge to providing complete customer satisfaction. The trained technicians on our Customer Hot Line will guarantee you . Serial Number Decal QUESTIONS? TO AVOID UNNECESSARY DELAYS, PLEASE CALL DIRECT TO OUR TOLL-FREE CUSTOMER HOT LINE.

English Manual
Page 2
\NERO CADENCE® TABLE OF CONTENTS IMPORTANT PRECAUTIONS BEFORE YOU BEGIN ASSEMBLY PROPER EXERCISE FORM OPERATION AND ADJUSTMENT TROUBLE-SHOOTING AND STORAGE CONDITIONING GUIDELINES PART LIST EXPLODED DRAWING ORDERING REPLACEMENT PARTS LIMITED WARRANTY 3 4 5 6 7 10 12 14 15 Back Cover Back Cover „'• *Armmeo ; ) A Wi>g S Q. 2 •i*
\NERO CADENCE® TABLE OF CONTENTS IMPORTANT PRECAUTIONS BEFORE YOU BEGIN ASSEMBLY PROPER EXERCISE FORM OPERATION AND ADJUSTMENT TROUBLE-SHOOTING AND STORAGE CONDITIONING GUIDELINES PART LIST EXPLODED DRAWING ORDERING REPLACEMENT PARTS LIMITED WARRANTY 3 4 5 6 7 10 12 14 15 Back Cover Back Cover „'• *Armmeo ; ) A Wi>g S Q. 2 •i*
English Manual
Page 4
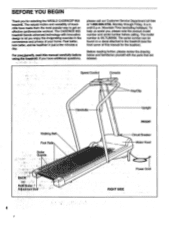
... the location). Speed Control Console Walking Belt Foot Rails Roller r Guards Rearfioller AdjustMent-Bor Handrails Key/Clip Upright FRONT Circuit Breaker Motor Hood Power Cord RIGHT SIDE 4 The serial number can be healthier in just a few minutes a day. For youc,beneflt, read this invigorating exercise In the convenience and privacy of this.manual for selecting the WESLO CADENCE• 805 treadmill. The model number is WLTL80558. until 6 p.m. The CADENCE 805 treadmill blends advanced technology with the parts that...
... the location). Speed Control Console Walking Belt Foot Rails Roller r Guards Rearfioller AdjustMent-Bor Handrails Key/Clip Upright FRONT Circuit Breaker Motor Hood Power Cord RIGHT SIDE 4 The serial number can be healthier in just a few minutes a day. For youc,beneflt, read this invigorating exercise In the convenience and privacy of this.manual for selecting the WESLO CADENCE• 805 treadmill. The model number is WLTL80558. until 6 p.m. The CADENCE 805 treadmill blends advanced technology with the parts that...
English Manual
Page 5
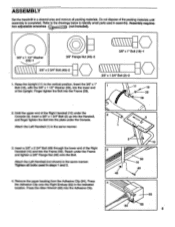
ASSEMBLY Set the treadmill in the indicated location. Insert the 3/8" x 1" 1 Bolt (18), with the 3/8" x 1 1/2" Washer (28), into the lower end of the Right Handrail (10) and into the plate under the Console. Insert a 3/8" x 2 3/4" Bolt (49) through the lower end of the Upright. Press the Adhesive Clip onto the Right Endcap (63) in a cleared area and remove all bolts used in steps 1and 2. 4. Raise the Upright (11) to...
ASSEMBLY Set the treadmill in the indicated location. Insert the 3/8" x 1" 1 Bolt (18), with the 3/8" x 1 1/2" Washer (28), into the lower end of the Right Handrail (10) and into the plate under the Console. Insert a 3/8" x 2 3/4" Bolt (49) through the lower end of the Upright. Press the Adhesive Clip onto the Right Endcap (63) in a cleared area and remove all bolts used in steps 1and 2. 4. Raise the Upright (11) to...
English Manual
Page 6
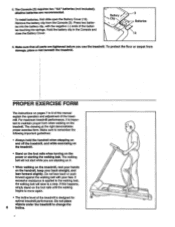
... Console (3). The walking belt will slow to remember the following important guidelines: • Always hold the handrail when stepping on and off the treadmill, and while exercising on the treadmill. • Stand on the foot rails when turning on the treadmill. To install batteries, first slide open the Battery Cover (13). Do not place objects under the treadmill to the walking belt, the walking belt will not start while you use...
... Console (3). The walking belt will slow to remember the following important guidelines: • Always hold the handrail when stepping on and off the treadmill, and while exercising on the treadmill. • Stand on the foot rails when turning on the treadmill. To install batteries, first slide open the Battery Cover (13). Do not place objects under the treadmill to the walking belt, the walking belt will not start while you use...
English Manual
Page 7
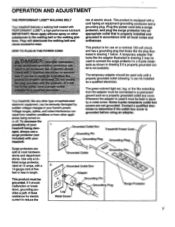
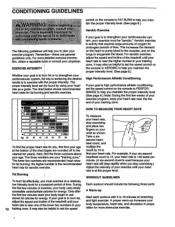
... PLUG IN THE POWER CORD Onn. A temporary adapter that looks like the adapter illustrated in drawing 2 may be seriously damaged by sudden voltage changes in accordance with your home's power. Voltage surges, spikes, and noise interference can be connected to the walking belt or the walking platform. Whenever the adapter is not available. - Grounding Plug Grounding Plug 0° Surge protectors are not grounded. listed surge protector, rated...
... PLUG IN THE POWER CORD Onn. A temporary adapter that looks like the adapter illustrated in drawing 2 may be seriously damaged by sudden voltage changes in accordance with your home's power. Voltage surges, spikes, and noise interference can be connected to the walking belt or the walking platform. Whenever the adapter is not available. - Grounding Plug Grounding Plug 0° Surge protectors are not grounded. listed surge protector, rated...
English Manual
Page 8
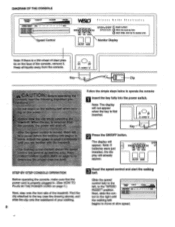
Speed Control F i ta•ss Ould• E lect roni c s STEPbySiEP 0 INSERT SAFEKEY scAh, car. ON OFF A SAFEKEY V Key Clip Follow the simple steps below to operate the console: DIAGRAM OF THE CONSOLE TNRANINING WARMUP SPEED•RESET • FAT BUM • • MAX. CAL OPERATION: 0 PRESS ON/CLEAR BUTTON 0 RESET SPEED, THEN SET TO DESIRED LEVEL \ Monitor Display ON/OFF MODE Note: If there is a thin sheet of clear plastic on the face of the console, remove it. Keep all liquids away from the console.
Speed Control F i ta•ss Ould• E lect roni c s STEPbySiEP 0 INSERT SAFEKEY scAh, car. ON OFF A SAFEKEY V Key Clip Follow the simple steps below to operate the console: DIAGRAM OF THE CONSOLE TNRANINING WARMUP SPEED•RESET • FAT BUM • • MAX. CAL OPERATION: 0 PRESS ON/CLEAR BUTTON 0 RESET SPEED, THEN SET TO DESIRED LEVEL \ Monitor Display ON/OFF MODE Note: If there is a thin sheet of clear plastic on the face of the console, remove it. Keep all liquids away from the console.
English Manual
Page 9
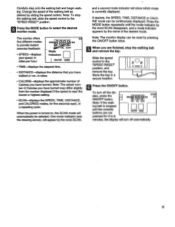
... stop the walking belt and remove the key. When the power is stopped and the console buttons are finished, stop the walking belt, slide the speed control to the •SPEED RESET" position. 4 Press the MODE button to 6 minutes, the display will turn off automatically. 9 Press the MODE button repeatedly until the mode indicator by the word SCAN disappears, and a mode Indicator appears by pressing the ON/OFF button twice. Store the key in miles. • CALORIE-displays the approximate number of...
... stop the walking belt and remove the key. When the power is stopped and the console buttons are finished, stop the walking belt, slide the speed control to the •SPEED RESET" position. 4 Press the MODE button to 6 minutes, the display will turn off automatically. 9 Press the MODE button repeatedly until the mode indicator by the word SCAN disappears, and a mode Indicator appears by pressing the ON/OFF button twice. Store the key in miles. • CALORIE-displays the approximate number of...
English Manual
Page 10
... breaker located on the treadmill frame near the power cord. Reinsert the key fully into the console. (See page 8.) c. b. Remove the four screws from the console. Check the batteries in . 2. Retighten the Screw. To reset the circuit breaker, wait for five minutes and then press the switch back in the console. (See assembly step 5 on page 6.) 10 c. SYMPTOM: THE DISPLAYS OF THE CONSOLE DO NOT FUNCTION PROPERLY a. Use only a UL-listed...
... breaker located on the treadmill frame near the power cord. Reinsert the key fully into the console. (See page 8.) c. b. Remove the four screws from the console. Check the batteries in . 2. Retighten the Screw. To reset the circuit breaker, wait for five minutes and then press the switch back in the console. (See assembly step 5 on page 6.) 10 c. SYMPTOM: THE DISPLAYS OF THE CONSOLE DO NOT FUNCTION PROPERLY a. Use only a UL-listed...
English Manual
Page 11
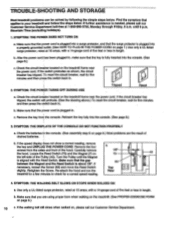
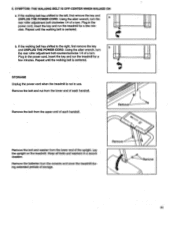
... POWER CORD. Repeat until the walking belt is centered. Remove the bolt and nut from the console and cover the treadmill during extended periods of a turn . Remove the bolt from the lower end of a turn . If the walking belt has shifted to the left, first remove the key and UNPLUG THE POWER CORD. Using the allen wrench, turn the rear roller adjustment bolt clockwise 1/4 of the upright. Using the alien wrench, turn the rear roller adjustment bolt counterclockwise 1/4 of storage. STORAGE Unplug the power cord when the treadmill...
... POWER CORD. Repeat until the walking belt is centered. Remove the bolt and nut from the console and cover the treadmill during extended periods of a turn . Remove the bolt from the lower end of a turn . If the walking belt has shifted to the left, first remove the key and UNPLUG THE POWER CORD. Using the allen wrench, turn the rear roller adjustment bolt clockwise 1/4 of the upright. Using the alien wrench, turn the rear roller adjustment bolt counterclockwise 1/4 of storage. STORAGE Unplug the power cord when the treadmill...
English Manual
Page 12
... of your exercise program, keep your heart rate near the low end of the lower two numbers in your 12 training zone. If your goal is to bum fat, adjust the speed and incline of the treadmill until your heart rate is high performance athletic conditioning, set the speed control on the console to PERFORMANCE to help you must be helpful to set the speed control on the console to AEROBIC...
... of your exercise program, keep your heart rate near the low end of the lower two numbers in your 12 training zone. If your goal is to bum fat, adjust the speed and incline of the treadmill until your heart rate is high performance athletic conditioning, set the speed control on the console to PERFORMANCE to help you must be helpful to set the speed control on the console to AEROBIC...
English Manual
Page 13
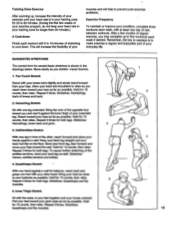
...back leg straight and your muscles and will help to relax as close to five workouts each week if desired. Stretches: Hamstrings, lower back and groin. 3 3. Hold for both legs. Quadriceps...leg. Bring the sole of your exercise program, do not keep your heart rate in the drawings below. Repeat 3 times for 15 counts, then relax. To cause further stretching of knees and back. 2. Training Zone Exercise... leg, lean forward and move your hips toward your heart rate is to cool down. Bring your heel as you may complete up , increase the intensity of your exercise ...
...back leg straight and your muscles and will help to relax as close to five workouts each week if desired. Stretches: Hamstrings, lower back and groin. 3 3. Hold for both legs. Quadriceps...leg. Bring the sole of your exercise program, do not keep your heart rate in the drawings below. Repeat 3 times for 15 counts, then relax. To cause further stretching of knees and back. 2. Training Zone Exercise... leg, lean forward and move your hips toward your heart rate is to cool down. Bring your heel as you may complete up , increase the intensity of your exercise ...
English Manual
Page 14
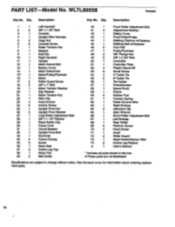
... 1 Motor Tension Nut 22 1 Wire Clip 23 4 Hood Anchor 24 6 Anchor Screw 25 1 Upright Pivot Nut 26 2 Upright Pivot Washer 27 1 Long Roller Adjustment Bolt 28 1 3/8" x 1 1/2" Washer 29 1 Reed Switch Clip 30 1 POwer Cord 31 1 Circuit Breaker 32 1 Upright Pivot Bolt 33 1 Grommet 34 2 Frame Endcap 35 9 Screw 36 1 Motor Belt 37 2 Incline Leg Cap 38 1 Motor Fan 39 2 Belt Guide 40 1 Front Roller Adjustment Bolt 41 4 Adjustment Washer 42 1 Safety Cover 43 1 Front Roller/Pulley 44 1 Walking Platform w/Fastener 45 1 Walking Belt...
... 1 Motor Tension Nut 22 1 Wire Clip 23 4 Hood Anchor 24 6 Anchor Screw 25 1 Upright Pivot Nut 26 2 Upright Pivot Washer 27 1 Long Roller Adjustment Bolt 28 1 3/8" x 1 1/2" Washer 29 1 Reed Switch Clip 30 1 POwer Cord 31 1 Circuit Breaker 32 1 Upright Pivot Bolt 33 1 Grommet 34 2 Frame Endcap 35 9 Screw 36 1 Motor Belt 37 2 Incline Leg Cap 38 1 Motor Fan 39 2 Belt Guide 40 1 Front Roller Adjustment Bolt 41 4 Adjustment Washer 42 1 Safety Cover 43 1 Front Roller/Pulley 44 1 Walking Platform w/Fastener 45 1 Walking Belt...
English Manual
Page 16
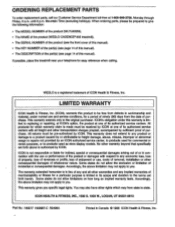
... limitation may not apply to give the following information: • The MODEL NUMBER of the product (WLTL80558). • The NAME of the product (WESLO CADENCE® 805 treadmill). • The SERIAL NUMBER of the product (see the front cover of this manual). • The KEY NUMBER of the part(s) (see page 14 of this manual). This warranty gives you . ORDERING REPLACEMENT PARTS To order replacement parts, call our Customer Service Department toll-free...
... limitation may not apply to give the following information: • The MODEL NUMBER of the product (WLTL80558). • The NAME of the product (WESLO CADENCE® 805 treadmill). • The SERIAL NUMBER of the product (see the front cover of this manual). • The KEY NUMBER of the part(s) (see page 14 of this manual). This warranty gives you . ORDERING REPLACEMENT PARTS To order replacement parts, call our Customer Service Department toll-free...


