

English Manual
Page 2
WESLO is a registered trademark of this manual. TABLE OF CONTENTS IMPORTANT PRECAUTIONS 3 BEFORE YOU BEGIN 5 ASSEMBLY 6 OPERATION AND ADJUSTMENT 9 HOW TO FOLD AND MOVE THE TREADMILL 12 MAINTENANCE AND TROUBLESHOOTING 13 EXERCISE GUIDELINES 15 ORDERING REPLACEMENT PARTS Back Cover Note: A PART IDENTIFICATION CHART, an EXPLODED DRAWING, and a PART LIST are located at the end of ICON IP, Inc. 2
WESLO is a registered trademark of this manual. TABLE OF CONTENTS IMPORTANT PRECAUTIONS 3 BEFORE YOU BEGIN 5 ASSEMBLY 6 OPERATION AND ADJUSTMENT 9 HOW TO FOLD AND MOVE THE TREADMILL 12 MAINTENANCE AND TROUBLESHOOTING 13 EXERCISE GUIDELINES 15 ORDERING REPLACEMENT PARTS Back Cover Note: A PART IDENTIFICATION CHART, an EXPLODED DRAWING, and a PART LIST are located at the end of ICON IP, Inc. 2

English Manual
Page 3
... plug the surge suppressor into a grounded circuit capable of carrying 15 or more amps. Use the treadmill only as described. 3. Keep the treadmill indoors, away from heated surfaces. 14. Do not put the treadmill in the treadmill. Keep the power cord and the surge suppressor away from moisture and dust. Never move the... recommended for both men and women. Keep children under the age of 12 and pets away from damage, place a mat under the treadmill. 3 No other appliance should not be able to safely lift 45 pounds (20 kg) to raise, lower, or move the walking belt while ...
... plug the surge suppressor into a grounded circuit capable of carrying 15 or more amps. Use the treadmill only as described. 3. Keep the treadmill indoors, away from heated surfaces. 14. Do not put the treadmill in the treadmill. Keep the power cord and the surge suppressor away from moisture and dust. Never move the... recommended for both men and women. Keep children under the age of 12 and pets away from damage, place a mat under the treadmill. 3 No other appliance should not be able to safely lift 45 pounds (20 kg) to raise, lower, or move the walking belt while ...

English Manual
Page 4
... please go to do so by an authorized service representative only. 25. SAVE THESE INSTRUCTIONS The decals shown here have been placed on the treadmill. 22. Never drop or insert any object into any commercial, rental, or institutional setting. If a decal is missing, or if it is... especially important for in-home use this treadmill in this manual. scribed in the location shown. Never remove the motor hood unless instructed to www.iconservice.com and order a free replacement decal...
... please go to do so by an authorized service representative only. 25. SAVE THESE INSTRUCTIONS The decals shown here have been placed on the treadmill. 22. Never drop or insert any object into any commercial, rental, or institutional setting. If a decal is missing, or if it is... especially important for in-home use this treadmill in this manual. scribed in the location shown. Never remove the motor hood unless instructed to www.iconservice.com and order a free replacement decal...
English Manual
Page 5
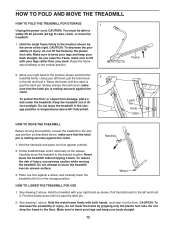
...legs rather than your right hand as described above 85° Fahrenheit. See drawing 1 above . Slowly release the latch knob; Do not leave the treadmill in the storage position in temperatures above . To reduce the risk of injury, do not lower the frame by gripping only the plastic foot rails...tipping it to bend your legs and keep your back straight. Hold the metal frame firmly in the storage position. Wheel HOW TO LOWER THE TREADMILL FOR USE 1. Hold the metal frame firmly with both hands, and lower it back. Make sure to the floor. Hold the handrails and ...
...legs rather than your right hand as described above 85° Fahrenheit. See drawing 1 above . Slowly release the latch knob; Do not leave the treadmill in the storage position in temperatures above . To reduce the risk of injury, do not lower the frame by gripping only the plastic foot rails...tipping it to bend your legs and keep your back straight. Hold the metal frame firmly in the storage position. Wheel HOW TO LOWER THE TREADMILL FOR USE 1. Hold the metal frame firmly with both hands, and lower it back. Make sure to the floor. Hold the handrails and ...
English Manual
Page 6
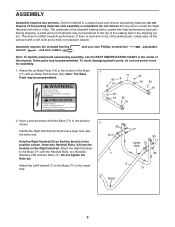
...the shipping carton. Do not remove the long wire is in the position shown. Attach the Left Handrail (7) to . This does not affect treadmill performance. Identify the Right Handrail (6) which has a large hole near the lower end. Attach the Right Handrail to the Base (71) with... with the Handrail Bolts, two Handrail Washers (30) and two Nuts (17). Note: The Base Pads may be transferred to the bottom of the treadmill walking belt is coated with a soft cloth and a mild, non-abrasive cleaner. and your own Phillips screwdriver , adjustable Note: To identify small parts...
...the shipping carton. Do not remove the long wire is in the position shown. Attach the Left Handrail (7) to . This does not affect treadmill performance. Identify the Right Handrail (6) which has a large hole near the lower end. Attach the Right Handrail to the Base (71) with... with the Handrail Bolts, two Handrail Washers (30) and two Nuts (17). Note: The Base Pads may be transferred to the bottom of the treadmill walking belt is coated with a soft cloth and a mild, non-abrasive cleaner. and your own Phillips screwdriver , adjustable Note: To identify small parts...
English Manual
Page 7
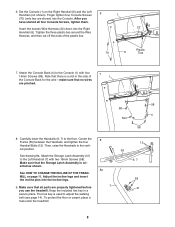
... overtighten the Wheel Nuts; Hold the Console (1) near the Right Handrail (6). Tie the end of the wire securely to the outer sides of the Frame (55). If it . Have a second person lift and hold the front end of the Base (71) with a Frame Bolt (10), a Handrail Washer (30), and a ...Handrail Star Washer (60). With the help of a second person, raise the Handrails 3 (6, 7) so the Base (71) is extending from the end of the treadmill. 5. Next, locate the long wire inside of the lower end of the treadmill Frame (55) between the Right 4 Handrail (6) and the Frame.
... overtighten the Wheel Nuts; Hold the Console (1) near the Right Handrail (6). Tie the end of the wire securely to the outer sides of the Frame (55). If it . Have a second person lift and hold the front end of the Base (71) with a Frame Bolt (10), a Handrail Washer (30), and a ...Handrail Star Washer (60). With the help of a second person, raise the Handrails 3 (6, 7) so the Base (71) is extending from the end of the treadmill. 5. Next, locate the long wire inside of the lower end of the treadmill Frame (55) between the Right 4 Handrail (6) and the Frame.
English Manual
Page 8
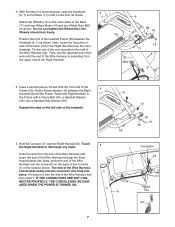
...see page 14). After you have started all parts are properly tightened before you use the treadmill. Carefully lower the Handrails (6, 7) to the vertical position. See HOW TO CHANGE THE INCLINE OF THE TREADMILL on the Right Handrail (6) and the Left Handrail (not shown). Make sure that no wires...into the Console. The hex key is oriented as shown. Plastic 70 6 Ties 7. To protect the floor or carpet, place a mat under the treadmill. 8 8a 7 12 55 6, 7 58 41 8 Set the Console (1) on page 11. Keep the included hex key in the side of the plastic ties. Center the ...
...see page 14). After you have started all parts are properly tightened before you use the treadmill. Carefully lower the Handrails (6, 7) to the vertical position. See HOW TO CHANGE THE INCLINE OF THE TREADMILL on the Right Handrail (6) and the Left Handrail (not shown). Make sure that no wires...into the Console. The hex key is oriented as shown. Plastic 70 6 Ties 7. To protect the floor or carpet, place a mat under the treadmill. 8 8a 7 12 55 6, 7 58 41 8 Set the Console (1) on page 11. Keep the included hex key in the side of the plastic ties. Center the ...
English Manual
Page 9
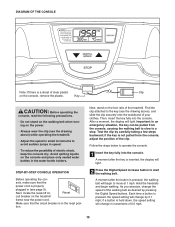
... can be pulled from the console, adjust the position of electric shock, keep the console dry. As you exercise, change the speed of the treadmill. STEP-BY-STEP CONSOLE OPERATION Before operating the con- Then, insert the key fully into the console. Test the clip by pressing the Digital ... will begin walking. Hold the handrails and begin to a stop. Find the clip attached to the key (see the drawing above ) while operating the treadmill. • Adjust the speed in small increments to operate the console. 1 Insert the key fully into the console. Follow the steps below to avoid ...
... can be pulled from the console, adjust the position of electric shock, keep the console dry. As you exercise, change the speed of the treadmill. STEP-BY-STEP CONSOLE OPERATION Before operating the con- Then, insert the key fully into the console. Test the clip by pressing the Digital ... will begin walking. Hold the handrails and begin to a stop. Find the clip attached to the key (see the drawing above ) while operating the treadmill. • Adjust the speed in small increments to operate the console. 1 Insert the key fully into the console. Follow the steps below to avoid ...
English Manual
Page 10
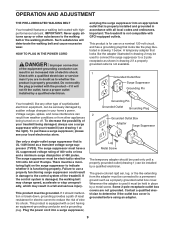
... injury. Voltage surges, spikes, and noise interference can be a monitoring light on or off. To purchase a surge suppressor, please see your treadmill (see drawing 1 at the right). There must be held in place by sudden voltage changes in drawing 1 below. Plug the power cord ...the surge suppressor into a surge suppressor, Lug Metal Screw The temporary adapter should malfunction or break down, grounding provides a path of the treadmill. The surge suppressor must be grounded. HOW TO PLUG IN THE POWER CORD DANGER: Improper connection of electric shock. To decrease the ...
... injury. Voltage surges, spikes, and noise interference can be a monitoring light on or off. To purchase a surge suppressor, please see your treadmill (see drawing 1 at the right). There must be held in place by sudden voltage changes in drawing 1 below. Plug the power cord ...the surge suppressor into a surge suppressor, Lug Metal Screw The temporary adapter should malfunction or break down, grounding provides a path of the treadmill. The surge suppressor must be grounded. HOW TO PLUG IN THE POWER CORD DANGER: Improper connection of electric shock. To decrease the ...

English Manual
Page 11
... viewing. The time will not be shown in the display. The lower right corner of the display can change the incline of the treadmill. Press the Display button repeatedly until the priority display shows the information that you are three incline levels. HOW TO CHANGE THE INCLINE...position (see page 14). 3 Monitor your exercise, you have burned. To stop the walking belt, press the Stop button. Next, fold the treadmill to change the incline, first remove the incline pin from the console. Adjust the other incline leg in the priority display. After you have ...
... viewing. The time will not be shown in the display. The lower right corner of the display can change the incline of the treadmill. Press the Display button repeatedly until the priority display shows the information that you are three incline levels. HOW TO CHANGE THE INCLINE...position (see page 14). 3 Monitor your exercise, you have burned. To stop the walking belt, press the Stop button. Next, fold the treadmill to change the incline, first remove the incline pin from the console. Adjust the other incline leg in the priority display. After you have ...
English Manual
Page 12
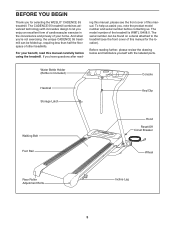
The model number of this manual for selecting the WESLO® CADENCE 55 treadmill. Before reading further, please review the drawing below and familiarize yourself with innovative design to the treadmill (see the front cover of the treadmill is WMTL19408.0. The serial number can be found on a decal ...Roller Adjustment Bolts Incline Leg 5 And when youʼre not exercising, the unique CADENCE 55 treadmill can be folded up, requiring less than half the floor space of other treadmills. To help us assist you have questions after read this manual, please see the front...
The model number of this manual for selecting the WESLO® CADENCE 55 treadmill. Before reading further, please review the drawing below and familiarize yourself with innovative design to the treadmill (see the front cover of the treadmill is WMTL19408.0. The serial number can be found on a decal ...Roller Adjustment Bolts Incline Leg 5 And when youʼre not exercising, the unique CADENCE 55 treadmill can be folded up, requiring less than half the floor space of other treadmills. To help us assist you have questions after read this manual, please see the front...
English Manual
Page 13
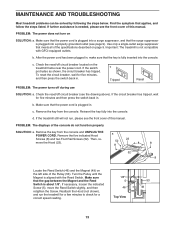
...the Hood (23). 52 23 8 8 8 52 8 Locate the Reed Switch (46) and the Magnet (49) on page 9. MAINTENANCE AND TROUBLESHOOTING Most treadmill problems can be solved by following the steps below. If the switch protrudes as shown, the circuit breaker has tripped. c. PROBLEM: The displays of this... sure that applies, and follow the steps listed. Remove the key from the console and UNPLUG THE POWER CORD. d. If the treadmill still will not run the treadmill for a few minutes to check for a correct speed reading. 1/8" 5 46 Top View 53 49 13 Turn the Pulley until ...
...the Hood (23). 52 23 8 8 8 52 8 Locate the Reed Switch (46) and the Magnet (49) on page 9. MAINTENANCE AND TROUBLESHOOTING Most treadmill problems can be solved by following the steps below. If the switch protrudes as shown, the circuit breaker has tripped. c. PROBLEM: The displays of this... sure that applies, and follow the steps listed. Remove the key from the console and UNPLUG THE POWER CORD. d. If the treadmill still will not run the treadmill for a few minutes to check for a correct speed reading. 1/8" 5 46 Top View 53 49 13 Turn the Pulley until ...
English Manual
Page 14
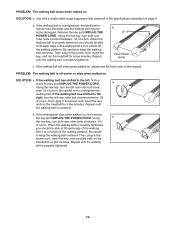
... clockwise, 1/4 of the walking belt 2 to keep the walking belt centered. Then, plug in the power cord, insert the key, and run the treadmill for a few minutes. Repeat until the walking belt is correctly tightened, you should be able to 3 inches off -center or slips when walked on... has shifted to the left rear roller bolt counterclockwise 1/2 of a turn . Then, plug in the power cord, insert the key, and run the treadmill for a few minutes. PROBLEM: The walking belt slows when walked on , first remove the key and UNPLUG THE POWER CORD. Be careful to overtighten...
... clockwise, 1/4 of the walking belt 2 to keep the walking belt centered. Then, plug in the power cord, insert the key, and run the treadmill for a few minutes. Repeat until the walking belt is correctly tightened, you should be able to 3 inches off -center or slips when walked on... has shifted to the left rear roller bolt counterclockwise 1/2 of a turn . Then, plug in the power cord, insert the key, and run the treadmill for a few minutes. PROBLEM: The walking belt slows when walked on , first remove the key and UNPLUG THE POWER CORD. Be careful to overtighten...
English Manual
Page 15
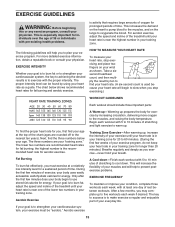
... of time. This will help you may complete up , increase the intensity of your exercise until your heart rate is to 10 minutes of the treadmill until your heart rate as shown. This is in your training zone. For aerobic exercise, adjust the speed and incline of the... treadmill until your heart rate is especially important for individuals over the age of 35 or individuals with 5 to 10 minutes of your muscles and will ...
... of time. This will help you may complete up , increase the intensity of your exercise until your heart rate is to 10 minutes of the treadmill until your heart rate as shown. This is in your training zone. For aerobic exercise, adjust the speed and incline of the... treadmill until your heart rate is especially important for individuals over the age of 35 or individuals with 5 to 10 minutes of your muscles and will ...

English Manual
Page 19
To help us assist you, be prepared to give the following information: • the MODEL NUMBER of the product (WMTL19408.0) • the NAME of the product (WESLO CADENCE 55 treadmill) • the SERIAL NUMBER of the product (see the front cover of this manual) • the KEY NUMBER and DESCRIPTION of the desired part(s) (see the front cover of this manual. ORDERING REPLACEMENT PARTS To order replacement parts, please see the PART LIST and the EXPLODED DRAWING in the center of this manual) Part No. 274599 R0908A Printed in China © 2008 ICON IP, Inc.
To help us assist you, be prepared to give the following information: • the MODEL NUMBER of the product (WMTL19408.0) • the NAME of the product (WESLO CADENCE 55 treadmill) • the SERIAL NUMBER of the product (see the front cover of this manual) • the KEY NUMBER and DESCRIPTION of the desired part(s) (see the front cover of this manual. ORDERING REPLACEMENT PARTS To order replacement parts, please see the PART LIST and the EXPLODED DRAWING in the center of this manual) Part No. 274599 R0908A Printed in China © 2008 ICON IP, Inc.


