
English Manual
Page 1
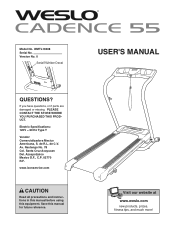
... Specifications: 120V ~ 60 Hz Type Y Vendor: Comercializadora Mexico Americana, S. de R.L. Nextengo No. 78 Col. Visit our website at www.weslo.com new products, prizes, fitness tips, and much more! Azcapotzalco Mexico D.F., C.P. 02770 R.F. WMTL19408 Serial No. de C.V. Version No. 0 Serial Number Decal USER'S MANUAL QUESTIONS? Av. www.iconservice.com CAUTION Read all precautions and instructions in this manual before using this manual for...
... Specifications: 120V ~ 60 Hz Type Y Vendor: Comercializadora Mexico Americana, S. de R.L. Nextengo No. 78 Col. Visit our website at www.weslo.com new products, prizes, fitness tips, and much more! Azcapotzalco Mexico D.F., C.P. 02770 R.F. WMTL19408 Serial No. de C.V. Version No. 0 Serial Number Decal USER'S MANUAL QUESTIONS? Av. www.iconservice.com CAUTION Read all precautions and instructions in this manual before using this manual for...
English Manual
Page 2
WESLO is a registered trademark of this manual. TABLE OF CONTENTS IMPORTANT PRECAUTIONS 3 BEFORE YOU BEGIN 5 ASSEMBLY 6 OPERATION AND ADJUSTMENT 9 HOW TO FOLD AND MOVE THE TREADMILL 12 MAINTENANCE AND TROUBLESHOOTING 13 EXERCISE GUIDELINES 15 ORDERING REPLACEMENT PARTS Back Cover Note: A PART IDENTIFICATION CHART, an EXPLODED DRAWING, and a PART LIST are located at the end of ICON IP, Inc. 2
WESLO is a registered trademark of this manual. TABLE OF CONTENTS IMPORTANT PRECAUTIONS 3 BEFORE YOU BEGIN 5 ASSEMBLY 6 OPERATION AND ADJUSTMENT 9 HOW TO FOLD AND MOVE THE TREADMILL 12 MAINTENANCE AND TROUBLESHOOTING 13 EXERCISE GUIDELINES 15 ORDERING REPLACEMENT PARTS Back Cover Note: A PART IDENTIFICATION CHART, an EXPLODED DRAWING, and a PART LIST are located at the end of ICON IP, Inc. 2
English Manual
Page 3
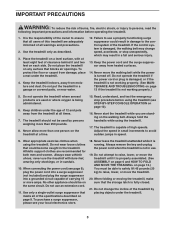
... of the owner to ensure that the storage latch is running. Do not change speed, accelerate, or stop procedure before operating the treadmill. 1. Keep the treadmill indoors, away from heated surfaces. 14. If the control system is not working properly.) 5. Do not operate the treadmill if the power cord or plug is damaged, or if the treadmill is damaged, the walking belt may change the incline of the treadmill by...
... of the owner to ensure that the storage latch is running. Do not change speed, accelerate, or stop procedure before operating the treadmill. 1. Keep the treadmill indoors, away from heated surfaces. 14. If the control system is not working properly.) 5. Do not operate the treadmill if the power cord or plug is damaged, or if the treadmill is damaged, the walking belt may change the incline of the treadmill by...

English Manual
Page 4
... treadmill. tenance and adjustment procedures de- WARNING: Before beginning this treadmill in any opening. This is not legible, please go to do so by or through the use only. Note: The decals are not shown at actual size. ! ! 4 DANGER: 24. scribed in the location shown. Never remove the motor hood unless instructed to www.iconservice.com and order a free replacement decal. Do not use...
... treadmill. tenance and adjustment procedures de- WARNING: Before beginning this treadmill in any opening. This is not legible, please go to do so by or through the use only. Note: The decals are not shown at actual size. ! ! 4 DANGER: 24. scribed in the location shown. Never remove the motor hood unless instructed to www.iconservice.com and order a free replacement decal. Do not use...
English Manual
Page 5
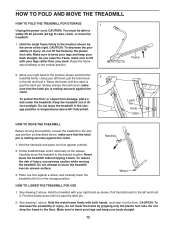
... and hold the 2 treadmill firmly. HOW TO FOLD AND MOVE THE TREADMILL HOW TO FOLD THE TREADMILL FOR STORAGE 1 Unplug the power cord. Hold the metal frame firmly in temperatures above . Make sure to the left hand, pull the latch knob to bend your legs and keep your right hand as described above . Frame 2. Move your back. Slowly release the latch knob; make sure to...
... and hold the 2 treadmill firmly. HOW TO FOLD AND MOVE THE TREADMILL HOW TO FOLD THE TREADMILL FOR STORAGE 1 Unplug the power cord. Hold the metal frame firmly in temperatures above . Make sure to the left hand, pull the latch knob to bend your legs and keep your right hand as described above . Frame 2. Move your back. Slowly release the latch knob; make sure to...
English Manual
Page 6
...-performance lubricant. Some parts may be preassembled. 42 19 ! 71 42 19 42 19 42 ! 19 42 19 2. Attach the six Base Pads (19) to the bottom of the treadmill walking belt is coated with six Base Pad Screws (42). Note: The Base Pads may be transferred to . Do not tighten the Nuts yet. do not use power tools for assembly...
...-performance lubricant. Some parts may be preassembled. 42 19 ! 71 42 19 42 19 42 ! 19 42 19 2. Attach the six Base Pads (19) to the bottom of the treadmill walking belt is coated with six Base Pad Screws (42). Note: The Base Pads may be transferred to . Do not tighten the Nuts yet. do not use power tools for assembly...
English Manual
Page 7
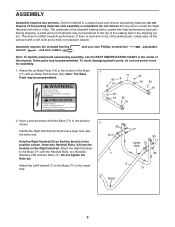
... is flat on the left side of the Wire Harness (22). Hold a Frame Spacer (13) between the Handrails (6, 7) as shown. IF THE CONNECTORS ARE NOT CONNECTED PROPERLY, THE CONSOLE MAY BE DAMAGED WHEN THE POWER IS TURNED ON. 7 6 13 30 10 60 55 Connector 1 22 Plastic 6 Ties 22 With the help...the treadmill. 5. Have a second person lift and hold the front end of the Wire Harness (22). Repeat this step on the floor as shown. Next, press the end of the Console (1) in the location shown. The end of the Wire Harness should turn the end of the Right Handrail. 6 55 22 22 Wire 88...
... is flat on the left side of the Wire Harness (22). Hold a Frame Spacer (13) between the Handrails (6, 7) as shown. IF THE CONNECTORS ARE NOT CONNECTED PROPERLY, THE CONSOLE MAY BE DAMAGED WHEN THE POWER IS TURNED ON. 7 6 13 30 10 60 55 Connector 1 22 Plastic 6 Ties 22 With the help...the treadmill. 5. Have a second person lift and hold the front end of the Wire Harness (22). Repeat this step on the floor as shown. Next, press the end of the Console (1) in the location shown. The end of the Wire Harness should turn the end of the Right Handrail. 6 55 22 22 Wire 88...
English Manual
Page 8
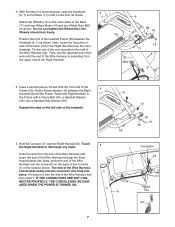
... that all four Console Screws, tighten them. Plastic 70 6 Ties 7. To protect the floor or carpet, place a mat under the treadmill. 8 8a 7 12 55 6, 7 58 41 8 Insert the excess Wire Harness (22) down into the incline legs. 9. Attach the Console Back (4) to the vertical position. The hex key is oriented as shown. After you use the treadmill. Attach the Storage Latch Assembly (41) to adjust the walking belt (see page...
... that all four Console Screws, tighten them. Plastic 70 6 Ties 7. To protect the floor or carpet, place a mat under the treadmill. 8 8a 7 12 55 6, 7 58 41 8 Insert the excess Wire Harness (22) down into the incline legs. 9. Attach the Console Back (4) to the vertical position. The hex key is oriented as shown. After you use the treadmill. Attach the Storage Latch Assembly (41) to adjust the walking belt (see page...
English Manual
Page 9
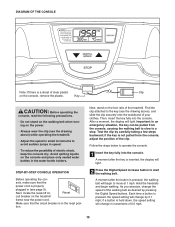
... walking belt as desired by carefully taking a few steps backward; As you exercise, change by 0.1 mph; if a button is in small increments to operate the console. 1 Insert the key fully into the console. After a moment, the display will change the speed of your clothes. Make sure that the power cord is inserted, the display will light. 2 Press the Digital Speed increase button to a stop. A moment after the key is properly plugged...
... walking belt as desired by carefully taking a few steps backward; As you exercise, change by 0.1 mph; if a button is in small increments to operate the console. 1 Insert the key fully into the console. After a moment, the display will change the speed of your clothes. Make sure that the power cord is inserted, the display will light. 2 Press the Digital Speed increase button to a stop. A moment after the key is properly plugged...
English Manual
Page 10
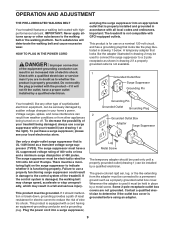
... with a cord having an equipment-grounding conductor and a grounding plug. OPERATION AND ADJUSTMENT THE PRE-LUBRICATED WALKING BELT Your treadmill features a walking belt coated with the product-if it must be used to connect the surge suppressor to indicate whether it should be used it will deteriorate the walking belt and cause excessive wear. If it is damaged, the walking belt may change speed, accelerate or stop unexpectedly, which...
... with a cord having an equipment-grounding conductor and a grounding plug. OPERATION AND ADJUSTMENT THE PRE-LUBRICATED WALKING BELT Your treadmill features a walking belt coated with the product-if it must be used to connect the surge suppressor to indicate whether it should be used it will deteriorate the walking belt and cause excessive wear. If it is damaged, the walking belt may change speed, accelerate or stop unexpectedly, which...

English Manual
Page 11
... speed of the walking belt, or the approximate number of calories you exercise, the lower left or right corner of the display can show the elapsed time and the distance that both incline legs are three incline levels. To see page 12). 11 Step onto the foot rails, press the Stop button, and remove the key from the console. Adjust the incline leg Incline Pin Incline Leg to the "off" position and unplug the power cord. CAUTION...
... speed of the walking belt, or the approximate number of calories you exercise, the lower left or right corner of the display can show the elapsed time and the distance that both incline legs are three incline levels. To see page 12). 11 Step onto the foot rails, press the Stop button, and remove the key from the console. Adjust the incline leg Incline Pin Incline Leg to the "off" position and unplug the power cord. CAUTION...
English Manual
Page 12
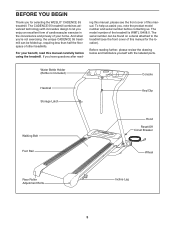
... treadmill (see the front cover of other treadmills. The serial number can be found on a decal attached to let you enjoy an excellent form of cardiovascular exercise in the convenience and privacy of your benefit, read - Water Bottle Holder (Bottle not included) Console Handrail Storage Latch Key/Clip Walking Belt Foot Rail Hood Reset/Off Circuit Breaker Wheel Rear Roller Adjustment Bolts Incline Leg 5 For your home. ing this manual, please see the front cover...
... treadmill (see the front cover of other treadmills. The serial number can be found on a decal attached to let you enjoy an excellent form of cardiovascular exercise in the convenience and privacy of your benefit, read - Water Bottle Holder (Bottle not included) Console Handrail Storage Latch Key/Clip Walking Belt Foot Rail Hood Reset/Off Circuit Breaker Wheel Rear Roller Adjustment Bolts Incline Leg 5 For your home. ing this manual, please see the front cover...
English Manual
Page 13
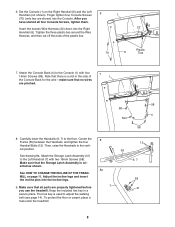
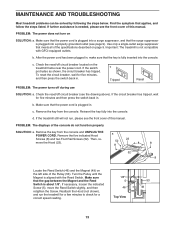
...). Remove the key from the console. Make sure that the power cord is fully inserted into a surge suppressor, and that applies, and follow the steps listed. PROBLEM: The displays of this manual. Remove the five indicated Hood a Screws (8) and two Foot Rail Screws (52). Then, remove the Hood (23). 52 23 8 8 8 52 8 Locate the Reed Switch (46) and the Magnet (49) on SOLUTION: a. Turn the Pulley until the Magnet is plugged in...
...). Remove the key from the console. Make sure that the power cord is fully inserted into a surge suppressor, and that applies, and follow the steps listed. PROBLEM: The displays of this manual. Remove the five indicated Hood a Screws (8) and two Foot Rail Screws (52). Then, remove the Hood (23). 52 23 8 8 8 52 8 Locate the Reed Switch (46) and the Magnet (49) on SOLUTION: a. Turn the Pulley until the Magnet is plugged in...
English Manual
Page 14
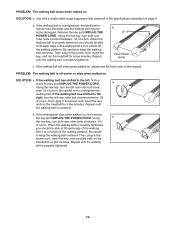
... THE POWER CORD. Using the hex key, turn both rear roller bolts clockwise, 1/4 of the walking belt 2 to the right, turn . PROBLEM: The walking belt is correctly tightened, you should be able to the left rear roller bolt counterclockwise 1/2 of a turn . If the walking belt has shifted to lift each edge of a turn the left rear roller bolt clock- a Using the hex key, turn . Then, plug in the power cord, insert the key, and run the treadmill for a few minutes. b. Using b the hex key, turn both rear roller bolts...
... THE POWER CORD. Using the hex key, turn both rear roller bolts clockwise, 1/4 of the walking belt 2 to the right, turn . PROBLEM: The walking belt is correctly tightened, you should be able to the left rear roller bolt counterclockwise 1/2 of a turn . If the walking belt has shifted to lift each edge of a turn the left rear roller bolt clock- a Using the hex key, turn . Then, plug in the power cord, insert the key, and run the treadmill for a few minutes. b. Using b the hex key, turn both rear roller bolts...
English Manual
Page 15
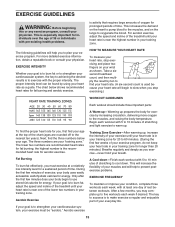
... burn fat, adjust the speed and incline of the treadmill until your heart rate is used because your breath. For aerobic exercise, adjust the speed and incline of time. The proper intensity level can be "aerobic." Next, find the three numbers below shows recommended heart rates for energy. Fat Burning To burn fat effectively, you exercise-never hold your heart rate will help to use stored fat calories...
... burn fat, adjust the speed and incline of the treadmill until your heart rate is used because your breath. For aerobic exercise, adjust the speed and incline of time. The proper intensity level can be "aerobic." Next, find the three numbers below shows recommended heart rates for energy. Fat Burning To burn fat effectively, you exercise-never hold your heart rate will help to use stored fat calories...
English Manual
Page 16
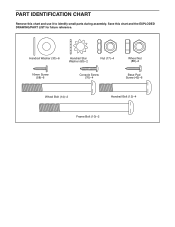
PART IDENTIFICATION CHART Remove this chart and the EXPLODED DRAWING/PART LIST for future reference. Save this chart and use it to identify small parts during assembly. Handrail Washer (30)-6 Handrail Star Washer (60)-2 Nut (17)-4 16mm Screw (58)-6 Console Screw (70)-4 Wheel Nut (88)-2 Base Pad Screw (42)-6 Wheel Bolt (14)-2 Handrail Bolt (12)-4 Frame Bolt (10)-2
PART IDENTIFICATION CHART Remove this chart and the EXPLODED DRAWING/PART LIST for future reference. Save this chart and use it to identify small parts during assembly. Handrail Washer (30)-6 Handrail Star Washer (60)-2 Nut (17)-4 16mm Screw (58)-6 Console Screw (70)-4 Wheel Nut (88)-2 Base Pad Screw (42)-6 Wheel Bolt (14)-2 Handrail Bolt (12)-4 Frame Bolt (10)-2
English Manual
Page 17
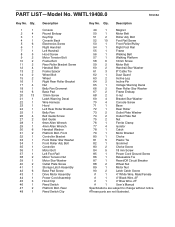
... Screw Latch Warning Decal Wire Harness Hood Left Rear Roller Bracket Belly Pan Belt Guide Screw Belt Guide 6mm Allen Wrench 4mm Allen Wrench Handrail Washer Platform Bolt, Front Controller Bracket Front Roller Star Washer Front Roller Adj. Qty. Description 49 1 Magnet 50 1 Motor Belt 51 2 Roller Adj. WMTL19408.0 R0908A Key No. PART LIST-Model No. Bolt 52 10 Foot Rail Screw 53 1 Front Roller/Pulley 54 1 Right Foot Rail 55 1 Frame 56 1 Walking Belt 57 1 Walking Platform 58 6 16mm Screw...
... Screw Latch Warning Decal Wire Harness Hood Left Rear Roller Bracket Belly Pan Belt Guide Screw Belt Guide 6mm Allen Wrench 4mm Allen Wrench Handrail Washer Platform Bolt, Front Controller Bracket Front Roller Star Washer Front Roller Adj. Qty. Description 49 1 Magnet 50 1 Motor Belt 51 2 Roller Adj. WMTL19408.0 R0908A Key No. PART LIST-Model No. Bolt 52 10 Foot Rail Screw 53 1 Front Roller/Pulley 54 1 Right Foot Rail 55 1 Frame 56 1 Walking Belt 57 1 Walking Platform 58 6 16mm Screw...

English Manual
Page 18
... 52 5 69 72 11 47 51 67 66 16 75 63 29 28 52 46 20 48 77 49 31 52 54 52 56 57 55 64 59 38 39 9 38 79 89 20 68 50 53 43 36 83 80 52 34 33 68 31 20 77 20 27 26... 8 18 42 20 88 19 42 71 19 42 13 82 12 88 2 22 15 14 30 19 42 19 17 42 R0908A EXPLODED DRAWING-Model No.
... 52 5 69 72 11 47 51 67 66 16 75 63 29 28 52 46 20 48 77 49 31 52 54 52 56 57 55 64 59 38 39 9 38 79 89 20 68 50 53 43 36 83 80 52 34 33 68 31 20 77 20 27 26... 8 18 42 20 88 19 42 71 19 42 13 82 12 88 2 22 15 14 30 19 42 19 17 42 R0908A EXPLODED DRAWING-Model No.
English Manual
Page 19
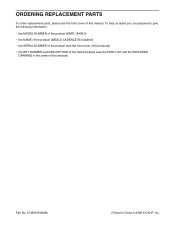
To help us assist you, be prepared to give the following information: • the MODEL NUMBER of the product (WMTL19408.0) • the NAME of the product (WESLO CADENCE 55 treadmill) • the SERIAL NUMBER of the product (see the front cover of this manual) • the KEY NUMBER and DESCRIPTION of the desired part(s) (see the front cover of this manual) Part No. 274599 R0908A Printed in the center of this manual. ORDERING REPLACEMENT PARTS To order replacement parts, please see the PART LIST and the EXPLODED DRAWING in China © 2008 ICON IP, Inc.
To help us assist you, be prepared to give the following information: • the MODEL NUMBER of the product (WMTL19408.0) • the NAME of the product (WESLO CADENCE 55 treadmill) • the SERIAL NUMBER of the product (see the front cover of this manual) • the KEY NUMBER and DESCRIPTION of the desired part(s) (see the front cover of this manual) Part No. 274599 R0908A Printed in the center of this manual. ORDERING REPLACEMENT PARTS To order replacement parts, please see the PART LIST and the EXPLODED DRAWING in China © 2008 ICON IP, Inc.


