
English Manual
Page 2
... cord of five feet or less in a garage or covered patio, or near water, outdoors, or on the treadmill at all warnings and precautions. 2. Keep the treadmill indoors, away from the treadmill at a time. 10. Do not wear loose clothing that blocks any air openings. 5. Save the EXPLODED DRAWING and PART LIST for both...
... cord of five feet or less in a garage or covered patio, or near water, outdoors, or on the treadmill at all warnings and precautions. 2. Keep the treadmill indoors, away from the treadmill at a time. 10. Do not wear loose clothing that blocks any air openings. 5. Save the EXPLODED DRAWING and PART LIST for both...
English Manual
Page 3
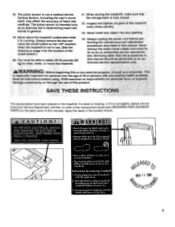
... months. 23. Inspect and tighten all parts of heart rate readings. SAVE THESE INSTRUCTIONS The decals below have been placed on latch and move the treadmill. 21. Grasp top end of 35 or persons with both hands and lower to the floor. \,..ptsEt) O Noy 1 4 1996 k? The pulse ...left hand to fold down or move the on page 4 for personal injury or property damage sustained by pulling up on the treadmill. 18. Never leave the treadmill unattended while it is not a medical device. ICON assumes no responsibility for the location of this manual should be fully engaged ...
... months. 23. Inspect and tighten all parts of heart rate readings. SAVE THESE INSTRUCTIONS The decals below have been placed on latch and move the treadmill. 21. Grasp top end of 35 or persons with both hands and lower to the floor. \,..ptsEt) O Noy 1 4 1996 k? The pulse ...left hand to fold down or move the on page 4 for personal injury or property damage sustained by pulling up on the treadmill. 18. Never leave the treadmill unattended while it is not a medical device. ICON assumes no responsibility for the location of this manual should be fully engaged ...
English Manual
Page 4
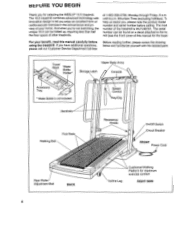
... serial number can be found on a decal attached to let you for selecting the WESLO® 10.5 treadmill. at 1-800-999-3756, Monday through Friday, 6 a.m. The mod number of the treadmill is not included. If you have additional questions, please call our Customer Service Department ...Time (excluding holidays). -1( help us assist you 're not exercising, the unique 10.5 can be folded up, requiring less than half the floor space of other treadmills. until 6 p.m. The 10.5 treadmill combines advanced technology with the labeled parts Towel Rack Water Bottle Holder* Upper Body ...
... serial number can be found on a decal attached to let you for selecting the WESLO® 10.5 treadmill. at 1-800-999-3756, Monday through Friday, 6 a.m. The mod number of the treadmill is not included. If you have additional questions, please call our Customer Service Department ...Time (excluding holidays). -1( help us assist you 're not exercising, the unique 10.5 can be folded up, requiring less than half the floor space of other treadmills. until 6 p.m. The 10.5 treadmill combines advanced technology with the labeled parts Towel Rack Water Bottle Holder* Upper Body ...

English Manual
Page 5
... to the storage position. Pivot the Console (6) to the vertical position. . 74 75 32 4 6 . (e . 9 17 % G 2 51 .- / 9 4 57 4 ( 5 Hold the treadmill with your legs rather than your hands in a cleared area and remove all four holes. Loosen the Crossbar Bolts (2) in the indicated locations (see the... inset drawing). Tighten Crossbar Screws (9) into all packing materials. As you raise the treadmill, make sure to the bottom of the Base (75) in the ends of the Console Crossbar (17). Tools required for assembly: The ...
... to the storage position. Pivot the Console (6) to the vertical position. . 74 75 32 4 6 . (e . 9 17 % G 2 51 .- / 9 4 57 4 ( 5 Hold the treadmill with your legs rather than your hands in a cleared area and remove all four holes. Loosen the Crossbar Bolts (2) in the indicated locations (see the... inset drawing). Tighten Crossbar Screws (9) into all packing materials. As you raise the treadmill, make sure to the bottom of the Base (75) in the ends of the Console Crossbar (17). Tools required for assembly: The ...

English Manual
Page 6
...Clip onto the Frame (84) in the indicated location. Make sure that all parts are tightened before you use of the Storage Latch. Raise the treadmill until the locking pin is resting on the Base (75) in the indi- 8 cated location. Attach the Stabilizer Plate (88) to the ...second person should slide the Stabilizer Plate (88) onto the Base (see drawing 6C). Using your left hand, lift the Storage Latch (120). Pivot the treadmill slightly until the locking pin snaps into the Adhesive Clip. Place one foot on the Base. Attach a Base Pad (73) to assembly drawing 5 at ...
...Clip onto the Frame (84) in the indicated location. Make sure that all parts are tightened before you use of the Storage Latch. Raise the treadmill until the locking pin is resting on the Base (75) in the indi- 8 cated location. Attach the Stabilizer Plate (88) to the ...second person should slide the Stabilizer Plate (88) onto the Base (see drawing 6C). Using your left hand, lift the Storage Latch (120). Pivot the treadmill slightly until the locking pin snaps into the Adhesive Clip. Place one foot on the Base. Attach a Base Pad (73) to assembly drawing 5 at ...

English Manual
Page 7
...grounding plug that looks like any other type of sophisticated electronic equipment, can be held in place by sudden voltage changes in your treadmill being damaged, always use on or off. Use only a UL- OPERATION AND ADJUSTMENT THE PERFORMANT LUBETM WALKING BELT electric shock. ... is properly installed and substances to reduce the risk of least resistance for use a surge protector (not in length. Grounded Outlet Box Treadmill Power Cord Grounding Pin 0 cluded) with having an equipment-grounding conductor and a grounding plug. The green-colored rigid ear, lug, ...
...grounding plug that looks like any other type of sophisticated electronic equipment, can be held in place by sudden voltage changes in your treadmill being damaged, always use on or off. Use only a UL- OPERATION AND ADJUSTMENT THE PERFORMANT LUBETM WALKING BELT electric shock. ... is properly installed and substances to reduce the risk of least resistance for use a surge protector (not in length. Grounded Outlet Box Treadmill Power Cord Grounding Pin 0 cluded) with having an equipment-grounding conductor and a grounding plug. The green-colored rigid ear, lug, ...
English Manual
Page 8
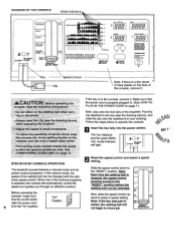
... will automatically control the speed as it . PC" STEP-BY-STEP CONSOLE OPERATION LI Reset the speed control and select a speed 10 setting. Namamt•iedaN arladdeNN. of electric shock, keep thikfren seas • Slop il you through an effective workout. Note: ...r„. EA* lacicagshaNmennt Nvi tobembrmINwok, alkohNINNANalp• THUMB PULSE Prose buffon gent. Next, step onto the foot rails of your clothing. The treadmill console features a manual mode and six preset workout programs. In the manual mode, the speed of tweed! TRAINING ZONES - "On" Position...
... will automatically control the speed as it . PC" STEP-BY-STEP CONSOLE OPERATION LI Reset the speed control and select a speed 10 setting. Namamt•iedaN arladdeNN. of electric shock, keep thikfren seas • Slop il you through an effective workout. Note: ...r„. EA* lacicagshaNmennt Nvi tobembrmINwok, alkohNINNANalp• THUMB PULSE Prose buffon gent. Next, step onto the foot rails of your clothing. The treadmill console features a manual mode and six preset workout programs. In the manual mode, the speed of tweed! TRAINING ZONES - "On" Position...

English Manual
Page 10
... START/ STOP button while inserting the key into the console. A V INCLINE HOW TO USE THE UPPER BODY ARMS As you exercise on the treadmill, you walk. THE INFORMATION MODE The console features an information mode that you are finished, remove the key. The TIME display will be detected.... pulse will be displayed. Try the sensor several times until you have walked or DIST. /PULSE LAI nt run. Remember to 10 seconds, your thumb on the treadmill. curate reading. The DIS- Upper Body Arms Resistance Knobs To vary the intensity of your pulse is lit, the distance will...
... START/ STOP button while inserting the key into the console. A V INCLINE HOW TO USE THE UPPER BODY ARMS As you exercise on the treadmill, you walk. THE INFORMATION MODE The console features an information mode that you are finished, remove the key. The TIME display will be detected.... pulse will be displayed. Try the sensor several times until you have walked or DIST. /PULSE LAI nt run. Remember to 10 seconds, your thumb on the treadmill. curate reading. The DIS- Upper Body Arms Resistance Knobs To vary the intensity of your pulse is lit, the distance will...

English Manual
Page 11
... hand as shown. 3. Caution: You must be able to safely lift 45 pounds (20 kg) In order to raise, lower, or move the treadmill to lift with your back. As you raise the treadmill, make sure to the desired location. To protect the floor or carpet from damage, place a mat under the... the risk of injury, bend your legs and keep your left hand, lift the storage latch. Do not attempt to the vertical position. Raise the treadmill until it is fully closed . Make sure that the locking pin is inside the storage latch, and that the storage latch is resting in the...
... hand as shown. 3. Caution: You must be able to safely lift 45 pounds (20 kg) In order to raise, lower, or move the treadmill to lift with your back. As you raise the treadmill, make sure to the desired location. To protect the floor or carpet from damage, place a mat under the... the risk of injury, bend your legs and keep your left hand, lift the storage latch. Do not attempt to the vertical position. Raise the treadmill until it is fully closed . Make sure that the locking pin is inside the storage latch, and that the storage latch is resting in the...
English Manual
Page 12
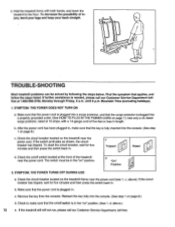
...DURING USE a. c. above .) 12 e. Remove the key from the console. d. SYMPTOM: THE POWER DOES NOT TURN ON a. Check the circuit breaker located on the treadmill frame near the power cord (see 1. Check the on/off switch is plugged into a properly grounded outlet. (See HOW TO PLUG IN THE POWER CORD...reset the circuit breaker, wait for five minutes and then press the switch back in the "on page 8.) d. Check the circuit breaker located on the treadmill near the power cord. Reinsert the key fully into the console. (See step 1 on /off switch located at 15 amps, with both hands, ...
...DURING USE a. c. above .) 12 e. Remove the key from the console. d. SYMPTOM: THE POWER DOES NOT TURN ON a. Check the circuit breaker located on the treadmill frame near the power cord (see 1. Check the on/off switch is plugged into a properly grounded outlet. (See HOW TO PLUG IN THE POWER CORD...reset the circuit breaker, wait for five minutes and then press the switch back in the "on page 8.) d. Check the circuit breaker located on the treadmill near the power cord. Reinsert the key fully into the console. (See step 1 on /off switch located at 15 amps, with both hands, ...

English Manual
Page 13
... surface of the Resistance Bracket [66], press it can be removed. Repeat until it back in the power cord, insert the key and run the treadmill for a few minutes. Remove the Resistance Cone (60) and the Upper Body Arm (12), along with a 14-gauge cord of a turn the left rear roller... until the walking belt is centered. Plug in length b. clockwise 1/4 of five feet or less in the power cord, insert the key and run the treadmill for a few minutes. SYMPTOM: THE WALKING BELT SLOWS WHEN WALKED ON a. N.., b.
... surface of the Resistance Bracket [66], press it can be removed. Repeat until it back in the power cord, insert the key and run the treadmill for a few minutes. Remove the Resistance Cone (60) and the Upper Body Arm (12), along with a 14-gauge cord of a turn the left rear roller... until the walking belt is centered. Plug in length b. clockwise 1/4 of five feet or less in the power cord, insert the key and run the treadmill for a few minutes. SYMPTOM: THE WALKING BELT SLOWS WHEN WALKED ON a. N.., b.
English Manual
Page 16
...made must be prepared to give the following information: • The MODEL NUMBER OF THE PRODUCT (WLTL98761). • The NAME OF THE PRODUCT (WESLO® 10.5 treadmill). • The SERIAL NUMBER OF THE PRODUCT (see the front cover of this manual). • The KEY NUMBER OF THE PART(S) (see...FITNESS FOR A PARTICULAR PURPOSE IS LIMITED IN ITS SCOPE AND DURATION TO THE TERMS SET FORTH HEREIN. until 6 p.m. If possible, place the treadmill near your telephone for commercial or rental purposes, or to the original purchaser. This warranty extends only to products used as store display models....
...made must be prepared to give the following information: • The MODEL NUMBER OF THE PRODUCT (WLTL98761). • The NAME OF THE PRODUCT (WESLO® 10.5 treadmill). • The SERIAL NUMBER OF THE PRODUCT (see the front cover of this manual). • The KEY NUMBER OF THE PART(S) (see...FITNESS FOR A PARTICULAR PURPOSE IS LIMITED IN ITS SCOPE AND DURATION TO THE TERMS SET FORTH HEREIN. until 6 p.m. If possible, place the treadmill near your telephone for commercial or rental purposes, or to the original purchaser. This warranty extends only to products used as store display models....


