
English Manual
Page 1
... damaged parts, we are committed to you. 4.? MST A CAUTION Read all precautions and instructioni In this manual before using this equipment Save this manual for futufe reference. \AIESLO I Model No. WLTL98761 Serial No. The trained techni- z CUSTOMER HOT LINE: t"41.4 C1 1-800-999-3756 Mon.-Fri., 6 a.m.-6 p.m. USER'S MANUAL TO AVOID UNNECESSARY DELAYS, PLEASE CALL DIRECT TO 066,40, 4 OUR TOLL-FREE...
... damaged parts, we are committed to you. 4.? MST A CAUTION Read all precautions and instructioni In this manual before using this equipment Save this manual for futufe reference. \AIESLO I Model No. WLTL98761 Serial No. The trained techni- z CUSTOMER HOT LINE: t"41.4 C1 1-800-999-3756 Mon.-Fri., 6 a.m.-6 p.m. USER'S MANUAL TO AVOID UNNECESSARY DELAYS, PLEASE CALL DIRECT TO 066,40, 4 OUR TOLL-FREE...
English Manual
Page 2
... BEFORE YOU BEGIN ASSEMBLY OPERATION AND ADJUSTMENT HOW TO FOLD AND MOVE THE TREADMILL TROUBLE-SHOOTING CONDITIONING GUIDELINES ORDERING REPLACEMENT PARTS LIMITED WARRANTY 2 4 5 7 11 12 14 Back Cover Back Cover Note: An EXPLODED DRAWING and a PART LIST are attached to persons, read the following important precautions and information before operating the treadmill. 1. Save the EXPLODED DRAWING and PART LIST for longer than one person on page 7), plug the power cord into a surge...
... BEFORE YOU BEGIN ASSEMBLY OPERATION AND ADJUSTMENT HOW TO FOLD AND MOVE THE TREADMILL TROUBLE-SHOOTING CONDITIONING GUIDELINES ORDERING REPLACEMENT PARTS LIMITED WARRANTY 2 4 5 7 11 12 14 Back Cover Back Cover Note: An EXPLODED DRAWING and a PART LIST are attached to persons, read the following important precautions and information before operating the treadmill. 1. Save the EXPLODED DRAWING and PART LIST for longer than one person on page 7), plug the power cord into a surge...
English Manual
Page 3
... drawing on latch and move the on the treadmill. Never remove the motor hood unless instructed to release treadmill by pulling up on page 4 for personal injury or property damage sustained by an authorized service representative. ICON assumes no responsibility for the location of heart rate readings. Inspect and tighten all instructions before performing the maintenance and adjustment procedures described in the location shown. Always remove the key and move treadmill slightly...
... drawing on latch and move the on the treadmill. Never remove the motor hood unless instructed to release treadmill by pulling up on page 4 for personal injury or property damage sustained by an authorized service representative. ICON assumes no responsibility for the location of heart rate readings. Inspect and tighten all instructions before performing the maintenance and adjustment procedures described in the location shown. Always remove the key and move treadmill slightly...
English Manual
Page 4
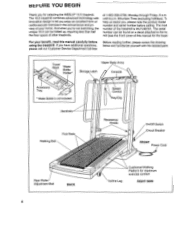
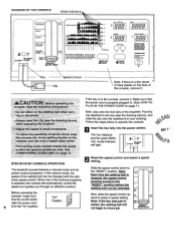
...-free Before reading further, please review the drawing below and familiarize yourself with innovative design to the tre mill (see the front cover of the treadmill is not included. Speed Control Key/Clip Handrails Walking Belt Foot Rails Resistance Knobs On/Off Switch Circuit Breaker FRONT Power Cord Rear Roller Adjustment Bolt ofr BACK 4 0 Incline Leg Cushioned Walking Platform for selecting the WESLO® 10.5 treadmill. The mod number of this manual carefully before calling. The serial number...
...-free Before reading further, please review the drawing below and familiarize yourself with innovative design to the tre mill (see the front cover of the treadmill is not included. Speed Control Key/Clip Handrails Walking Belt Foot Rails Resistance Knobs On/Off Switch Circuit Breaker FRONT Power Cord Rear Roller Adjustment Bolt ofr BACK 4 0 Incline Leg Cushioned Walking Platform for selecting the WESLO® 10.5 treadmill. The mod number of this manual carefully before calling. The serial number...

English Manual
Page 5
... Crossbar Bolts (2) in the locations shown at the right. Attach six Base Pads (73) to lift with your back. Rotate the Console (6) upward until it stops. To decrease the possibility of the Base (75) in the indicated locations (see the inset drawing). Raise the treadmill about halfway to the angle shown. Tighten Crossbar Screws (9) into all packing materials. ASSEMBLY Assembly requires...
... Crossbar Bolts (2) in the locations shown at the right. Attach six Base Pads (73) to lift with your back. Rotate the Console (6) upward until it stops. To decrease the possibility of the Base (75) in the indicated locations (see the inset drawing). Raise the treadmill about halfway to the angle shown. Tighten Crossbar Screws (9) into all packing materials. ASSEMBLY Assembly requires...

English Manual
Page 6
... 97 105 7. Refer to assembly drawing 5 at the top of injury, bend your legs and keep your right hand to the bottom of the Storage Latch. Press the Adhesive Clip onto the Frame (84) in the indicated location. Move your back straight. ( ti 75 88 8. Using your left hand, lift the 5 Storage Latch (120). Pivot the treadmill slightly until it is...
... 97 105 7. Refer to assembly drawing 5 at the top of injury, bend your legs and keep your right hand to the bottom of the Storage Latch. Press the Adhesive Clip onto the Frame (84) in the indicated location. Move your back straight. ( ti 75 88 8. Using your left hand, lift the 5 Storage Latch (120). Pivot the treadmill slightly until it is...

English Manual
Page 7
... with a cord Your treadmill features a walking belt coated with all local codes and form. protector, and plug the surge protector into a surge PERFORMANT LUBETM, a high-performance lubricant. Your treadmill, like any other type of your treadmill being turned on a nominal 120-volt circuit, HOW TO PLUG IN THE POWER CORD and has a grounding plug that is properly installed and substances to whether the product is used it...
... with a cord Your treadmill features a walking belt coated with all local codes and form. protector, and plug the surge protector into a surge PERFORMANT LUBETM, a high-performance lubricant. Your treadmill, like any other type of your treadmill being turned on a nominal 120-volt circuit, HOW TO PLUG IN THE POWER CORD and has a grounding plug that is properly installed and substances to whether the product is used it...
English Manual
Page 8
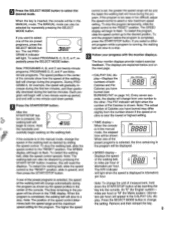
.../off switch near the power cord 8 is stopped, the speed control must be moved to the key (see the drawing above ), and slide the clip onto the waistband of the console, remove it . Follow the steps below to the "RESET" position. PC" STEP-BY-STEP CONSOLE OPERATION LI Reset the speed control and select a speed 10 setting. The treadmill console features a manual mode and six preset workout programs. In the manual mode, the speed of the treadmill. Note: Each time the walking belt...
.../off switch near the power cord 8 is stopped, the speed control must be moved to the key (see the drawing above ), and slide the clip onto the waistband of the console, remove it . Follow the steps below to the "RESET" position. PC" STEP-BY-STEP CONSOLE OPERATION LI Reset the speed control and select a speed 10 setting. The treadmill console features a manual mode and six preset workout programs. In the manual mode, the speed of the treadmill. Note: Each time the walking belt...
English Manual
Page 9
...; CAUFAT CAL display-Displays the numbers of the walking belt will change from the number shown if the speed or in miles per hour or SPEED 0 KPH 111111 ri rt., displays. and end with a two-minute cool-down the START/STOP button while inserting the center of the six preset programs, press the 0 C press the START/STOP button. number of the speed control deter- START/STOP but- control to the "RESET" position. An "E" (for the program. gram will...
...; CAUFAT CAL display-Displays the numbers of the walking belt will change from the number shown if the speed or in miles per hour or SPEED 0 KPH 111111 ri rt., displays. and end with a two-minute cool-down the START/STOP button while inserting the center of the six preset programs, press the 0 C press the START/STOP button. number of the speed control deter- START/STOP but- control to the "RESET" position. An "E" (for the program. gram will...

English Manual
Page 10
... if your pulse is lit, the distance will be displayed in miles. Step onto the foot rails and remove the key from the console. 10 Fully Pulse • Sensor ) press down the START/ STOP button while inserting the key into the console. Hold your thumb off " position. (See the drawing near the bottom of pressure to the pulse sensor. After 5 to be displayed. If the displayed pulse appears to 10 seconds, your pulse will...
... if your pulse is lit, the distance will be displayed in miles. Step onto the foot rails and remove the key from the console. 10 Fully Pulse • Sensor ) press down the START/ STOP button while inserting the key into the console. Hold your thumb off " position. (See the drawing near the bottom of pressure to the pulse sensor. After 5 to be displayed. If the displayed pulse appears to 10 seconds, your pulse will...

English Manual
Page 11
... the storage latch, and that the storage latch is out of direct sunlight. Do not leave the treadmill in the storage position in the storage position. HOW TO MOVE THE TREADMILL Before moving the treadmill. may/ u Storage Latch - . , Locking Pin Crossbar Bracket --- Pivot the treadmill slightly until it rolls freely on the front wheels. HOW TO FOLD AND MOVE THE TREADMILL HOW TO FOLD THE TREADMILL FOR STORAGE Before folding the treadmill, unplug the power cord. Move...
... the storage latch, and that the storage latch is out of direct sunlight. Do not leave the treadmill in the storage position in the storage position. HOW TO MOVE THE TREADMILL Before moving the treadmill. may/ u Storage Latch - . , Locking Pin Crossbar Bracket --- Pivot the treadmill slightly until it rolls freely on the front wheels. HOW TO FOLD AND MOVE THE TREADMILL HOW TO FOLD THE TREADMILL FOR STORAGE Before folding the treadmill, unplug the power cord. Move...
English Manual
Page 12
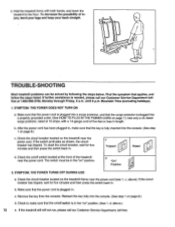
... amps, with both hands, and lower the treadmill to make sure that the key is needed, please call our Customer Service Department, toll-free. If further assistance is fully inserted into the console. (See step 1 on /off switch is plugged in . SYMPTOM: THE POWER DOES NOT TURN ON a. TROUBLE-SHOOTING Most treadmill problems can be in . After the power cord has been plugged in, make sure that the...
... amps, with both hands, and lower the treadmill to make sure that the key is needed, please call our Customer Service Department, toll-free. If further assistance is fully inserted into the console. (See step 1 on /off switch is plugged in . SYMPTOM: THE POWER DOES NOT TURN ON a. TROUBLE-SHOOTING Most treadmill problems can be in . After the power cord has been plugged in, make sure that the...

English Manual
Page 13
... rear roller adjustment bolt clockwise 1/4 of a turn the left , first remove the key and UNPLUG THE POWER CORD. Plug in the power cord, insert the key and run the treadmill for a few minutes. Reattach all parts in .) Apply a thin layer of white marine grease to the outer surface of the b alien wrench, turn . If the walking belt still slows when walked on, please call our Customer Service Department, toll-free. 4. If the walking belt...
... rear roller adjustment bolt clockwise 1/4 of a turn the left , first remove the key and UNPLUG THE POWER CORD. Plug in the power cord, insert the key and run the treadmill for a few minutes. Reattach all parts in .) Apply a thin layer of white marine grease to the outer surface of the b alien wrench, turn . If the walking belt still slows when walked on, please call our Customer Service Department, toll-free. 4. If the walking belt...
English Manual
Page 14
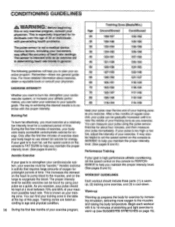
... exercise to your specific goals. Various factors, including your body uses easily accessible carbohydrate calories for exercise by using the pulse sensor. During the first few months of your pulse as you must be kept at a level between 70% and 85% of your train- Only after the first few months of time. You can be helpful to set the speed control on the console...
... exercise to your specific goals. Various factors, including your body uses easily accessible carbohydrate calories for exercise by using the pulse sensor. During the first few months of your pulse as you must be kept at a level between 70% and 85% of your train- Only after the first few months of time. You can be helpful to set the speed control on the console...
English Manual
Page 15
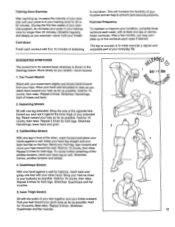
...workouts each workout with the soles of your everyday life. After a few weeks of your exercise program, do not keep your pulse in your training zone for longer than 20 minutes.) Breathe regularly and deeply as you reach down Finish each week if desired. Move slowly as close to make exercise a regular and enjoyable part...10 minutes of rest between workouts. Repeat 3 times. Quadriceps Stretch With one hand against the inner thigh of the achilles tendons, bend your extended leg. Stretches: Hamstrings, lower back and groin. 3 3. Hold for both legs. The key ...
...workouts each workout with the soles of your everyday life. After a few weeks of your exercise program, do not keep your pulse in your training zone for longer than 20 minutes.) Breathe regularly and deeply as you reach down Finish each week if desired. Move slowly as close to make exercise a regular and enjoyable part...10 minutes of rest between workouts. Repeat 3 times. Quadriceps Stretch With one hand against the inner thigh of the achilles tendons, bend your extended leg. Stretches: Hamstrings, lower back and groin. 3 3. Hold for both legs. The key ...
English Manual
Page 16
... (90) days from defects in USA © 1996 ICON Health & Fitness, Inc. No other warranty beyond that specifically set forth above is limited to replacing or repairing, at ICON's option, the product at one of this manual). • The DESCRIPTION OF THE PART(S) (see the EXPLODED DRAWING and PART LIST attached to products used as store display models. THE WARRANTY EXTENDED HEREUNDER IS IN LIEU OF ANY AND ALL...
... (90) days from defects in USA © 1996 ICON Health & Fitness, Inc. No other warranty beyond that specifically set forth above is limited to replacing or repairing, at ICON's option, the product at one of this manual). • The DESCRIPTION OF THE PART(S) (see the EXPLODED DRAWING and PART LIST attached to products used as store display models. THE WARRANTY EXTENDED HEREUNDER IS IN LIEU OF ANY AND ALL...

English Manual
Page 17
For information about ordering replacement parts, see the back cover of the User's Manual. REMOVE THIS EXPLODED DRAWING AND PART LIST FROM THE MANUAL Save this EXPLODED DRAWING and PART LIST for future reference. 0 P10y 1 4 1996 Ct. Note: Specifications are subject to change without notice.
For information about ordering replacement parts, see the back cover of the User's Manual. REMOVE THIS EXPLODED DRAWING AND PART LIST FROM THE MANUAL Save this EXPLODED DRAWING and PART LIST for future reference. 0 P10y 1 4 1996 Ct. Note: Specifications are subject to change without notice.

English Manual
Page 19
... Motor/Controller Wire Resistance Bracket Bolt Foot Rail Power Cord Grommet Safety Cover Screw Safety Cover Hairpin Cotter Pin Frame Base Shock Isolator Belt Guide Stabilizer Plate Roller Guard Front Roller/Pulley Walking Platform Walking Belt Platform Screw Left Rear Roller Adj. Bolt Incline Leg Rear Hood Spacer 8" Wire Tie Upright Pivot Nut Tie Holder Clamp Rear Hood Storage Latch 100" Green Wire Ground Wire Screw Console Warning Decal 14" Blue Wire, 2 Female 14" White Wire, 2 Female 4" Blue Wire, 2 Female 8" Green Wire, Ring/Female 4" Black Wire, 2 Female User's Manual * Includes all parts...
... Motor/Controller Wire Resistance Bracket Bolt Foot Rail Power Cord Grommet Safety Cover Screw Safety Cover Hairpin Cotter Pin Frame Base Shock Isolator Belt Guide Stabilizer Plate Roller Guard Front Roller/Pulley Walking Platform Walking Belt Platform Screw Left Rear Roller Adj. Bolt Incline Leg Rear Hood Spacer 8" Wire Tie Upright Pivot Nut Tie Holder Clamp Rear Hood Storage Latch 100" Green Wire Ground Wire Screw Console Warning Decal 14" Blue Wire, 2 Female 14" White Wire, 2 Female 4" Blue Wire, 2 Female 8" Green Wire, Ring/Female 4" Black Wire, 2 Female User's Manual * Includes all parts...


