
English Manual
Page 2
...in this or any exercise program, consult your physician. tions before beginning assembly. Use the home gym only on the pulleys at any worn parts immediately. 6. Inspect and tighten all times. 10. Important Precautions WARNING: To reduce the risk of this manual. Keep hands and feet ...fall with pre-existing health problems. Read all instructions before using the home gym. 3. Always disconnect the lat bar or ab strap from moving parts. 9. The home gym is especially important for persons over the age of 35 or persons with great force. 5. Table of Contents Important Precautions...
...in this or any exercise program, consult your physician. tions before beginning assembly. Use the home gym only on the pulleys at any worn parts immediately. 6. Inspect and tighten all times. 10. Important Precautions WARNING: To reduce the risk of this manual. Keep hands and feet ...fall with pre-existing health problems. Read all instructions before using the home gym. 3. Always disconnect the lat bar or ab strap from moving parts. 9. The home gym is especially important for persons over the age of 35 or persons with great force. 5. Table of Contents Important Precautions...
English Manual
Page 3
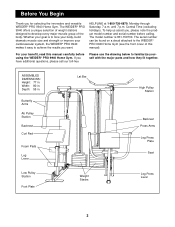
... to familiarize yourself with the major parts and how they fit together. until 7 p.m. If you for selecting the innovative and versatile WEIDER® PRO 9940 Home Gym. The WEIDER® PRO 9940 offers a unique selection of weight stations designed to the WEIDER® PRO 9940 Home Gym (see the front cover...achieve the results you , please note the product model number and serial number before using the WEIDER® PRO 9940 Home Gym. For your cardiovascular system, the WEIDER® PRO 9940 makes it easy to tone your body, build dramatic muscle size and strength or improve your ...
... to familiarize yourself with the major parts and how they fit together. until 7 p.m. If you for selecting the innovative and versatile WEIDER® PRO 9940 Home Gym. The WEIDER® PRO 9940 offers a unique selection of weight stations designed to the WEIDER® PRO 9940 Home Gym (see the front cover...achieve the results you , please note the product model number and serial number before using the WEIDER® PRO 9940 Home Gym. For your cardiovascular system, the WEIDER® PRO 9940 makes it easy to tone your body, build dramatic muscle size and strength or improve your ...
English Manual
Page 4
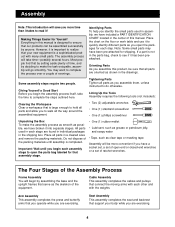
... process as smooth as you to realize that your body while you have broken it to complete the steps outlined here. All parts used in the shipping box. Place the chart on the floor or work table and use it into separate stages. Lining Up...this manual is completed. Making Things Easier for shipping. Some assembly steps require two people. However, it has been preattached. Tightening Parts Tighten all parts as possible, we have been pre-attached for Yourself Everything in the drawings. Assembly Note: This introduction will save you assemble this ...
... process as smooth as you to realize that your body while you have broken it to complete the steps outlined here. All parts used in the shipping box. Place the chart on the floor or work table and use it into separate stages. Lining Up...this manual is completed. Making Things Easier for shipping. Some assembly steps require two people. However, it has been preattached. Tightening Parts Tighten all parts as possible, we have been pre-attached for Yourself Everything in the drawings. Assembly Note: This introduction will save you assemble this ...

English Manual
Page 5
... information on page 4. Insert four 5/16" x 2 1/2" Carriage Bolts (92) up through the indicated holes at the end of the Butterfly Base (4). Locate and open the parts bag labeled "FRAME ASSEMBLY." See drawing 2b. Frame Assembly 1. Place the Butterfly Base flat on the Weight Base (5) with holes that you need a Support Plate...
... information on page 4. Insert four 5/16" x 2 1/2" Carriage Bolts (92) up through the indicated holes at the end of the Butterfly Base (4). Locate and open the parts bag labeled "FRAME ASSEMBLY." See drawing 2b. Frame Assembly 1. Place the Butterfly Base flat on the Weight Base (5) with holes that you need a Support Plate...

English Manual
Page 10
Locate and open the parts bag labeled "ARM ASSEMBLY." Lubricate the 3/8" x 8" Bolt (52). it must be easy to assemble the second Press Arm (77, not shown). 8 8 50 6 Lubricate 100 Welded ...
Locate and open the parts bag labeled "ARM ASSEMBLY." Lubricate the 3/8" x 8" Bolt (52). it must be easy to assemble the second Press Arm (77, not shown). 8 8 50 6 Lubricate 100 Welded ...
English Manual
Page 11
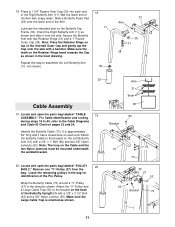
... the Butterfly Cable (73). Note: The loop on the Retainer Rings bend towards the Cap as shown in the inset drawing. Locate and open the parts bag labeled "CABLE 19 ASSEMBLY." Wrap the Butterfly Cable (73) around a "V"-Pulley (27) in the bag for identification of the Arm. Make sure the ... (38). 18. Wet the lower end of the Right Butterfly Arm (11). Slide a Butterfly Foam Pad (29) onto the lower end of the Pro Pulley. Locate and open the parts bag labeled "PULLEY 20 BAG 2." Press a 1 3/4" Square Inner Cap (35) into each end. Secure the Butterfly Arm with soapy water. Attach ...
... the Butterfly Cable (73). Note: The loop on the Retainer Rings bend towards the Cap as shown in the inset drawing. Locate and open the parts bag labeled "CABLE 19 ASSEMBLY." Wrap the Butterfly Cable (73) around a "V"-Pulley (27) in the bag for identification of the Arm. Make sure the ... (38). 18. Wet the lower end of the Right Butterfly Arm (11). Slide a Butterfly Foam Pad (29) onto the lower end of the Pro Pulley. Locate and open the parts bag labeled "PULLEY 20 BAG 2." Press a 1 3/4" Square Inner Cap (35) into each end. Secure the Butterfly Arm with soapy water. Attach ...
English Manual
Page 14
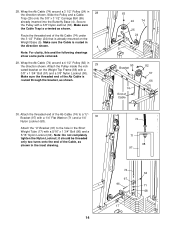
... the threaded end of the Ab Cable (74) to the hole in the direction shown. 4 Note: For clarity, this and the following drawings show some parts removed. 29.
... the threaded end of the Ab Cable (74) to the hole in the direction shown. 4 Note: For clarity, this and the following drawings show some parts removed. 29.
English Manual
Page 20
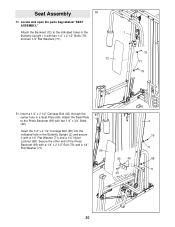
Secure the other end of the Press Backrest (99) with two 1/4" x 3/4" Bolts (49). Locate and open the parts bag labeled "SEAT ASSEMBLY." Insert a 1/4" x 2 1/2" Carriage Bolt (45) through the center hole in the Butterfly Upright (2) and secure it with two 1/4" x 2 1/2" Bolts (79) and two 1/4" ...
Secure the other end of the Press Backrest (99) with two 1/4" x 3/4" Bolts (49). Locate and open the parts bag labeled "SEAT ASSEMBLY." Insert a 1/4" x 2 1/2" Carriage Bolt (45) through the center hole in the Butterfly Upright (2) and secure it with two 1/4" x 2 1/2" Bolts (79) and two 1/4" ...
English Manual
Page 22
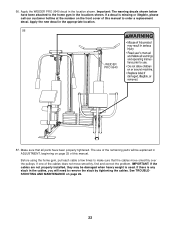
...will be damaged when heavy weight is missing or illegible, please call our customer hotline at the number on the front cover of the remaining parts will need to the home gym in ADJUSTMENT, beginning on page 26. 22 Important: The warning decals shown below have been properly tightened.... on page 25 of the cables does not move smoothly over the pulleys. Apply the WEIDER PRO 9940 decal in the appropriate location. 56 WEIDER PRO 9940 57. 56. If a decal is used. If one of this manual to make sure that all parts have been attached to remove the slack by tightening the cables.
...will be damaged when heavy weight is missing or illegible, please call our customer hotline at the number on the front cover of the remaining parts will need to the home gym in ADJUSTMENT, beginning on page 26. 22 Important: The warning decals shown below have been properly tightened.... on page 25 of the cables does not move smoothly over the pulleys. Apply the WEIDER PRO 9940 decal in the appropriate location. 56 WEIDER PRO 9940 57. 56. If a decal is used. If one of this manual to make sure that all parts have been attached to remove the slack by tightening the cables.
English Manual
Page 25
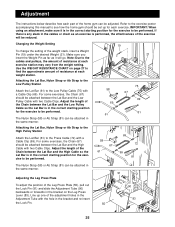
... WEIGHT RESISTANCE CHART on the Leg Press Lever (83). For some exercises, the Chain (67) should be performed. Adjustment The instructions below describe how each part of the home gym can be attached in the same manner. 91 Adjusting the Leg Press Plate To adjust the position of the Leg Press...
... WEIGHT RESISTANCE CHART on the Leg Press Lever (83). For some exercises, the Chain (67) should be performed. Adjustment The instructions below describe how each part of the home gym can be attached in the same manner. 91 Adjusting the Leg Press Plate To adjust the position of the Leg Press...
English Manual
Page 26
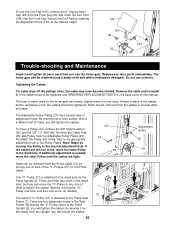
... Remove the cable and re-install it is attached to the second adjustment hole. Slack can be tightened. To move the "V"-Pulley to any worn parts immediately. Secure the Curl Pad by moving the "V"-Pulley closer to be removed form the Press Cable (72) by moving it fur- If the ...gym. Start by inserting the Adjustment Knob (103) at the desired height. 105 104 28 103 20 Trouble-shooting and Maintenance Inspect and tighten all parts each time you will loosen the cables. 26 ther away from the Adjustable Pulley Plates (23). If there is felt, the cables should be ...
... Remove the cable and re-install it is attached to the second adjustment hole. Slack can be tightened. To move the "V"-Pulley to any worn parts immediately. Secure the Curl Pad by moving the "V"-Pulley closer to be removed form the Press Cable (72) by moving it fur- If the ...gym. Start by inserting the Adjustment Knob (103) at the desired height. 105 104 28 103 20 Trouble-shooting and Maintenance Inspect and tighten all parts each time you will loosen the cables. 26 ther away from the Adjustable Pulley Plates (23). If there is felt, the cables should be ...
English Manual
Page 29
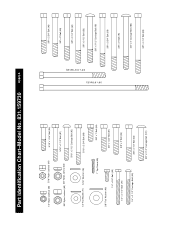
Part Identification Chart-Model No. 831.159730 R0800A 1/4" Nylon Locknut (68) 5/16" Nylon Locknut (64) 5/16" x 1 3/4" Bolt (96) 3/8" Nylon Locknut (50) 3/8" Nylon Jamnut (63) 5/16" x 2 1/2" Bolt (...
Part Identification Chart-Model No. 831.159730 R0800A 1/4" Nylon Locknut (68) 5/16" Nylon Locknut (64) 5/16" x 1 3/4" Bolt (96) 3/8" Nylon Locknut (50) 3/8" Nylon Jamnut (63) 5/16" x 2 1/2" Bolt (...
English Manual
Page 30
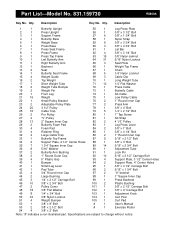
... Adjustable Pulley Plate 77 2 Press Arm 24 20 3 1/2" Pulley 78 1 3/8" x 4" Bolt 25 16 Cable Trap 79 5 1/4" x 2 1/2" Bolt 26 2 Pro Pulley 80 1 1" Tap Screw 27 4 "V"-Pulley 81 1 Ab Strap 28 13 2" Square Inner Cap 82 2 4 1/2" Pulley 29 2 Butterfly Foam Pad 83 1...Pad 52 1 3/8" x 8" Bolt # 1 User's Manual 53 2 3/8" x 2 1/2" Bolt # 1 Exercise Poster 54 4 3/8" x 2" Bolt Note: "#" indicates a non-illustrated part. Description Key No. Qty. Part List-Model No. 831.159730 R0800A Key No. Specifications are subject to change without notice. Qty.
... Adjustable Pulley Plate 77 2 Press Arm 24 20 3 1/2" Pulley 78 1 3/8" x 4" Bolt 25 16 Cable Trap 79 5 1/4" x 2 1/2" Bolt 26 2 Pro Pulley 80 1 1" Tap Screw 27 4 "V"-Pulley 81 1 Ab Strap 28 13 2" Square Inner Cap 82 2 4 1/2" Pulley 29 2 Butterfly Foam Pad 83 1...Pad 52 1 3/8" x 8" Bolt # 1 User's Manual 53 2 3/8" x 2 1/2" Bolt # 1 Exercise Poster 54 4 3/8" x 2" Bolt Note: "#" indicates a non-illustrated part. Description Key No. Qty. Part List-Model No. 831.159730 R0800A Key No. Specifications are subject to change without notice. Qty.
English Manual
Page 32
... • The MODEL NUMBER of the product (831.159730) • The NAME of the product (WEIDER® PRO 9940 Home Gym) • The KEY NUMBER and DESCRIPTION of the PART (see the PART LIST/EXPLODED DRAWING in the center of this manual to find that: • you need help assembling or...not apply when the WEIGHT SYSTEM EXERCISER is missing • or you visit your WEIDER® PRO 9940 Home Gym are available for rental purposes. SEARS, ROEBUCK AND CO., DEPT. 817WA, HOFFMAN ESTATES, IL 60179 Part No. 158051 R0800A Printed in this SEARS WEIGHT SYSTEM EXERCISER, contact the nearest SEARS...
... • The MODEL NUMBER of the product (831.159730) • The NAME of the product (WEIDER® PRO 9940 Home Gym) • The KEY NUMBER and DESCRIPTION of the PART (see the PART LIST/EXPLODED DRAWING in the center of this manual to find that: • you need help assembling or...not apply when the WEIGHT SYSTEM EXERCISER is missing • or you visit your WEIDER® PRO 9940 Home Gym are available for rental purposes. SEARS, ROEBUCK AND CO., DEPT. 817WA, HOFFMAN ESTATES, IL 60179 Part No. 158051 R0800A Printed in this SEARS WEIGHT SYSTEM EXERCISER, contact the nearest SEARS...


