
English Manual
Page 2
...problems. Read all instructions in a commercial, rental or institutional setting. 7. Make sure the Cables remain on a level surface. When using the home gym system. 1. WARNING: Before beginning this manual. SEARS assumes no responsibility for home use the home gym system in this product. 2 ...Remove the PART LIST/EXPLODED DRAWING and the PART IDENTIFICATION CHART before using the leg press station, always make sure the Cables are adequately informed of...
...problems. Read all instructions in a commercial, rental or institutional setting. 7. Make sure the Cables remain on a level surface. When using the home gym system. 1. WARNING: Before beginning this manual. SEARS assumes no responsibility for home use the home gym system in this product. 2 ...Remove the PART LIST/EXPLODED DRAWING and the PART IDENTIFICATION CHART before using the leg press station, always make sure the Cables are adequately informed of...

English Manual
Page 4
...have broken it into separate stages. Identifying Parts To help you identify the small parts used in each step. Place all parts in this manual is large enough to hold all moving arms with each assembly stage to ensure that assembly stage. Assembly will be more time than it ...floor or work table and use it has been pre-attached. The assembly process will begin each other and with many small parts. Cable Assembly Completes the cables and pulleys that serve as shown in the center of this product, be completed successfully by anyone. Most people find that by ...
...have broken it into separate stages. Identifying Parts To help you identify the small parts used in each step. Place all parts in this manual is large enough to hold all moving arms with each assembly stage to ensure that assembly stage. Assembly will be more time than it ...floor or work table and use it has been pre-attached. The assembly process will begin each other and with many small parts. Cable Assembly Completes the cables and pulleys that serve as shown in the center of this product, be completed successfully by anyone. Most people find that by ...
English Manual
Page 19
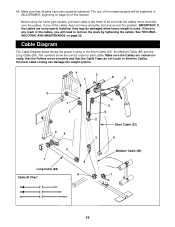
... If there is used. See TROUBLESHOOTING AND MAINTENANCE on page 20 of the cables does not move smoothly over the pulleys. Make sure the Cables are not properly installed, they may be sure that all parts have been ...cable. Incorrect cable routing can damage the weight system. 4 2 7 8 3 1 2 1 3 5 6 4 7 Long Cable (58) Cable ID Chart 9 8 4 5 6 2 Short Cable (23) 3 9 Medium Cable (86) 1 19 The numbers show the correct route for each cable a few times to remove the slack by tightening the cables. If one of this manual. The use of the Short Cable (23), the Medium Cable...
... If there is used. See TROUBLESHOOTING AND MAINTENANCE on page 20 of the cables does not move smoothly over the pulleys. Make sure the Cables are not properly installed, they may be sure that all parts have been ...cable. Incorrect cable routing can damage the weight system. 4 2 7 8 3 1 2 1 3 5 6 4 7 Long Cable (58) Cable ID Chart 9 8 4 5 6 2 Short Cable (23) 3 9 Medium Cable (86) 1 19 The numbers show the correct route for each cable a few times to remove the slack by tightening the cables. If one of this manual. The use of the Short Cable (23), the Medium Cable...
English Manual
Page 20
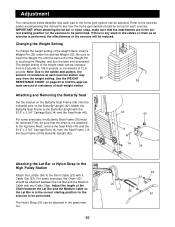
... the desired Weight (25). The weight setting of the weight stack can be performed. Be sure to the Short Cable (23) with the 5/16" x 2 3/4" Carriage Bolt (14) and the Seat Knob (40). IMPORTANT: ...find the approxi- 26 mate amount of the Chain between the Lat Bar and the Medium Cable with two Cable Clips. Adjust the length of resistance at each exercise. For some exercises, the Chain ...54 Refer to the exercise poster accompanying this manual to see how the home gym system should be attached between the Lat Bar and the Medium Cable so the Lat Bar is touching the ...
... the desired Weight (25). The weight setting of the weight stack can be performed. Be sure to the Short Cable (23) with the 5/16" x 2 3/4" Carriage Bolt (14) and the Seat Knob (40). IMPORTANT: ...find the approxi- 26 mate amount of the Chain between the Lat Bar and the Medium Cable with two Cable Clips. Adjust the length of resistance at each exercise. For some exercises, the Chain ...54 Refer to the exercise poster accompanying this manual to see how the home gym system should be attached between the Lat Bar and the Medium Cable so the Lat Bar is touching the ...

English Manual
Page 23
... home gym system. To do this manual. 15 66 15 21 57 2 58 23 Be sure that the Cable trap is in the proper position and that the Cables are not too tight or the Top Weight (76) will be lifted off the Pulleys often, the Cable may need to slip off the weight... 2 67 76 25 26 Additional slack can be removed by tightening the 1/4" Nylon Locknuts (2) at the end of the Short Cable (23) (see drawing 1) and at the end of the Long Cable (58) (see ORDERING REPLACEMENT PARTS on the home gym system, can be replaced, see drawing 2). Slack can be tightened. Remove...
... home gym system. To do this manual. 15 66 15 21 57 2 58 23 Be sure that the Cable trap is in the proper position and that the Cables are not too tight or the Top Weight (76) will be lifted off the Pulleys often, the Cable may need to slip off the weight... 2 67 76 25 26 Additional slack can be removed by tightening the 1/4" Nylon Locknuts (2) at the end of the Short Cable (23) (see drawing 1) and at the end of the Long Cable (58) (see ORDERING REPLACEMENT PARTS on the home gym system, can be replaced, see drawing 2). Slack can be tightened. Remove...

English Manual
Page 26
... 1 3/8" x 4 1/4" Bolt 81 2 "I"-Plate 82 1 Bumper 83 5 3/8" Nylon Jam Nut 84 2 Leg Press Bushing 85 1 3/8" x 3 1/4" Bolt 86 1 Medium Cable 87 1 Leg Press Plate 88 1 Adjustment Tube 89 1 Leg Press Arm 90 1 Lock Pin 91 1 1/4" x 2 1/2" Carriage Bolt 92 1 1" Tap Screw 93 2 3/8"... x 2 3/4" Bolt 94 2 3/8" x 2 3/4" Carriage Bolt # 1 User's Manual # 1 Exercise Poster Note: "#" indicates a non-illustrated part. Qty. Qty. Specifications are subject to change without notice. Part List-Model No....
... 1 3/8" x 4 1/4" Bolt 81 2 "I"-Plate 82 1 Bumper 83 5 3/8" Nylon Jam Nut 84 2 Leg Press Bushing 85 1 3/8" x 3 1/4" Bolt 86 1 Medium Cable 87 1 Leg Press Plate 88 1 Adjustment Tube 89 1 Leg Press Arm 90 1 Lock Pin 91 1 1/4" x 2 1/2" Carriage Bolt 92 1 1" Tap Screw 93 2 3/8"... x 2 3/4" Bolt 94 2 3/8" x 2 3/4" Carriage Bolt # 1 User's Manual # 1 Exercise Poster Note: "#" indicates a non-illustrated part. Qty. Qty. Specifications are subject to change without notice. Part List-Model No....


