

English Manual
Page 3
... properly tighten all parts regularly. Always stand on the foot plate when performing an exercise that all users of the weight system are raised. This is enough clearance around the weight system to prevent unauthorized use the weight system. 7. Always wear athletic shoes for persons over age 35...WARNING: To reduce the risk of serious injury, read all important precautions and instructions in this manual and all warnings on your weight system before using your physician. If the cables bind while you experience pain while exercising, stop immediately and make sure that does ...
... properly tighten all parts regularly. Always stand on the foot plate when performing an exercise that all users of the weight system are raised. This is enough clearance around the weight system to prevent unauthorized use the weight system. 7. Always wear athletic shoes for persons over age 35...WARNING: To reduce the risk of serious injury, read all important precautions and instructions in this manual and all warnings on your weight system before using your physician. If the cables bind while you experience pain while exercising, stop immediately and make sure that does ...
English Manual
Page 4
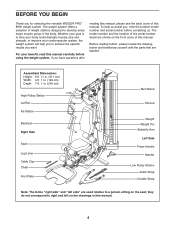
... left on the drawings in . (216 cm) High Pulley Station Lat Bar Ab Station Backrest Right Side Seat Leg Lever Cable Clip Chain Foot Plate Burn Band Shroud Weight Weight Pin Butterfly Arm Left Side Press Handle Handle Low Pulley Station Ankle Strap Double Strap Note: The terms "right side" and "left side... us. Assembled Dimensions: Height: 6 ft. 11 in. (211 cm) Width: 4 ft. 1 in. (124 cm) Depth: 7 ft. 1 in this manual. 4 If you for selecting the versatile WEIDER PRO™ 8900 weight system.
... left on the drawings in . (216 cm) High Pulley Station Lat Bar Ab Station Backrest Right Side Seat Leg Lever Cable Clip Chain Foot Plate Burn Band Shroud Weight Weight Pin Butterfly Arm Left Side Press Handle Handle Low Pulley Station Ankle Strap Double Strap Note: The terms "right side" and "left side... us. Assembled Dimensions: Height: 6 ft. 11 in. (211 cm) Width: 4 ft. 1 in. (124 cm) Depth: 7 ft. 1 in this manual. 4 If you for selecting the versatile WEIDER PRO™ 8900 weight system.
English Manual
Page 7
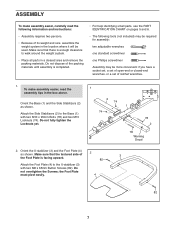
... 5 and 6. • The following information and instructions: • Assembly requires two persons. • Because of its weight and size, assemble the weight system in the box above. the Foot Plate must pivot easily. 4 82 7 Do not fully tighten the Locknuts yet. 1 2 74 74 1 78 2 78 ...adjustable wrenches one standard screwdriver one Phillips screwdriver Assembly may be used. Orient the U-stabilizer (3) and the Foot Plate (4) as shown. Attach the Side Stabilizers (2) to walk around the weight system. • Place all parts in a cleared area and remove the packing materials.
... 5 and 6. • The following information and instructions: • Assembly requires two persons. • Because of its weight and size, assemble the weight system in the box above. the Foot Plate must pivot easily. 4 82 7 Do not fully tighten the Locknuts yet. 1 2 74 74 1 78 2 78 ...adjustable wrenches one standard screwdriver one Phillips screwdriver Assembly may be used. Orient the U-stabilizer (3) and the Foot Plate (4) as shown. Attach the Side Stabilizers (2) to walk around the weight system. • Place all parts in a cleared area and remove the packing materials.
English Manual
Page 36
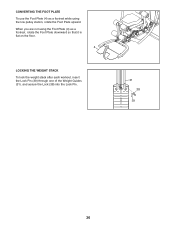
When you are not using the low pulley station, rotate the Foot Plate upward. CONVERTING THE FOOT PLATE To use the Foot Plate (4) as a footrest while using the Foot Plate (4) as a footrest, rotate the Foot Plate downward so that it is flat on the floor. 4 LOCKING THE WEIGHT STACK To lock the weight stack after each workout, insert the Lock Pin (39) through one of the Weight Guides (31), and secure the Lock (38) into the Lock Pin. 31 38 39 36
When you are not using the low pulley station, rotate the Foot Plate upward. CONVERTING THE FOOT PLATE To use the Foot Plate (4) as a footrest while using the Foot Plate (4) as a footrest, rotate the Foot Plate downward so that it is flat on the floor. 4 LOCKING THE WEIGHT STACK To lock the weight stack after each workout, insert the Lock Pin (39) through one of the Weight Guides (31), and secure the Lock (38) into the Lock Pin. 31 38 39 36
English Manual
Page 39
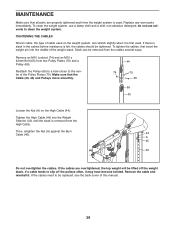
... Cable (44) into the middle of the Pulley Plates (70). Remove the cable and reinstall it may have become twisted. TIGHTENING THE CABLES Woven cable, the type of this manual. 39 To tighten the cables, first insert the weight pin into the Weight Selector (32) until the slack is used .... parts immediately. If the cables are properly tightened each time the weight system is removed from two Pulley Plates (70) and a Pulley (69). If the cables need to the center of the weight stack. If a cable tends to clean the weight system. MAINTENANCE Make sure that the Cable (43, 44) and...
... Cable (44) into the middle of the Pulley Plates (70). Remove the cable and reinstall it may have become twisted. TIGHTENING THE CABLES Woven cable, the type of this manual. 39 To tighten the cables, first insert the weight pin into the Weight Selector (32) until the slack is used .... parts immediately. If the cables are properly tightened each time the weight system is removed from two Pulley Plates (70) and a Pulley (69). If the cables need to the center of the weight stack. If a cable tends to clean the weight system. MAINTENANCE Make sure that the Cable (43, 44) and...
English Manual
Page 43
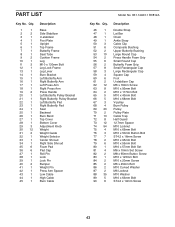
... 12 31 2 32 1 33 1 34 1 35 6 36 6 37 1 38 1 39 1 40 2 41 1 42 1 43 1 44 1 45 1 Description Base Side Stabilizer U-stabilizer Foot Plate Upright Top Frame Butterfly Frame Seat Tube Cushion Frame Leg M10 x 130mm Bolt Leg Lock Frame Leg Lever Burn Bracket Left Butterfly Arm Right Butterfly...Pad Right Butterfly Pad Seat Backrest Burn Band Top Cover Bottom Cover Adjustment Knob Weight Weight Guide Weight Selector Center Shroud Right Side Shroud Foam Pad Pad Cap Roll Pin Lock Lock Pin Bumper Weight Pin Press Arm Spacer Low Cable High Cable Burn Cable Model No. 831.14923...
... 12 31 2 32 1 33 1 34 1 35 6 36 6 37 1 38 1 39 1 40 2 41 1 42 1 43 1 44 1 45 1 Description Base Side Stabilizer U-stabilizer Foot Plate Upright Top Frame Butterfly Frame Seat Tube Cushion Frame Leg M10 x 130mm Bolt Leg Lock Frame Leg Lever Burn Bracket Left Butterfly Arm Right Butterfly...Pad Right Butterfly Pad Seat Backrest Burn Band Top Cover Bottom Cover Adjustment Knob Weight Weight Guide Weight Selector Center Shroud Right Side Shroud Foam Pad Pad Cap Roll Pin Lock Lock Pin Bumper Weight Pin Press Arm Spacer Low Cable High Cable Burn Cable Model No. 831.14923...


