
Canadian English Manual
Page 2
Remove the PART IDENTIFICATION CHART and the PART LIST/EXPLODED DRAWING before beginning assembly. 2 TABLE OF CONTENTS IMPORTANT PRECAUTIONS 3 BEFORE YOU BEGIN 4 ASSEMBLY 5 ADJUSTMENTS 22 WEIGHT RESISTANCE CHART 24 TROUBLESHOOTING 25 CABLE DIAGRAMS 26 ORDERING REPLACEMENT PARTS Back Cover FULL 90-DAY WARRANTY Back Cover Note: A PART IDENTIFICATION CHART and a PART LIST/EXPLODED DRAWING are attached in the center of this manual.
Remove the PART IDENTIFICATION CHART and the PART LIST/EXPLODED DRAWING before beginning assembly. 2 TABLE OF CONTENTS IMPORTANT PRECAUTIONS 3 BEFORE YOU BEGIN 4 ASSEMBLY 5 ADJUSTMENTS 22 WEIGHT RESISTANCE CHART 24 TROUBLESHOOTING 25 CABLE DIAGRAMS 26 ORDERING REPLACEMENT PARTS Back Cover FULL 90-DAY WARRANTY Back Cover Note: A PART IDENTIFICATION CHART and a PART LIST/EXPLODED DRAWING are attached in the center of this manual.

Canadian English Manual
Page 3
...the locations shown on the foot plate when performing an exercise that all instructions in this or any worn parts immediately. 6. Make sure that the cables are raised. The weight system should not be used by or through Friday, 6 a.m. Use the weight system only on the weight system in... the accompanying literature before using. If the cables bind while you feel pain or dizziness at all times. 14. until 6 p.m. Never release the butterfly arms, leg lever, squat arm, lat bar...
...the locations shown on the foot plate when performing an exercise that all instructions in this or any worn parts immediately. 6. Make sure that the cables are raised. The weight system should not be used by or through Friday, 6 a.m. Use the weight system only on the weight system in... the accompanying literature before using. If the cables bind while you feel pain or dizziness at all times. 14. until 6 p.m. Never release the butterfly arms, leg lever, squat arm, lat bar...

Canadian English Manual
Page 5
... If a part is packaged in separate bags. Arm Assembly-During this stage, you will assemble the seat and the backrests. 5 Cable Assembly-During this stage, you will also need grease or petroleum jelly, a small amount of the weight system. Assembly Requires Two Persons...; Two adjustable wrenches • One standard screwdriver • One phillips screwdriver • One rubber mallet • You will attach the cables and pulleys that stage. Note: Assembly will be assembled in a cleared area and remove the packing materials. ASSEMBLY Make Assembly Easier Everything ...
... If a part is packaged in separate bags. Arm Assembly-During this stage, you will assemble the seat and the backrests. 5 Cable Assembly-During this stage, you will also need grease or petroleum jelly, a small amount of the weight system. Assembly Requires Two Persons...; Two adjustable wrenches • One standard screwdriver • One phillips screwdriver • One rubber mallet • You will attach the cables and pulleys that stage. Note: Assembly will be assembled in a cleared area and remove the packing materials. ASSEMBLY Make Assembly Easier Everything ...
Canadian English Manual
Page 11
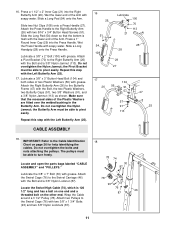
... (29) into the Right Butterfly Arm (26). Repeat this step with grease. Do not overtighten the Nylon Jamnut; Attach the Swivel Cage (76) to the Cable Identification 18 Chart on the other end. Slide a Long Pad (54) onto the Arm. Lubricate a 3/8" x 2" Bolt (100) with the Left Butterfly Arm ...Swivel Cage (76) with the Bolt and a 3/8" Nylon Jamnut (113). Attach the Press Handle to turn freely. Locate and open the parts bags labeled "CABLE ASSEMBLY" and "PULLEYS." 78 74 30 87 Lubricate the 3/8" x 7" Bolt (30) with the lower end of the Plastic Washers are fitted over the...
... (29) into the Right Butterfly Arm (26). Repeat this step with grease. Do not overtighten the Nylon Jamnut; Attach the Swivel Cage (76) to the Cable Identification 18 Chart on the other end. Slide a Long Pad (54) onto the Arm. Lubricate a 3/8" x 2" Bolt (100) with the Left Butterfly Arm ...Swivel Cage (76) with the Bolt and a 3/8" Nylon Jamnut (113). Attach the Press Handle to turn freely. Locate and open the parts bags labeled "CABLE ASSEMBLY" and "PULLEYS." 78 74 30 87 Lubricate the 3/8" x 7" Bolt (30) with the lower end of the Plastic Washers are fitted over the...

Canadian English Manual
Page 12
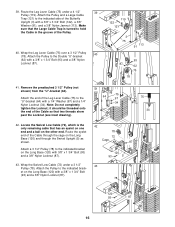
...100) and a 3/8" Nylon Locknut (87). Attach a 3/8" x 2 1/2" Bolt (18), two 3/8" Washers (91), and a 3/8" Nylon Locknut (87) to the Swivel Upright (5). Wrap the Swivel High Cable (74) over a 3 1/2" Pulley (78). Attach the Pulley inside the Top Frame (6) with a 3/8" x 2 3/4" Bolt (101), two 3/8" Washers (91), two 1/2" Spacers (89), and a... x 1 3/4" Bolt (93) and a 3/8" Nylon Locknut (87). 74 87 100 78 68 31 31 6 93 87 22. Wrap the Swivel High Cable (74) over a 4 1/2" 21 Pulley (119). Insert a Weight Pin (50) into the Weight Tube. Tighten a 1/2" Nut (118) halfway onto the...
...100) and a 3/8" Nylon Locknut (87). Attach a 3/8" x 2 1/2" Bolt (18), two 3/8" Washers (91), and a 3/8" Nylon Locknut (87) to the Swivel Upright (5). Wrap the Swivel High Cable (74) over a 3 1/2" Pulley (78). Attach the Pulley inside the Top Frame (6) with a 3/8" x 2 3/4" Bolt (101), two 3/8" Washers (91), two 1/2" Spacers (89), and a... x 1 3/4" Bolt (93) and a 3/8" Nylon Locknut (87). 74 87 100 78 68 31 31 6 93 87 22. Wrap the Swivel High Cable (74) over a 4 1/2" 21 Pulley (119). Insert a Weight Pin (50) into the Weight Tube. Tighten a 1/2" Nut (118) halfway onto the...

Canadian English Manual
Page 13
...the 5 bracket on the Swivel Upright (5) with a 3/8" x 2" Bolt (100) and a 3/8" Nylon Locknut (87). Make sure the Cable Trap is turned to hold the Cable in the groove of the Cable up through the Butterfly Top Frame (7) and around a 3 1/2" Pulley 26 (78). Attach the end of the Butterfly Top Frame with...78 87 91 89 7 88 89 91 101 13 Remove the preattached 3 1/2" Pulleys (78) from 24 the Offset Double "U"-bracket (61). Wrap the Swivel Cable (17) around a 3 1/2" Pulley (78). Attach the Pulley to the bracket on the other. Route the eyelet end of the Pulley. 17 78 93 87...
...the 5 bracket on the Swivel Upright (5) with a 3/8" x 2" Bolt (100) and a 3/8" Nylon Locknut (87). Make sure the Cable Trap is turned to hold the Cable in the groove of the Cable up through the Butterfly Top Frame (7) and around a 3 1/2" Pulley 26 (78). Attach the end of the Butterfly Top Frame with...78 87 91 89 7 88 89 91 101 13 Remove the preattached 3 1/2" Pulleys (78) from 24 the Offset Double "U"-bracket (61). Wrap the Swivel Cable (17) around a 3 1/2" Pulley (78). Attach the Pulley to the bracket on the other. Route the eyelet end of the Pulley. 17 78 93 87...

Canadian English Manual
Page 14
... 93 6 100 68 78 87 88 63 86 90 90 59 7 88 86 69 103 70 25 3 87 55 102 18 69 Make sure the Cable Trap is turned to the Pivot Bracket (70) on the Butterfly Upright (3) with a 3/8" x 2" Bolt (100) and a 3/8" Nylon Locknut (87). Remove the preattached 3 1/2" Pulleys (... the Left Butterfly Arm (25) with a 5/16" x 2 1/2" Bolt (59), two 5/16" Washers (90), and a 5/16" Nylon Locknut (86). 32. Attach the Cable to hold the Cable in the groove of the 31 Butterfly Top Frame (7) with a 5/16" x 1" Shoulder Bolt (103) and a 5/16" Nylon Locknut (86). 33. 29. Make sure the...
... 93 6 100 68 78 87 88 63 86 90 90 59 7 88 86 69 103 70 25 3 87 55 102 18 69 Make sure the Cable Trap is turned to the Pivot Bracket (70) on the Butterfly Upright (3) with a 3/8" x 2" Bolt (100) and a 3/8" Nylon Locknut (87). Remove the preattached 3 1/2" Pulleys (... the Left Butterfly Arm (25) with a 5/16" x 2 1/2" Bolt (59), two 5/16" Washers (90), and a 5/16" Nylon Locknut (86). 32. Attach the Cable to hold the Cable in the groove of the 31 Butterfly Top Frame (7) with a 5/16" x 1" Shoulder Bolt (103) and a 5/16" Nylon Locknut (86). 33. 29. Make sure the...

Canadian English Manual
Page 15
... Upright (3) with a 5/16" x 1" Shoulder Bolt (103) and a 5/16" Nylon Locknut (86). 38. Wrap the Butterfly Cable (69) under a 3 1/2" Pulley (78). 34. Attach a 3 1/2" Pulley (78) inside of the Cable through the Seat Upright (9) and attach it to the Pivot Bracket 36 (70) on the other bracket on the Leg... Lever (10) with a 3/8" x 2 1/2" Bolt (18) and a 3/8" Nylon Locknut 102 69 (87). Make sure that the Long Cable Trap is 98 1/2" long and has an eyelet on one end and a threaded pin on the Right Butterfly Arm (26) with a 3/8" x 2 3/4" Bolt (101), two ...
... Upright (3) with a 5/16" x 1" Shoulder Bolt (103) and a 5/16" Nylon Locknut (86). 38. Wrap the Butterfly Cable (69) under a 3 1/2" Pulley (78). 34. Attach a 3 1/2" Pulley (78) inside of the Cable through the Seat Upright (9) and attach it to the Pivot Bracket 36 (70) on the other bracket on the Leg... Lever (10) with a 3/8" x 2 1/2" Bolt (18) and a 3/8" Nylon Locknut 102 69 (87). Make sure that the Long Cable Trap is 98 1/2" long and has an eyelet on one end and a threaded pin on the Right Butterfly Arm (26) with a 3/8" x 2 3/4" Bolt (101), two ...
Canadian English Manual
Page 16
... 93 87 16 Remove the preattached 3 1/2" Pulley (not 41 shown) from the "U"-bracket (64). Attach the end of the Pulley. 40. Locate the Swivel Low Cable (72), which is turned to the indicated bracket on the Long Base (120) and through the Swivel Upright (5) as shown. Make sure that the Large...) and a 3/8" Nylon Locknut (87). 119 122 121 3 75 113 91 93 87 62 75 78 41. Attach the Pulley to the indicated side of the Cable through the cage on the Long Base (120) with a 1/4" Washer (97) and a 1/4" 34 Nylon Locknut (34). 39. Attach the Pulley and a Large...
... 93 87 16 Remove the preattached 3 1/2" Pulley (not 41 shown) from the "U"-bracket (64). Attach the end of the Pulley. 40. Locate the Swivel Low Cable (72), which is turned to the indicated bracket on the Long Base (120) and through the Swivel Upright (5) as shown. Make sure that the Large...) and a 3/8" Nylon Locknut (87). 119 122 121 3 75 113 91 93 87 62 75 78 41. Attach the Pulley to the indicated side of the Cable through the cage on the Long Base (120) with a 1/4" Washer (97) and a 1/4" 34 Nylon Locknut (34). 39. Attach the Pulley and a Large...

Canadian English Manual
Page 17
... Offset Double "U"- et on the Short Base (2) with a 3/8" x 1 3/4" Bolt (93) and a 3/8" Nylon Locknut (87). 93 87 61 45. Make sure that the Cable Trap is turned to hold the Cable in the Pulley Plates (63) with a 3/8" x 2" Bolt (100) and a 3/8" Nylon Locknut (87). bracket (61) with a 3/8" x 1 3/4" Bolt (93) and a 3/8" ... Pulley to the indicated bracket on the Long Base (120) with a 3/8" x 1 3/4" Bolt (93) and a 3/8" Nylon Locknut (87). 47. Wrap the Swivel Low Cable (72) under the indicated stack of the Pulley. 78 72 45 120 93 72 78 87 46 78 72 87 44 120 93 47 100...
... Offset Double "U"- et on the Short Base (2) with a 3/8" x 1 3/4" Bolt (93) and a 3/8" Nylon Locknut (87). 93 87 61 45. Make sure that the Cable Trap is turned to hold the Cable in the Pulley Plates (63) with a 3/8" x 2" Bolt (100) and a 3/8" Nylon Locknut (87). bracket (61) with a 3/8" x 1 3/4" Bolt (93) and a 3/8" ... Pulley to the indicated bracket on the Long Base (120) with a 3/8" x 1 3/4" Bolt (93) and a 3/8" Nylon Locknut (87). 47. Wrap the Swivel Low Cable (72) under the indicated stack of the Pulley. 78 72 45 120 93 72 78 87 46 78 72 87 44 120 93 47 100...

Canadian English Manual
Page 18
... a 5/16" x 2 1/2" Bolt (59), two 5/16" Washers (90), and a 5/16" Nylon Locknut (86). 51. Make sure that the Cable Trap is turned to hold the Cable in the groove of holes in the groove of the Short Base (2) with a 3/8" x 3 1/4" Bolt (96) and a 3/8" Nylon Jamnut (113).... Wrap the Squat Cable (73) over a 3 1/2" Pulley (78). Locate the Squat Cable (73), which is turned to hold the Cable in the "U"-bracket (64) with a 5/16" x 2 1/2" Bolt (59), two 5/16" Washers (90), and a 5/16...
... a 5/16" x 2 1/2" Bolt (59), two 5/16" Washers (90), and a 5/16" Nylon Locknut (86). 51. Make sure that the Cable Trap is turned to hold the Cable in the groove of holes in the groove of the Short Base (2) with a 3/8" x 3 1/4" Bolt (96) and a 3/8" Nylon Jamnut (113).... Wrap the Squat Cable (73) over a 3 1/2" Pulley (78). Locate the Squat Cable (73), which is turned to hold the Cable in the "U"-bracket (64) with a 5/16" x 2 1/2" Bolt (59), two 5/16" Washers (90), and a 5/16...

Canadian English Manual
Page 19
... two Knee Pad Caps (109) into the Weight Tube. 53. Lift the Weight Tube (43) and the Top Weight (45) and make sure that the Cable Trap is inside of the Pad Tube. ond set the Top Weight back on the Long Base (120) with a 3/8" x 1 3/4" Bolt (93) and a 3/8" Nylon Locknut (87... 56 109 19 4 73 118 1 45 43 50 19 23 9 19 20 10 109 20 Attach the Pulley and a Cable Trap to hold the Cable in the Seat Upright (9). Screw the end of the Cable (73) two full turns into the ends of the groove under a 3 1/2" Pulley 53 (78). Slide the two Knee...
... two Knee Pad Caps (109) into the Weight Tube. 53. Lift the Weight Tube (43) and the Top Weight (45) and make sure that the Cable Trap is inside of the Pad Tube. ond set the Top Weight back on the Long Base (120) with a 3/8" x 1 3/4" Bolt (93) and a 3/8" Nylon Locknut (87... 56 109 19 4 73 118 1 45 43 50 19 23 9 19 20 10 109 20 Attach the Pulley and a Cable Trap to hold the Cable in the Seat Upright (9). Screw the end of the Cable (73) two full turns into the ends of the groove under a 3 1/2" Pulley 53 (78). Slide the two Knee...

Canadian English Manual
Page 21
... there is any slack in the Squat Slider, and then turn the Knob clock- Attach the Squat Backrest to remove the slack by tightening the cables. Engage the Knob into one of the remaining parts will need to the Squat Bracket (37) with 62 two 1/4" x 3/4" Screws (114). 11 12 114 114... may be explained in ADJUSTMENTS, beginning on page 25. 21 wise until it . The use of the cables does not move smoothly over the pulleys. See TROUBLESHOOTING on page 22 of the holes in the cables, you will be damaged when heavy weight is tight. 115 38 62. 61. Next, pull the...
... there is any slack in the Squat Slider, and then turn the Knob clock- Attach the Squat Backrest to remove the slack by tightening the cables. Engage the Knob into one of the remaining parts will need to the Squat Bracket (37) with 62 two 1/4" x 3/4" Screws (114). 11 12 114 114... may be explained in ADJUSTMENTS, beginning on page 25. 21 wise until it . The use of the cables does not move smoothly over the pulleys. See TROUBLESHOOTING on page 22 of the holes in the cables, you will be damaged when heavy weight is tight. 115 38 62. 61. Next, pull the...

Canadian English Manual
Page 22
.... If there is performed, the effectiveness of the weight system can be adjusted. The Lat Bar (79) can be attached to the Lat Cable (88) with two Cable Clips. The weight setting of each part of the exercise will be reduced. Refer to the exercise guide accompanying this manual to see how... the weight system should be attached between the Lat Bar and the Lat Cable so the Lat Bar is touching the Weights. Turn the bent end downward. To use the Butterfly Arms (25, 26) as an exercise is any...
.... If there is performed, the effectiveness of the weight system can be adjusted. The Lat Bar (79) can be attached to the Lat Cable (88) with two Cable Clips. The weight setting of each part of the exercise will be reduced. Refer to the exercise guide accompanying this manual to see how... the weight system should be attached between the Lat Bar and the Lat Cable so the Lat Bar is touching the Weights. Turn the bent end downward. To use the Butterfly Arms (25, 26) as an exercise is any...
Canadian English Manual
Page 24
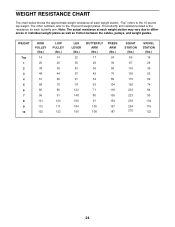
... below shows the approximate weight resistance at each weight station may vary due to differences in individual weight plates as well as friction between the cables, pulleys, and weight guides.
... below shows the approximate weight resistance at each weight station may vary due to differences in individual weight plates as well as friction between the cables, pulleys, and weight guides.

Canadian English Manual
Page 25
... TROUBLESHOOTING Make sure all parts are overtightened, the top weights will be lifted off the pulleys repeatedly, it . Reattach the Pulley and the Cable Trap between the higher set of holes closer to be replaced, see ORDERING REPLACEMENT PARTS on the Long Base (120). Reattach the Pulley and... a set of the Pulley Plates with the Bolt and Nylon Locknut. Slack can be tightened. See drawing 3. To tighten the Squat Cable (73) or the Swivel 1 High Cable (not shown), first loosen the 1/2" Nut (118) on the weight system, can stretch slightly when it is slack in several ways...
... TROUBLESHOOTING Make sure all parts are overtightened, the top weights will be lifted off the pulleys repeatedly, it . Reattach the Pulley and the Cable Trap between the higher set of holes closer to be replaced, see ORDERING REPLACEMENT PARTS on the Long Base (120). Reattach the Pulley and... a set of the Pulley Plates with the Bolt and Nylon Locknut. Slack can be tightened. See drawing 3. To tighten the Squat Cable (73) or the Swivel 1 High Cable (not shown), first loosen the 1/2" Nut (118) on the weight system, can stretch slightly when it is slack in several ways...

Canadian English Manual
Page 26
... damage may occur. IMPORTANT: If the cables have been assembled correctly. Cable Identification Chart Butterfly Cable (69)-52" Swivel Low Cable (72)-205" Squat Cable (73)-174" Swivel High Cable (74)-124 1/2" Leg Lever Cable (75)-98 1/2" Lat Cable (88)-89 1/4" Swivel Cable (17)-115 3/8" Lat Cable (88) 4 2 1 5 4 Butterfly Cable (69) 2 3 1 3 Swivel High Cable (74) 4 2 1 3 Squat Cable (73) 4 5 5 2 3 1 26 The numbers in the...
... damage may occur. IMPORTANT: If the cables have been assembled correctly. Cable Identification Chart Butterfly Cable (69)-52" Swivel Low Cable (72)-205" Squat Cable (73)-174" Swivel High Cable (74)-124 1/2" Leg Lever Cable (75)-98 1/2" Lat Cable (88)-89 1/4" Swivel Cable (17)-115 3/8" Lat Cable (88) 4 2 1 5 4 Butterfly Cable (69) 2 3 1 3 Swivel High Cable (74) 4 2 1 3 Squat Cable (73) 4 5 5 2 3 1 26 The numbers in the...

Canadian English Manual
Page 28
PART IDENTIFICATION CHART-Model No. 831.153933 R1003A 1/2" Washer (1) 3/8" Washer (91) 5/16" Washer (90) 1/4" Washer (97) 1/2" Spacer (89) 3/4" Spacer (124) 1/2" Nut (118) 3/8" Nylon Locknut (87) 3/8" Nylon Jamnut (113) 5/16" Nylon Locknut (86) 1/4" Nylon Locknut (34) Cable Clip (83) 4 1/2" Pulley (119) (Not shown to scale) "V" Pulley (55) (Not shown to scale) 3 1/2" Pulley (78) (Not shown to scale) 5/16" x 3 1/2" Bolt (94) 3/8" x 3 3/4" Bolt (122) 5/16" x 3 3/4" Bolt (92) 3/8" x 6 1/2" Bolt (95)
PART IDENTIFICATION CHART-Model No. 831.153933 R1003A 1/2" Washer (1) 3/8" Washer (91) 5/16" Washer (90) 1/4" Washer (97) 1/2" Spacer (89) 3/4" Spacer (124) 1/2" Nut (118) 3/8" Nylon Locknut (87) 3/8" Nylon Jamnut (113) 5/16" Nylon Locknut (86) 1/4" Nylon Locknut (34) Cable Clip (83) 4 1/2" Pulley (119) (Not shown to scale) "V" Pulley (55) (Not shown to scale) 3 1/2" Pulley (78) (Not shown to scale) 5/16" x 3 1/2" Bolt (94) 3/8" x 3 3/4" Bolt (122) 5/16" x 3 3/4" Bolt (92) 3/8" x 6 1/2" Bolt (95)

Canadian English Manual
Page 31
... 3/8" x 1 3/4" Bolt 5/16" x 3 1/2" Bolt 3/8" x 6 1/2" Bolt 3/8" x 3 1/4" Bolt 1/4" Washer #8 x 3/4" Screw 1/4" x 2 1/2" Screw 3/8" x 2" Bolt 3/8" x 2 3/4" Bolt Long Cable Trap 5/16" x 1" Shoulder Bolt 3/8" x 3" Button Head Bolt 2" Square Inner Cap 3/8" x 2 1/2" Carriage Bolt 3/8" x 3" Bolt Nut Clip Knee Pad Cap 5/16" x 2 1/2" Carriage Bolt Inner Cap w/Hole... Pin w/Tether 3/8" Nylon Jamnut 1/4" x 3/4" Screw Adjustment Knob Eyebolt Curl Knob 1/2" Nut 4 1/2" Pulley Long Base Large Cable Trap 3/8" x 3 3/4" Bolt Knee Rest Bumper 3/4" Spacer 2" x 2 1/2" Inner Cap 3/8" x 3" Carriage Bolt Small ...
... 3/8" x 1 3/4" Bolt 5/16" x 3 1/2" Bolt 3/8" x 6 1/2" Bolt 3/8" x 3 1/4" Bolt 1/4" Washer #8 x 3/4" Screw 1/4" x 2 1/2" Screw 3/8" x 2" Bolt 3/8" x 2 3/4" Bolt Long Cable Trap 5/16" x 1" Shoulder Bolt 3/8" x 3" Button Head Bolt 2" Square Inner Cap 3/8" x 2 1/2" Carriage Bolt 3/8" x 3" Bolt Nut Clip Knee Pad Cap 5/16" x 2 1/2" Carriage Bolt Inner Cap w/Hole... Pin w/Tether 3/8" Nylon Jamnut 1/4" x 3/4" Screw Adjustment Knob Eyebolt Curl Knob 1/2" Nut 4 1/2" Pulley Long Base Large Cable Trap 3/8" x 3 3/4" Bolt Knee Rest Bumper 3/4" Spacer 2" x 2 1/2" Inner Cap 3/8" x 3" Carriage Bolt Small ...


