

Canadian English Manual
Page 1
Model No. 831.153933 Serial No. Write the serial number in this manual before using this manual for reference. Patent Pending Sears, Roebuck and Co., Hoffman Estates, IL 60179 WEIGHT SYSTEM EXERCISER User's Manual Serial Number Decal (under seat) · Assembly · Adjustments · Troubleshooting · Part List and Drawing CAUTION Read all precautions and instructions in the space above for future reference. Save this equipment.
Model No. 831.153933 Serial No. Write the serial number in this manual before using this manual for reference. Patent Pending Sears, Roebuck and Co., Hoffman Estates, IL 60179 WEIGHT SYSTEM EXERCISER User's Manual Serial Number Decal (under seat) · Assembly · Adjustments · Troubleshooting · Part List and Drawing CAUTION Read all precautions and instructions in the space above for future reference. Save this equipment.
Canadian English Manual
Page 2
TABLE OF CONTENTS IMPORTANT PRECAUTIONS 3 BEFORE YOU BEGIN 4 ASSEMBLY 5 ADJUSTMENTS 22 WEIGHT RESISTANCE CHART 24 TROUBLESHOOTING 25 CABLE DIAGRAMS 26 ORDERING REPLACEMENT PARTS Back Cover FULL 90-DAY WARRANTY Back Cover Note: A PART IDENTIFICATION CHART and a PART LIST/EXPLODED DRAWING are attached in the center of this manual. Remove the PART IDENTIFICATION CHART and the PART LIST/EXPLODED DRAWING before beginning assembly. 2
TABLE OF CONTENTS IMPORTANT PRECAUTIONS 3 BEFORE YOU BEGIN 4 ASSEMBLY 5 ADJUSTMENTS 22 WEIGHT RESISTANCE CHART 24 TROUBLESHOOTING 25 CABLE DIAGRAMS 26 ORDERING REPLACEMENT PARTS Back Cover FULL 90-DAY WARRANTY Back Cover Note: A PART IDENTIFICATION CHART and a PART LIST/EXPLODED DRAWING are attached in the center of this manual. Remove the PART IDENTIFICATION CHART and the PART LIST/EXPLODED DRAWING before beginning assembly. 2

Canadian English Manual
Page 3
... Never release the butterfly arms, leg lever, squat arm, lat bar, row bar, or handle while weights are adequately informed of all parts are properly tightened each time you are exercising, stop immediately and begin cooling down. 16. Sears assumes no responsibility for foot protection. 9. ... The weight system is intended for persons over the age of 35 or persons with great force. Always disconnect the lat bar from moving parts. 8. The weight system is designed to protect the floor. 5. If a decal is especially important for home use the weight system. ...
... Never release the butterfly arms, leg lever, squat arm, lat bar, row bar, or handle while weights are adequately informed of all parts are properly tightened each time you are exercising, stop immediately and begin cooling down. 16. Sears assumes no responsibility for foot protection. 9. ... The weight system is intended for persons over the age of 35 or persons with great force. Always disconnect the lat bar from moving parts. 8. The weight system is designed to protect the floor. 5. If a decal is especially important for home use the weight system. ...

Canadian English Manual
Page 4
...with the parts that are labeled. Lat Bar High Pulley Station Swivel Carriage Butterfly Arm/Press Arm Backrest Low Pulley Station Curl Pad Seat Leg Lever WARNING DECAL 1 ASSEMBLED DIMENSIONS: Height: 81 in . Whether your goal is 831.153933. For your cardiovascular system, the PRO 4850 weight ...system offers an impressive array of weight stations designed to the weight system (see the front cover of this manual for selecting the versatile WEIDER® PRO 4850 weight system. Width: 96 in . WARNING DECAL 2 (one on a decal attached to develop every major muscle group of the decal)....
...with the parts that are labeled. Lat Bar High Pulley Station Swivel Carriage Butterfly Arm/Press Arm Backrest Low Pulley Station Curl Pad Seat Leg Lever WARNING DECAL 1 ASSEMBLED DIMENSIONS: Height: 81 in . Whether your goal is 831.153933. For your cardiovascular system, the PRO 4850 weight ...system offers an impressive array of weight stations designed to the weight system (see the front cover of this manual for selecting the versatile WEIDER® PRO 4850 weight system. Width: 96 in . WARNING DECAL 2 (one on a decal attached to develop every major muscle group of the decal)....

Canadian English Manual
Page 5
...the weight stations to open -end or closed-end wrenches, or a set of the packing materials until you have been preattached. Note: Some small parts may have questions after reading the assembly instructions, please call 1-800-4-MY-HOME® (1-800-469-4663). If you begin by assembling the base and...the weight system can be assembled successfully by deciding to walk around the weight system as you have a socket set, a set of open the parts bag(s) for that form the skeleton of the weight system in the location where it . Note: Assembly will save you much more convenient if you...
...the weight stations to open -end or closed-end wrenches, or a set of the packing materials until you have been preattached. Note: Some small parts may have questions after reading the assembly instructions, please call 1-800-4-MY-HOME® (1-800-469-4663). If you begin by assembling the base and...the weight system can be assembled successfully by deciding to walk around the weight system as you have a socket set, a set of open the parts bag(s) for that form the skeleton of the weight system in the location where it . Note: Assembly will save you much more convenient if you...
Canadian English Manual
Page 6
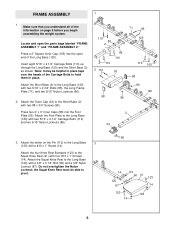
... Carriage Bolts to pivot. 98 14 120 87 112 96 41 123 14 123 123 14 6 Press two 2" x 3" Inner Caps (58) into the open the parts bags labeled "FRAME ASSEMBLY 1" and "FRAME ASSEMBLY 2." Locate and open end of the information on the Pin (112) to the Short Base (2) with a #10 x 1" Screw...
... Carriage Bolts to pivot. 98 14 120 87 112 96 41 123 14 123 123 14 6 Press two 2" x 3" Inner Caps (58) into the open the parts bags labeled "FRAME ASSEMBLY 1" and "FRAME ASSEMBLY 2." Locate and open end of the information on the Pin (112) to the Short Base (2) with a #10 x 1" Screw...

Canadian English Manual
Page 10
... the Top Frame (6) with a #8 x 3/4" Screw (98). 12. Press two 2" x 3" Inner Caps (58) into the Leg Lever (10). Do not tighten the Locknuts yet. Open the parts bag labeled "ARM ASSEMBLY." ARM ASSEMBLY 14. Press a 2" x 2 1/2" Inner Cap (125) into the Butterfly Frame (47). Attach the Top Frame (6) between the Squat Upright (4) and...
... the Top Frame (6) with a #8 x 3/4" Screw (98). 12. Press two 2" x 3" Inner Caps (58) into the Leg Lever (10). Do not tighten the Locknuts yet. Open the parts bag labeled "ARM ASSEMBLY." ARM ASSEMBLY 14. Press a 2" x 2 1/2" Inner Cap (125) into the Butterfly Frame (47). Attach the Top Frame (6) between the Squat Upright (4) and...
Canadian English Manual
Page 11
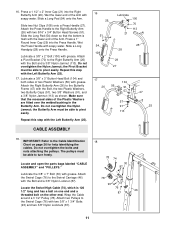
... step with soapy water. The pulleys must be able to the Butterfly Frame (47) with two 5/16" x 3/4" Button Head Screws (51). Locate and open the parts bags labeled "CABLE ASSEMBLY" and "PULLEYS." 78 74 30 87 Lubricate the 3/8" x 7" Bolt (30) with the Bolt and a 3/8" Nylon Locknut (87). 16. Do not overtighten...
... step with soapy water. The pulleys must be able to the Butterfly Frame (47) with two 5/16" x 3/4" Button Head Screws (51). Locate and open the parts bags labeled "CABLE ASSEMBLY" and "PULLEYS." 78 74 30 87 Lubricate the 3/8" x 7" Bolt (30) with the Bolt and a 3/8" Nylon Locknut (87). 16. Do not overtighten...

Canadian English Manual
Page 19
... 19 4 73 118 1 45 43 50 19 23 9 19 20 10 109 20 Place a 1/2" Washer (1) on top of the Pulley. 54. Locate and open the parts bag labeled "SEAT ASSEMBLY." ond set the Top Weight back on the Long Base (120) with a 3/8" x 1 3/4" Bolt (93) and a 3/8" Nylon Locknut (87). 73 78 68...
... 19 4 73 118 1 45 43 50 19 23 9 19 20 10 109 20 Place a 1/2" Washer (1) on top of the Pulley. 54. Locate and open the parts bag labeled "SEAT ASSEMBLY." ond set the Top Weight back on the Long Base (120) with a 3/8" x 1 3/4" Bolt (93) and a 3/8" Nylon Locknut (87). 73 78 68...

Canadian English Manual
Page 21
... CABLE DIAGRAMS on page 26 and 27 of the holes in ADJUSTMENTS, beginning on page 25. 21 See TROUBLESHOOTING on page 22 of the remaining parts will need to the Squat Bracket (37) with 62 two 1/4" x 3/4" Screws (114). 11 12 114 114 63. Attach the Squat Backrest to remove... the Curl Post (12) with four 1/4" x 3/4" Screws (114). 37 114 Turn the Adjustment Knob (115) counterclockwise 114 several times to make sure that all parts have been properly tightened. Before using the weight system, pull each cable a few times to loosen it is tight. 115 38 62. 61. If there...
... CABLE DIAGRAMS on page 26 and 27 of the holes in ADJUSTMENTS, beginning on page 25. 21 See TROUBLESHOOTING on page 22 of the remaining parts will need to the Squat Bracket (37) with 62 two 1/4" x 3/4" Screws (114). 11 12 114 114 63. Attach the Squat Backrest to remove... the Curl Post (12) with four 1/4" x 3/4" Screws (114). 37 114 Turn the Adjustment Knob (115) counterclockwise 114 several times to make sure that all parts have been properly tightened. Before using the weight system, pull each cable a few times to loosen it is tight. 115 38 62. 61. If there...

Canadian English Manual
Page 22
... 25 22 Note: Due to the Lat Cable (88) with two Cable Clips. Turn the bent end downward. ADJUSTMENTS The instructions below describe how each part of the weight system can be set of holes before performing any slack in the cables or chain as press arms, insert the "L"-pins w/Tethers...
... 25 22 Note: Due to the Lat Cable (88) with two Cable Clips. Turn the bent end downward. ADJUSTMENTS The instructions below describe how each part of the weight system can be set of holes before performing any slack in the cables or chain as press arms, insert the "L"-pins w/Tethers...

Canadian English Manual
Page 25
Replace any worn parts immediately. To tighten the Squat Cable (73) or the Swivel 1 High Cable (not shown), first loosen the 1/2" Nut (118) on the end of the Cable, ... and the Cable Trap between the higher set of holes with the Bolt and Nylon Locknut. TROUBLESHOOTING Make sure all parts are overtightened, the top weights will be replaced, see ORDERING REPLACEMENT PARTS on the back cover of this manual. 25 73 68 87 78 120 100 63 100 68 87 78...
Replace any worn parts immediately. To tighten the Squat Cable (73) or the Swivel 1 High Cable (not shown), first loosen the 1/2" Nut (118) on the end of the Cable, ... and the Cable Trap between the higher set of holes with the Bolt and Nylon Locknut. TROUBLESHOOTING Make sure all parts are overtightened, the top weights will be replaced, see ORDERING REPLACEMENT PARTS on the back cover of this manual. 25 73 68 87 78 120 100 63 100 68 87 78...

Canadian English Manual
Page 28
PART IDENTIFICATION CHART-Model No. 831.153933 R1003A 1/2" Washer (1) 3/8" Washer (91) 5/16" Washer (90) 1/4" Washer (97) 1/2" Spacer (89) 3/4" Spacer (124) 1/2" Nut (118) 3/8" Nylon Locknut (87) 3/8" Nylon Jamnut (113) 5/16" Nylon Locknut (86) 1/4" Nylon Locknut (34) Cable Clip (83) 4 1/2" Pulley (119) (Not shown to scale) "V" Pulley (55) (Not shown to scale) 3 1/2" Pulley (78) (Not shown to scale) 5/16" x 3 1/2" Bolt (94) 3/8" x 3 3/4" Bolt (122) 5/16" x 3 3/4" Bolt (92) 3/8" x 6 1/2" Bolt (95)
PART IDENTIFICATION CHART-Model No. 831.153933 R1003A 1/2" Washer (1) 3/8" Washer (91) 5/16" Washer (90) 1/4" Washer (97) 1/2" Spacer (89) 3/4" Spacer (124) 1/2" Nut (118) 3/8" Nylon Locknut (87) 3/8" Nylon Jamnut (113) 5/16" Nylon Locknut (86) 1/4" Nylon Locknut (34) Cable Clip (83) 4 1/2" Pulley (119) (Not shown to scale) "V" Pulley (55) (Not shown to scale) 3 1/2" Pulley (78) (Not shown to scale) 5/16" x 3 1/2" Bolt (94) 3/8" x 3 3/4" Bolt (122) 5/16" x 3 3/4" Bolt (92) 3/8" x 6 1/2" Bolt (95)

Canadian English Manual
Page 31
... Base Large Cable Trap 3/8" x 3 3/4" Bolt Knee Rest Bumper 3/4" Spacer 2" x 2 1/2" Inner Cap 3/8" x 3" Carriage Bolt Small Support Plate 1/4" x 3 1/2" Bolt User's Manual Exercise Guide Note: "#" indicates a non-illustrated part. PART LIST-Model No. 831.153933 R1003A Key No. Qty. Description Key No. Description Key No.
... Base Large Cable Trap 3/8" x 3 3/4" Bolt Knee Rest Bumper 3/4" Spacer 2" x 2 1/2" Inner Cap 3/8" x 3" Carriage Bolt Small Support Plate 1/4" x 3 1/2" Bolt User's Manual Exercise Guide Note: "#" indicates a non-illustrated part. PART LIST-Model No. 831.153933 R1003A Key No. Qty. Description Key No. Description Key No.

Canadian English Manual
Page 33
Sears, Roebuck and Co., Dept 817WA, Hoffman Estates, IL 60179 Part No. 206442 R1003A Printed in this WEIGHT SYSTEM EXERCISER, contact the nearest Sears Service Center throughout the United States and Sears will repair or replace ...
Sears, Roebuck and Co., Dept 817WA, Hoffman Estates, IL 60179 Part No. 206442 R1003A Printed in this WEIGHT SYSTEM EXERCISER, contact the nearest Sears Service Center throughout the United States and Sears will repair or replace ...


