
English Manual
Page 2
Remove the PART IDENTIFICATION CHART and the PART LIST/EXPLODED DRAWING before beginning assembly. 2 TABLE OF CONTENTS IMPORTANT PRECAUTIONS 3 BEFORE YOU BEGIN 4 ASSEMBLY 5 ADJUSTMENTS 21 WEIGHT RESISTANCE CHART 23 CABLE DIAGRAM 24 EXERCISE GUIDELINES 26 ORDERING REPLACEMENT PARTS Back Cover FULL 90 DAY WARRANTY Back Cover Note: A PART IDENTIFICATION CHART and a PART LIST/EXPLODED DRAWING are attached in the center of this manual.
Remove the PART IDENTIFICATION CHART and the PART LIST/EXPLODED DRAWING before beginning assembly. 2 TABLE OF CONTENTS IMPORTANT PRECAUTIONS 3 BEFORE YOU BEGIN 4 ASSEMBLY 5 ADJUSTMENTS 21 WEIGHT RESISTANCE CHART 23 CABLE DIAGRAM 24 EXERCISE GUIDELINES 26 ORDERING REPLACEMENT PARTS Back Cover FULL 90 DAY WARRANTY Back Cover Note: A PART IDENTIFICATION CHART and a PART LIST/EXPLODED DRAWING are attached in the center of this manual.
English Manual
Page 3
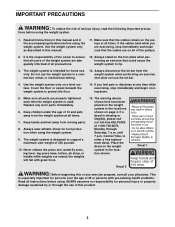
..., 7 a.m. Always stand on the foot plate when performing an exercise that the cables remain on the pulleys at any worn parts immediately. 6. Make sure all parts are adequately informed of all of 35 or persons with great force. 15. The warning decals shown here have been placed on...injury, read the following important precau- Central Time, to protect the floor. 14. This is the responsibility of 12 and pets away from moving parts. 8. Cover the floor or carpet beneath the weight system to order a free replacement decal. Keep hands and feet away from the weight system...
..., 7 a.m. Always stand on the foot plate when performing an exercise that the cables remain on the pulleys at any worn parts immediately. 6. Make sure all parts are adequately informed of all of 35 or persons with great force. 15. The warning decals shown here have been placed on...injury, read the following important precau- Central Time, to protect the floor. 14. This is the responsibility of 12 and pets away from moving parts. 8. Cover the floor or carpet beneath the weight system to order a free replacement decal. Keep hands and feet away from the weight system...
English Manual
Page 4
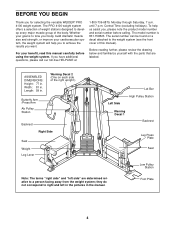
...or improve your benefit, read this manual). ASSEMBLED DIMENSIONS: Height: 77 in . If you for selecting the versatile WEIDER® PRO 4100 weight system. Central Time (excluding holidays). Whether your goal is 831.159823. Before reading further, please review the drawing... below and familiarize yourself with the parts that are determined relative to develop every major muscle group of this manual carefully before ...
...or improve your benefit, read this manual). ASSEMBLED DIMENSIONS: Height: 77 in . If you for selecting the versatile WEIDER® PRO 4100 weight system. Central Time (excluding holidays). Whether your goal is 831.159823. Before reading further, please review the drawing... below and familiarize yourself with the parts that are determined relative to develop every major muscle group of this manual carefully before ...
English Manual
Page 5
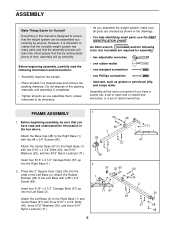
...in the box above. An Allen wrench (included) and the following information and instructions: • Assembly requires two people. • Place all parts in a cleared area and remove the packing materials. Insert four 5/16" x 2 1/2" Carriage Bolts (57) up into the Right Base (1). ... one standard screwdriver • one Phillips screwdriver • lubricant, such as shown in the drawings. • For help identifying small parts, use the PART IDENTIFICATION CHART. FRAME ASSEMBLY 1. Assembly will take time. Attach the Left Base (2) to do otherwise. • As you have read...
...in the box above. An Allen wrench (included) and the following information and instructions: • Assembly requires two people. • Place all parts in a cleared area and remove the packing materials. Insert four 5/16" x 2 1/2" Carriage Bolts (57) up into the Right Base (1). ... one standard screwdriver • one Phillips screwdriver • lubricant, such as shown in the drawings. • For help identifying small parts, use the PART IDENTIFICATION CHART. FRAME ASSEMBLY 1. Assembly will take time. Attach the Left Base (2) to do otherwise. • As you have read...
English Manual
Page 20
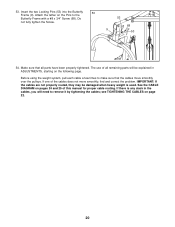
Before using the weight system, pull each cable a few times to make sure that all remaining parts will be damaged when heavy weight is any slack in ADJUSTMENTS, starting on the Pins to remove it by tightening the cables; See the CABLE ... of the cables does not move smoothly over the pulleys. If there is used. see TIGHTENING THE CABLES on pages 24 and 25 of all parts have been properly tightened. Insert the two Locking Pins (53) into the Butterfly 53 Frame (9). The use of this manual for proper cable routing. Attach...
Before using the weight system, pull each cable a few times to make sure that all remaining parts will be damaged when heavy weight is any slack in ADJUSTMENTS, starting on the Pins to remove it by tightening the cables; See the CABLE ... of the cables does not move smoothly over the pulleys. If there is used. see TIGHTENING THE CABLES on pages 24 and 25 of all parts have been properly tightened. Insert the two Locking Pins (53) into the Butterfly 53 Frame (9). The use of this manual for proper cable routing. Attach...
English Manual
Page 21
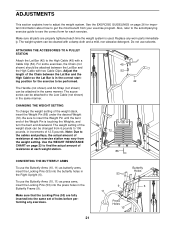
... High Cable with two Cable Clips. Butterfly Holes 53 9 6 11 Press Holes 10 21 The weight setting of holes before performing any worn parts immediately. Make sure all parts are fully inserted into the same set of the weight stack can be attached to insert the Weight Pin until the bent end...
... High Cable with two Cable Clips. Butterfly Holes 53 9 6 11 Press Holes 10 21 The weight setting of holes before performing any worn parts immediately. Make sure all parts are fully inserted into the same set of the weight stack can be attached to insert the Weight Pin until the bent end...
English Manual
Page 26
...of 12 repetitions without discomfort. WARMING UP Begin each exercise you progressively increase the intensity of your exercise. This requires moving only the appropriate parts of the body. Proper breathing is wrong before continuing. A "set . Rest for each exercise depends upon the individual user. Work ...set should be sensitive to your body's signals. To give your limits and select the amount of weight that is an essential part of repetitions in an uncontrolled manner will find the schedule that is the highest. Each workout should progress at least one sit...
...of 12 repetitions without discomfort. WARMING UP Begin each exercise you progressively increase the intensity of your exercise. This requires moving only the appropriate parts of the body. Proper breathing is wrong before continuing. A "set . Rest for each exercise depends upon the individual user. Work ...set should be sensitive to your body's signals. To give your limits and select the amount of weight that is an essential part of repetitions in an uncontrolled manner will find the schedule that is the highest. Each workout should progress at least one sit...
English Manual
Page 27
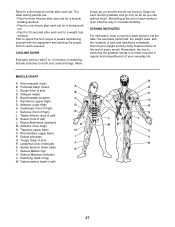
... Medius (hip) U. Include stretches for a weight loss workout. MUSCLE CHART A. Sternomastoid (neck) B. Adductor (inner thigh) M N. Gluteus Maximus (buttocks) V. Plan to make exercise a regular and enjoyable part of stretching. Remember, the key to achieving the greatest results is an effective way to 10 minutes of your weight and key body measurements at...
... Medius (hip) U. Include stretches for a weight loss workout. MUSCLE CHART A. Sternomastoid (neck) B. Adductor (inner thigh) M N. Gluteus Maximus (buttocks) V. Plan to make exercise a regular and enjoyable part of stretching. Remember, the key to achieving the greatest results is an effective way to 10 minutes of your weight and key body measurements at...
English Manual
Page 28
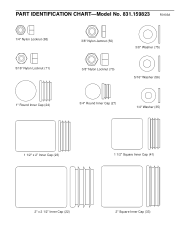
PART IDENTIFICATION CHART-Model No. 831.159823 R0103A 1/4" Nylon Locknut (65) 5/16" Nylon Locknut (71) 3/8" Nylon Jamnut (50) 3/8" Washer (75) 3/8" Nylon Locknut (70) 5/16" Washer (56) 1" Round Inner Cap (24) 3/4" Round Inner Cap (27) 1/4" Washer (35) 1 1/2" x 2" Inner Cap (23) 1 1/2" Square Inner Cap (41) 2" x 2 1/2" Inner Cap (22) 2" Square Inner Cap (33)
PART IDENTIFICATION CHART-Model No. 831.159823 R0103A 1/4" Nylon Locknut (65) 5/16" Nylon Locknut (71) 3/8" Nylon Jamnut (50) 3/8" Washer (75) 3/8" Nylon Locknut (70) 5/16" Washer (56) 1" Round Inner Cap (24) 3/4" Round Inner Cap (27) 1/4" Washer (35) 1 1/2" x 2" Inner Cap (23) 1 1/2" Square Inner Cap (41) 2" x 2 1/2" Inner Cap (22) 2" Square Inner Cap (33)
English Manual
Page 30
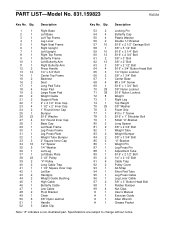
... 1 Leg Lever Cable 97 2 3/8" x 3" Button Head Bolt 98 1 Rubber Bumper 99 4 Nut Clips # 1 User's Manual # 1 Exercise Guide # 1 Allen Wrench # 1 Grease Packet Note: "#" indicates a non-illustrated part. Specifications are subject to change without notice. PART LIST-Model No. 831.159823 R0203A Key No. Qty. Description Key No.
... 1 Leg Lever Cable 97 2 3/8" x 3" Button Head Bolt 98 1 Rubber Bumper 99 4 Nut Clips # 1 User's Manual # 1 Exercise Guide # 1 Allen Wrench # 1 Grease Packet Note: "#" indicates a non-illustrated part. Specifications are subject to change without notice. PART LIST-Model No. 831.159823 R0203A Key No. Qty. Description Key No.

English Manual
Page 32
Sears, Roebuck and Co., Dept. 817WA, Hoffman Estates, IL 60179 Part No. 194159 R0203A Printed in this Sears Weight System Exerciser, contact the nearest Sears Service Center throughout the United States and Sears will repair or ...
Sears, Roebuck and Co., Dept. 817WA, Hoffman Estates, IL 60179 Part No. 194159 R0203A Printed in this Sears Weight System Exerciser, contact the nearest Sears Service Center throughout the United States and Sears will repair or ...


