
English Manual
Page 3
...Do not use of 35 or persons with pre-existing health problems. Read all times. 7. Always exercise with this product. 3 The weight bench is intended for personal injury or property damage sustained by or through the use a barbell longer than 310 pounds, including a barbell and weights...this manual before using the weight bench. You should stand behind you to see page 11). 2. Always place 50 pounds on a level surface. Read all users of the weight bench are adequately informed of the olympic bar (included) when you are performing bench press exercises, squat exercises or toe...
...Do not use of 35 or persons with pre-existing health problems. Read all times. 7. Always exercise with this product. 3 The weight bench is intended for personal injury or property damage sustained by or through the use a barbell longer than 310 pounds, including a barbell and weights...this manual before using the weight bench. You should stand behind you to see page 11). 2. Always place 50 pounds on a level surface. Read all users of the weight bench are adequately informed of the olympic bar (included) when you are performing bench press exercises, squat exercises or toe...
English Manual
Page 7
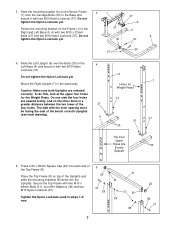
... four holes for Weight Rests 37 37 37 30 The Four Upper Holes Are 30 Evenly Spaced 5. The side with two M10 Nylon Locknuts (37). Press a 50 x 50mm Square Cap (20) into each end of the Uprights and slide the mounting brackets (B) down into the Uprights. Place the Top Frame (8) on... the Bench Frame 3 1 (1) onto the Carriage Bolts (30) in the 4 Left Base (4) and secure it with the even spacing must be facing the seat of the 37...
... four holes for Weight Rests 37 37 37 30 The Four Upper Holes Are 30 Evenly Spaced 5. The side with two M10 Nylon Locknuts (37). Press a 50 x 50mm Square Cap (20) into each end of the Uprights and slide the mounting brackets (B) down into the Uprights. Place the Top Frame (8) on... the Bench Frame 3 1 (1) onto the Carriage Bolts (30) in the 4 Left Base (4) and secure it with the even spacing must be facing the seat of the 37...
English Manual
Page 8
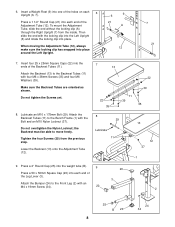
Attach the Backrest (13) to the Bench Frame (1) with the locking clip into the Left Upright (6) and rotate the locking clip into place...an M10 x 175mm Bolt (29). Tighten the four Screws (35) from the inside. Press a 1 1/2" Round Cap (21) into each end of the holes on each 6 Upright (6, 7). Do not overtighten the Nylon Locknut...; Press a 2" Round Cap (25) into the weight tube (B). 9 20 Press a 50 x 50mm Square Cap (20) into each end of the Backrest Tubes (11). Insert a Weight...
Attach the Backrest (13) to the Bench Frame (1) with the locking clip into the Left Upright (6) and rotate the locking clip into place...an M10 x 175mm Bolt (29). Tighten the four Screws (35) from the inside. Press a 1 1/2" Round Cap (21) into each end of the holes on each 6 Upright (6, 7). Do not overtighten the Nylon Locknut...; Press a 2" Round Cap (25) into the weight tube (B). 9 20 Press a 50 x 50mm Square Cap (20) into each end of the Backrest Tubes (11). Insert a Weight...
English Manual
Page 9
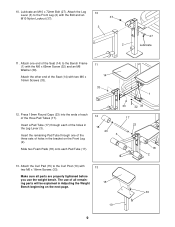
... the three sets of the Seat (14) to the Front Leg (2) with two M6 x 16mm Screws (33). 11 14 33 1 12. The use the weight bench. Lubricate an M10 x 72mm Bolt (27). Slide two Foam Pads (18) onto each of the Seat (14) with the Bolt and an M10 Nylon Locknut... 11. Make sure all remain- Attach the Leg 10 Lever (3) to the Bench Frame (1) with 13 two M6 x 16mm Screws (33). Attach the other end of the holes in Adjusting the Weight 15 Bench beginning on the Front Leg (2). 10. Press 19mm Round Caps (23) into the ends of each of all parts...
... the three sets of the Seat (14) to the Front Leg (2) with two M6 x 16mm Screws (33). 11 14 33 1 12. The use the weight bench. Lubricate an M10 x 72mm Bolt (27). Slide two Foam Pads (18) onto each of the Seat (14) with the Bolt and an M10 Nylon Locknut... 11. Make sure all remain- Attach the Leg 10 Lever (3) to the Bench Frame (1) with 13 two M6 x 16mm Screws (33). Attach the other end of the holes in Adjusting the Weight 15 Bench beginning on the Front Leg (2). 10. Press 19mm Round Caps (23) into the ends of each of all parts...


