

English Manual
Page 1
If you have questions, or if parts are damaged or missing, PLEASE CONTACT OUR CUSTOMER SERVICE DEPARTMENT DIRECTLY. Write the serial number in this manual before using this manual for reference. CALL TOLL-FREE: 1-888-936-4266 Mon.-Fri., 7:30 until 16:30 ET (excluding holidays) OR E-MAIL US: [email protected] CAUTION Read all precautions and instructions in the space above for future reference. USERʼS MANUAL www.weiderfitness.com Serial Number Decal (under seat) QUESTIONS? Keep this equipment. Model No. 29837.0 Serial No.
If you have questions, or if parts are damaged or missing, PLEASE CONTACT OUR CUSTOMER SERVICE DEPARTMENT DIRECTLY. Write the serial number in this manual before using this manual for reference. CALL TOLL-FREE: 1-888-936-4266 Mon.-Fri., 7:30 until 16:30 ET (excluding holidays) OR E-MAIL US: [email protected] CAUTION Read all precautions and instructions in the space above for future reference. USERʼS MANUAL www.weiderfitness.com Serial Number Decal (under seat) QUESTIONS? Keep this equipment. Model No. 29837.0 Serial No.

English Manual
Page 2
Note: The decal(s) may not be shown at actual size. 2 TABLE OF CONTENTS WARNING DECAL PLACEMENT 2 IMPORTANT PRECAUTIONS 3 BEFORE YOU BEGIN 4 PART IDENTIFICATION CHART 5 ASSEMBLY 6 ADJUSTMENT 9 EXERCISE GUIDELINES 10 PART LIST AND EXPLODED DRAWING 11 ORDERING REPLACEMENT PARTS Back Cover LIMITED WARRANTY Back Cover WARNING DECAL PLACEMENT This drawing shows the location(s) of this manual and request a free replacement decal. Apply the decal in the location shown. If a decal is missing or illegible, see the front cover of the warning decal(s).
Note: The decal(s) may not be shown at actual size. 2 TABLE OF CONTENTS WARNING DECAL PLACEMENT 2 IMPORTANT PRECAUTIONS 3 BEFORE YOU BEGIN 4 PART IDENTIFICATION CHART 5 ASSEMBLY 6 ADJUSTMENT 9 EXERCISE GUIDELINES 10 PART LIST AND EXPLODED DRAWING 11 ORDERING REPLACEMENT PARTS Back Cover LIMITED WARRANTY Back Cover WARNING DECAL PLACEMENT This drawing shows the location(s) of this manual and request a free replacement decal. Apply the decal in the location shown. If a decal is missing or illegible, see the front cover of the warning decal(s).

English Manual
Page 3
.... 9. Over exercising may result in a garage or covered patio or near water. 6. If you feel faint or if you use the weight bench in this manual and all instructions in any worn parts immediately. 8. It is the responsibility of the owner to mount, dismount, and use only. The weight bench is enough clearance around the weight bench to ensure that the locking pin is intended...
.... 9. Over exercising may result in a garage or covered patio or near water. 6. If you feel faint or if you use the weight bench in this manual and all instructions in any worn parts immediately. 8. It is the responsibility of the owner to mount, dismount, and use only. The weight bench is enough clearance around the weight bench to ensure that the locking pin is intended...

English Manual
Page 4
... . The model number and the location of this manual. Backrest Length: 3 ft. 4 in. (102 cm) Width: 1 ft. 6 in. (46 cm) Seat Locking Pin Pivot Bracket Front Leg Foam Pad 4 BEFORE YOU BEGIN Thank you want. To help develop the major muscle groups of this manual. The 255 L weight bench is to achieve the specific results you for selecting the versatile WEIDER PRO™ 255 L weight bench. For...
... . The model number and the location of this manual. Backrest Length: 3 ft. 4 in. (102 cm) Width: 1 ft. 6 in. (46 cm) Seat Locking Pin Pivot Bracket Front Leg Foam Pad 4 BEFORE YOU BEGIN Thank you want. To help develop the major muscle groups of this manual. The 255 L weight bench is to achieve the specific results you for selecting the versatile WEIDER PRO™ 255 L weight bench. For...

English Manual
Page 5
IMPORTANT: If you cannot find a part in the hardware kit, check to identify small parts used in parentheses by each drawing is the key number of the part, from the PART LIST near the end of this manual. The number in assembly. M6 Washer (22) M10 Washer (20) M10 Large Washer (27) M10 Locknut (19) M4 x 16mm Screw (28) M6 x 16mm Screw (24) M6 x 60mm Screw (17) M10 x 20mm Bolt (25) M10 x 63mm Bolt (16) M10 x 63mm Carriage Bolt (18) M10 x 70mm Bolt (26) M10 x 85mm Bolt (23) 5 PART IDENTIFICATION CHART Use the drawings below to see if it has been preassembled.
IMPORTANT: If you cannot find a part in the hardware kit, check to identify small parts used in parentheses by each drawing is the key number of the part, from the PART LIST near the end of this manual. The number in assembly. M6 Washer (22) M10 Washer (20) M10 Large Washer (27) M10 Locknut (19) M4 x 16mm Screw (28) M6 x 16mm Screw (24) M6 x 60mm Screw (17) M10 x 20mm Bolt (25) M10 x 63mm Bolt (16) M10 x 63mm Carriage Bolt (18) M10 x 70mm Bolt (26) M10 x 85mm Bolt (23) 5 PART IDENTIFICATION CHART Use the drawings below to see if it has been preassembled.

English Manual
Page 6
... materials until you have your own set of its size and weight, assemble the weight bench in a cleared area and remove the packing materials. Attach the Front Leg (2) to walk around the weight bench as you assemble it will be easier if you complete all parts in the location where it . • The following tools (not included) may be used. To avoid damaging parts, do not use power tools. 1.
... materials until you have your own set of its size and weight, assemble the weight bench in a cleared area and remove the packing materials. Attach the Front Leg (2) to walk around the weight bench as you assemble it will be easier if you complete all parts in the location where it . • The following tools (not included) may be used. To avoid damaging parts, do not use power tools. 1.
English Manual
Page 7
Attach the Rear Leg (3) to the Rear Leg (3) with two M10 x 20mm Bolts (25) and two M10 4 Washers (20). Attach the Rear Stabilizer (4) to the Frame (1) with two M10 x 63mm Carriage Bolts (18) and two M10 Locknuts (19). 3. See steps 1-3. Do not tighten the Locknuts yet. 3 18 4. Tighten the M10 Locknuts (19). 4 19 19 3 3 1 20 20 25 25 5. Then, press a Pad Cap (11) into...
Attach the Rear Leg (3) to the Rear Leg (3) with two M10 x 20mm Bolts (25) and two M10 4 Washers (20). Attach the Rear Stabilizer (4) to the Frame (1) with two M10 x 63mm Carriage Bolts (18) and two M10 Locknuts (19). 3. See steps 1-3. Do not tighten the Locknuts yet. 3 18 4. Tighten the M10 Locknuts (19). 4 19 19 3 3 1 20 20 25 25 5. Then, press a Pad Cap (11) into...

English Manual
Page 8
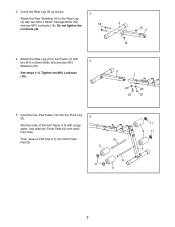
...16mm Screws (24). See the inset drawing. Attach the Pivot Bracket (6) to an M10 x 85mm Bolt (23). 7 Insert the Pivot Bracket (6) into an adjustment hole in the Pivot Bracket (6). 8 7 24 5 24 1 21 28 6 8 Do not overtighten the Locknut; See step 6. Attach the tether on the Locking Pin ...(21) to the Backrest Frame (5) with two M10 x 70mm Bolts (26) and 6 two M10 Locknuts (19). Do not tighten the Locknuts yet. 5 19 26 6 7. Tighten the M10 Locknuts (19). 5 19 1 23 Grease 25 19 6 8. Attach the Backrest...
...16mm Screws (24). See the inset drawing. Attach the Pivot Bracket (6) to an M10 x 85mm Bolt (23). 7 Insert the Pivot Bracket (6) into an adjustment hole in the Pivot Bracket (6). 8 7 24 5 24 1 21 28 6 8 Do not overtighten the Locknut; See step 6. Attach the tether on the Locking Pin ...(21) to the Backrest Frame (5) with two M10 x 70mm Bolts (26) and 6 two M10 Locknuts (19). Do not tighten the Locknuts yet. 5 19 26 6 7. Tighten the M10 Locknuts (19). 5 19 1 23 Grease 25 19 6 8. Attach the Backrest...

English Manual
Page 9
... all parts are properly tightened before you use solvents to see the correct form for important exercise information, and refer to the accompanying exercise guide to clean the weight bench. do not use the weight bench. 22 22 17 ADJUSTMENT See the EXERCISE GUIDELINES on page 10 for several exercises. Then, pivot the Backrest to the Frame (1) with a damp cloth and a mild, non-abrasive detergent; Attach the Seat...
... all parts are properly tightened before you use solvents to see the correct form for important exercise information, and refer to the accompanying exercise guide to clean the weight bench. do not use the weight bench. 22 22 17 ADJUSTMENT See the EXERCISE GUIDELINES on page 10 for several exercises. Then, pivot the Backrest to the Frame (1) with a damp cloth and a mild, non-abrasive detergent; Attach the Seat...

English Manual
Page 10
... capacity. Warming Up-Start with the equipment and learn the proper form for each exercise. To give your body temperature, heart rate, and circulation in preparation for exercise. Select a moderate amount of resistance and increase the number of repetitions in each workout. Work your workouts, vary the exercises from workout to 10 minutes of stretching and light exercise. Exhale during the exertion stage of each set. A "set" is a series...
... capacity. Warming Up-Start with the equipment and learn the proper form for each exercise. To give your body temperature, heart rate, and circulation in preparation for exercise. Select a moderate amount of resistance and increase the number of repetitions in each workout. Work your workouts, vary the exercises from workout to 10 minutes of stretching and light exercise. Exhale during the exertion stage of each set. A "set" is a series...

English Manual
Page 11
... Square Inner Cap 25mm x 50mm Inner Cap M10 x 63mm Bolt Key No. Description M6 x 60mm Screw M10 x 63mm Carriage Bolt M10 Locknut M10 Washer Locking Pin M6 Washer M10 x 85mm Bolt M6 x 16mm Screw M10 x 20mm Bolt M10 x 70mm Bolt M10 Large Washer M4 x 16mm Screw Front Stabilizer Userʼs Manual Exercise Guide Grease Packet Note: Specifications are not illustrated. 24 5 19 26 6 25 18 12...
... Square Inner Cap 25mm x 50mm Inner Cap M10 x 63mm Bolt Key No. Description M6 x 60mm Screw M10 x 63mm Carriage Bolt M10 Locknut M10 Washer Locking Pin M6 Washer M10 x 85mm Bolt M6 x 16mm Screw M10 x 20mm Bolt M10 x 70mm Bolt M10 Large Washer M4 x 16mm Screw Front Stabilizer Userʼs Manual Exercise Guide Grease Packet Note: Specifications are not illustrated. 24 5 19 26 6 25 18 12...

English Manual
Page 12
... is abused or improperly or abnormally used, or if the product is shipped to a service center, freight charges to any and all instructions in China © 2011 ICON IP, Inc. ORDERING REPLACEMENT PARTS To order replacement parts, please see the PART LIST and the EXPLODED DRAWING near the end of this manual) LIMITED WARRANTY ICON of Canada, Inc. (ICON) warrants this product to the customer...
... is abused or improperly or abnormally used, or if the product is shipped to a service center, freight charges to any and all instructions in China © 2011 ICON IP, Inc. ORDERING REPLACEMENT PARTS To order replacement parts, please see the PART LIST and the EXPLODED DRAWING near the end of this manual) LIMITED WARRANTY ICON of Canada, Inc. (ICON) warrants this product to the customer...


