
Canadian English Manual
Page 2
Remove the PART IDENTIFICATION CHART and PART LIST/EXPLODED DRAWING before beginning assembly. WEIDER is a registered trademark of this manual. TABLE OF CONTENTS WARNING DECAL PLACEMENT 3 IMPORTANT PRECAUTIONS 4 BEFORE YOU BEGIN 5 ASSEMBLY 6 UPPER CABLE ADJUSTMENT 14 ADJUSTMENTS 15 CABLE DIAGRAM 18 TROUBLESHOOTING 19 EXERCISE GUIDELINES 20 ORDERING REPLACEMENT PARTS Back Cover LIMITED WARRANTY Back Cover Note: A PART IDENTIFICATION CHART and a PART LIST/EXPLODED DRAWING are attached in the center of ICON IP, Inc. 2
Remove the PART IDENTIFICATION CHART and PART LIST/EXPLODED DRAWING before beginning assembly. WEIDER is a registered trademark of this manual. TABLE OF CONTENTS WARNING DECAL PLACEMENT 3 IMPORTANT PRECAUTIONS 4 BEFORE YOU BEGIN 5 ASSEMBLY 6 UPPER CABLE ADJUSTMENT 14 ADJUSTMENTS 15 CABLE DIAGRAM 18 TROUBLESHOOTING 19 EXERCISE GUIDELINES 20 ORDERING REPLACEMENT PARTS Back Cover LIMITED WARRANTY Back Cover Note: A PART IDENTIFICATION CHART and a PART LIST/EXPLODED DRAWING are attached in the center of ICON IP, Inc. 2
Canadian English Manual
Page 4
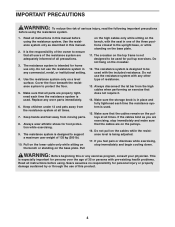
...the resistance system. 1. Use the resistance system only on the base plate. Keep hands and feet away from the high cables when performing an exercise that the cables are properly tightened each time the resistance system is used . 15. The resistance system is designed to be used with the seat... in place and fully tightened each time the resistance system is used . Use the resistance system only as you feel pain or dizziness while exercising, stop immediately and make sure that does not require it. 14. The crossbar on the pulleys. 16. Do not pull on the crossbar. ...
...the resistance system. 1. Use the resistance system only on the base plate. Keep hands and feet away from the high cables when performing an exercise that the cables are properly tightened each time the resistance system is used . 15. The resistance system is designed to be used with the seat... in place and fully tightened each time the resistance system is used . Use the resistance system only as you feel pain or dizziness while exercising, stop immediately and make sure that does not require it. 14. The crossbar on the pulleys. 16. Do not pull on the crossbar. ...
Canadian English Manual
Page 15
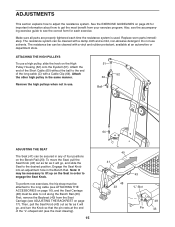
...slide the Seat to roll along the Bench Rail (23). First, remove the Backrest (40) from your exercise program. Then, pull the Seat Knob (43) out as far as it will go , and turn the... is used. Attach the other high pulley in the Bench Rail. To perform row exercises, the hip strap must be secured in any of four positions on the High Pulley Housing (52...cleaned with a damp cloth and a mild, non-abrasive detergent. Make sure all parts are properly tightened each exercise. Engage the Seat Knob into an adjustment hole in the same manner. ATTACHING THE HIGH PULLEYS To use ...
...slide the Seat to roll along the Bench Rail (23). First, remove the Backrest (40) from your exercise program. Then, pull the Seat Knob (43) out as far as it will go , and turn the... is used. Attach the other high pulley in the Bench Rail. To perform row exercises, the hip strap must be secured in any of four positions on the High Pulley Housing (52...cleaned with a damp cloth and a mild, non-abrasive detergent. Make sure all parts are properly tightened each exercise. Engage the Seat Knob into an adjustment hole in the same manner. ATTACHING THE HIGH PULLEYS To use ...

Canadian English Manual
Page 17
...), and tighten the Storage Knob into the side of the Transformer into the Back Mech Cover (8). Be careful not to the new location. For row exercises, remove the Backrest (40). Important: Always plug in this area 3 26 41 32 62 23 31 1 21 Hook 8 12 17 To use the Backrest (40...
...), and tighten the Storage Knob into the side of the Transformer into the Back Mech Cover (8). Be careful not to the new location. For row exercises, remove the Backrest (40). Important: Always plug in this area 3 26 41 32 62 23 31 1 21 Hook 8 12 17 To use the Backrest (40...

Canadian English Manual
Page 20
...30 minutes of 30 seconds between sets. Each workout should be sensitive to your body's signals. The repetitions in each set . Rest for each exercise you feeling exhausted. Complete as many sets of 15 to 20 repetitions as one sit-up. Work your muscles by using high amounts of resistance...Determining the exact length of time for 1 minute after each workout, as well as you want to develop most. Schedule your workouts for each exercise depends upon the individual user. Once you . This requires moving through the full range of motion for the time of day when your energy level...
...30 minutes of 30 seconds between sets. Each workout should be sensitive to your body's signals. The repetitions in each set . Rest for each exercise you feeling exhausted. Complete as many sets of 15 to 20 repetitions as one sit-up. Work your muscles by using high amounts of resistance...Determining the exact length of time for 1 minute after each workout, as well as you want to develop most. Schedule your workouts for each exercise depends upon the individual user. Once you . This requires moving through the full range of motion for the time of day when your energy level...
Canadian English Manual
Page 21
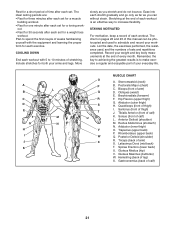
... (shoulder) R. Spinae Erectors (lower back) U. COOLING DOWN End each workout with the equipment and learning the proper form for each exercise. Include stretches for both your workouts. Sternomastoid (neck) B. Adductor (inner thigh) O. Gluteus Medius (hip) V. Plan to spend the...with 5 to schedule and record your arms and legs. Pectoralis Major (chest) C. Anterior Deltoid (shoulder) M. List the date, the exercises performed, the resistance used to 10 minutes of stretching. out. • Rest for 30 seconds after each workout is to increase flexibility...
... (shoulder) R. Spinae Erectors (lower back) U. COOLING DOWN End each workout with the equipment and learning the proper form for each exercise. Include stretches for both your workouts. Sternomastoid (neck) B. Adductor (inner thigh) O. Gluteus Medius (hip) V. Plan to spend the...with 5 to schedule and record your arms and legs. Pectoralis Major (chest) C. Anterior Deltoid (shoulder) M. List the date, the exercises performed, the resistance used to 10 minutes of stretching. out. • Rest for 30 seconds after each workout is to increase flexibility...
Canadian English Manual
Page 22
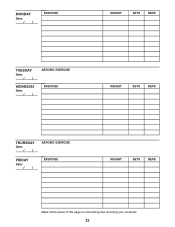
MONDAY Date: / / EXERCISE WEIGHT SETS REPS TUESDAY Date: / / WEDNESDAY Date: / / AEROBIC EXERCISE EXERCISE WEIGHT SETS REPS THURSDAY Date: / / FRIDAY Date: / / AEROBIC EXERCISE EXERCISE WEIGHT SETS REPS Make photocopies of this page for scheduling and recording your workouts. 22
MONDAY Date: / / EXERCISE WEIGHT SETS REPS TUESDAY Date: / / WEDNESDAY Date: / / AEROBIC EXERCISE EXERCISE WEIGHT SETS REPS THURSDAY Date: / / FRIDAY Date: / / AEROBIC EXERCISE EXERCISE WEIGHT SETS REPS Make photocopies of this page for scheduling and recording your workouts. 22

Canadian English Manual
Page 23
MONDAY Date: / / EXERCISE WEIGHT SETS REPS TUESDAY Date: / / WEDNESDAY Date: / / AEROBIC EXERCISE EXERCISE WEIGHT SETS REPS THURSDAY Date: / / FRIDAY Date: / / AEROBIC EXERCISE EXERCISE WEIGHT SETS REPS Make photocopies of this page for scheduling and recording your workouts. 23
MONDAY Date: / / EXERCISE WEIGHT SETS REPS TUESDAY Date: / / WEDNESDAY Date: / / AEROBIC EXERCISE EXERCISE WEIGHT SETS REPS THURSDAY Date: / / FRIDAY Date: / / AEROBIC EXERCISE EXERCISE WEIGHT SETS REPS Make photocopies of this page for scheduling and recording your workouts. 23
Canadian English Manual
Page 26
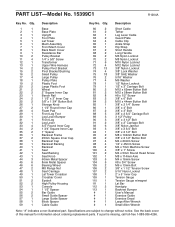
... Screw #8 x 3/4" Screw M6 x 13mm Bolt 3/8" x 1 1/2" Tension Screw 5/16" Nylon Locknut 2" x 5" Inner Cap Tension Gauge Tension Gauge w/magnet Lat Bar Handgrip Backrest Bumper User's Manual Exercise Guide Exercise Decal Large Allen Wrench Small Allen Wrench Note: "#" indicates a non-illustrated part. See the back cover of this manual for information about ordering replacement parts...
... Screw #8 x 3/4" Screw M6 x 13mm Bolt 3/8" x 1 1/2" Tension Screw 5/16" Nylon Locknut 2" x 5" Inner Cap Tension Gauge Tension Gauge w/magnet Lat Bar Handgrip Backrest Bumper User's Manual Exercise Guide Exercise Decal Large Allen Wrench Small Allen Wrench Note: "#" indicates a non-illustrated part. See the back cover of this manual for information about ordering replacement parts...


