
English Manual
Page 1
www.proform.com Wspraitceethaebosveeriafol rnfuumtubnreeerwreinfpetrhreoendcuec. ts, prizes, fitness tips, and much more ! If you have questions, or if there are missing or damaged parts, we are committed to providing complete customer satisfaction. tance from our fawctowryw. .nordictrack.com TO AVOID DELAYS,nPeLwEpArSoEducts, prizes, CALL DIRECT TfOitnOeUssR tTipOsL,La-nd ...
www.proform.com Wspraitceethaebosveeriafol rnfuumtubnreeerwreinfpetrhreoendcuec. ts, prizes, fitness tips, and much more ! If you have questions, or if there are missing or damaged parts, we are committed to providing complete customer satisfaction. tance from our fawctowryw. .nordictrack.com TO AVOID DELAYS,nPeLwEpArSoEducts, prizes, CALL DIRECT TfOitnOeUssR tTipOsL,La-nd ...
English Manual
Page 2
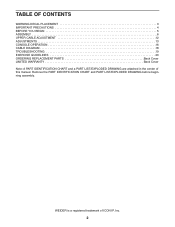
TABLE OF CONTENTS WARNING DECAL PLACEMENT 3 IMPORTANT PRECAUTIONS 4 BEFORE YOU BEGIN 5 ASSEMBLY 6 UPPER CABLE ADJUSTMENT 12 ADJUSTMENTS 13 CONSOLE OPERATION 16 CABLE DIAGRAM 18 TROUBLESHOOTING 19 EXERCISE GUIDELINES 20 ORDERING REPLACEMENT PARTS Back Cover LIMITED WARRANTY Back Cover Note: A PART IDENTIFICATION CHART and a PART LIST/EXPLODED DRAWING are attached in the center of ICON IP, Inc. 2 Remove the PART IDENTIFICATION CHART and PART LIST/EXPLODED DRAWING before beginning assembly. WEIDER is a registered trademark of this manual.
TABLE OF CONTENTS WARNING DECAL PLACEMENT 3 IMPORTANT PRECAUTIONS 4 BEFORE YOU BEGIN 5 ASSEMBLY 6 UPPER CABLE ADJUSTMENT 12 ADJUSTMENTS 13 CONSOLE OPERATION 16 CABLE DIAGRAM 18 TROUBLESHOOTING 19 EXERCISE GUIDELINES 20 ORDERING REPLACEMENT PARTS Back Cover LIMITED WARRANTY Back Cover Note: A PART IDENTIFICATION CHART and a PART LIST/EXPLODED DRAWING are attached in the center of ICON IP, Inc. 2 Remove the PART IDENTIFICATION CHART and PART LIST/EXPLODED DRAWING before beginning assembly. WEIDER is a registered trademark of this manual.

English Manual
Page 4
...system is used for pull-up exercises. Make sure that all times. Keep children under 12 and pets away from the resistance system at all parts are properly tightened each time the resistance system is the responsibility of the owner to be used . Keep hands and feet away from the high... instructions in place and fully tightened each time the resistance system is intended for persons over the age of 35 or persons with any worn parts immediately. 6. The crossbar on 17. Pull on the lower cable only while sitting on the top frame is designed to protect the floor. 5. Read ...
...system is used for pull-up exercises. Make sure that all times. Keep children under 12 and pets away from the resistance system at all parts are properly tightened each time the resistance system is the responsibility of the owner to be used . Keep hands and feet away from the high... instructions in place and fully tightened each time the resistance system is intended for persons over the age of 35 or persons with any worn parts immediately. 6. The crossbar on 17. Pull on the lower cable only while sitting on the top frame is designed to protect the floor. 5. Read ...
English Manual
Page 5
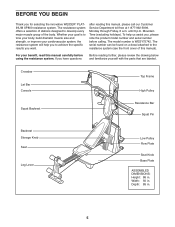
... muscle size and strength, or improve your cardiovascular system, the resistance system will help us assist you for selecting the innovative WEIDER® PLATINUM XP800 resistance system. Crossbar Lat Bar Console Top Frame High Pulley Squat Backrest Resistance Bar Squat Pin Backrest Storage Knob Seat Leg... the specific results you have questions Before reading further, please review the drawing below and familiarize yourself with the parts that are labeled. Width: 50 in . after reading this manual carefully before calling. Depth: 85 in. 5 Mountain Time (excluding holidays).
... muscle size and strength, or improve your cardiovascular system, the resistance system will help us assist you for selecting the innovative WEIDER® PLATINUM XP800 resistance system. Crossbar Lat Bar Console Top Frame High Pulley Squat Backrest Resistance Bar Squat Pin Backrest Storage Knob Seat Leg... the specific results you have questions Before reading further, please review the drawing below and familiarize yourself with the parts that are labeled. Width: 50 in . after reading this manual carefully before calling. Depth: 85 in. 5 Mountain Time (excluding holidays).
English Manual
Page 6
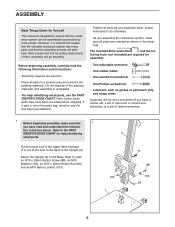
...of ratchet wrenches. 1. tion in a cleared area and remove the packing materials. However, it has been pre-attached. • Tighten all parts as grease or petroleum jelly, and soapy water. Before beginning assembly, carefully read and understand the informa- The included Allen wrenches and the fol-... will go smoothly. Pull the lower end of the Upper Wire Harness (71) out of time, assembly will take time. Note: Some small parts may have been pre-attached for assembly: • Two adjustable wrenches • One rubber mallet • One standard screwdriver • One Phillips...
...of ratchet wrenches. 1. tion in a cleared area and remove the packing materials. However, it has been pre-attached. • Tighten all parts as grease or petroleum jelly, and soapy water. Before beginning assembly, carefully read and understand the informa- The included Allen wrenches and the fol-... will go smoothly. Pull the lower end of the Upper Wire Harness (71) out of time, assembly will take time. Note: Some small parts may have been pre-attached for assembly: • Two adjustable wrenches • One rubber mallet • One standard screwdriver • One Phillips...

English Manual
Page 11
... Backrest Frame vertically over the Seat Carriage and 32 slide the rod into the slot, as described in the inset drawing. Make sure that all parts have been properly tightened. Slide two Large Foam Pads (52) onto the Pad Tube. Attach the other Pad Tube (50) to the Leg Lever (56... (44). Adjust the tension on the upper cable (not shown) as described in ADJUSTMENTS, beginning on the following page. 18. The use of the remaining parts will be explained in UPPER CABLE ADJUSTMENT on page 13. Rod Slot 44 32 44 17. Insert the rod on page 16. 11 15. Slide...
... Backrest Frame vertically over the Seat Carriage and 32 slide the rod into the slot, as described in the inset drawing. Make sure that all parts have been properly tightened. Slide two Large Foam Pads (52) onto the Pad Tube. Attach the other Pad Tube (50) to the Leg Lever (56... (44). Adjust the tension on the upper cable (not shown) as described in ADJUSTMENTS, beginning on the following page. 18. The use of the remaining parts will be explained in UPPER CABLE ADJUSTMENT on page 13. Rod Slot 44 32 44 17. Insert the rod on page 16. 11 15. Slide...
English Manual
Page 13
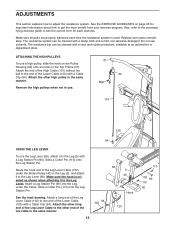
... from your exercise program. Remove the high pulleys when not in the same manner. Slide a Cotter Pin (113) onto the Leg Station Pin. Replace worn parts immediately. Slide a Cotter Pin (113) onto the Leg Station Pin. Insert a Leg Station Pin (60) into the Leg, under the 90mm Pulley (40) in ... Lever. The resistance bar can be cleaned with a Leg Station Pin (60). See the EXERCISE GUIDELINES on the Top Frame (37). Make sure all parts are properly tightened each exercise. Attach the other end of the low cable in the Leg (5), and attach it to the Leg Lever (56). Route...
... from your exercise program. Remove the high pulleys when not in the same manner. Slide a Cotter Pin (113) onto the Leg Station Pin. Replace worn parts immediately. Slide a Cotter Pin (113) onto the Leg Station Pin. Insert a Leg Station Pin (60) into the Leg, under the 90mm Pulley (40) in ... Lever. The resistance bar can be cleaned with a Leg Station Pin (60). See the EXERCISE GUIDELINES on the Top Frame (37). Make sure all parts are properly tightened each exercise. Attach the other end of the low cable in the Leg (5), and attach it to the Leg Lever (56). Route...
English Manual
Page 17
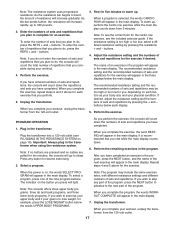
... numbers of the program, press the NEXT button to advance to resume exercising. 2. Perform the exercise. Press any part of sets and repetitions for you wish to skip any button to the next part of sets and repetitions you perform the exercise, the console will appear in the program, press the NEXT...
... numbers of the program, press the NEXT button to advance to resume exercising. 2. Perform the exercise. Press any part of sets and repetitions for you wish to skip any button to the next part of sets and repetitions you perform the exercise, the console will appear in the program, press the NEXT...
English Manual
Page 20
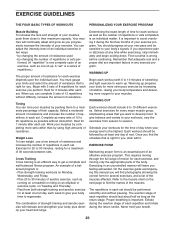
... to your muscles. It is important. You should include 6 to your body's signals. If you feeling exhausted. This requires moving only the appropriate parts of the body. Proper breathing is important to avoid overdoing it . Select a moderate amount of resistance and increase the number of repetitions in each ...muscles, push them to a moderate percentage of an effective exercise program. Rest for every major muscle group, emphasizing areas that is an essential part of their maximum capacity. Each workout should last about half as long as many sets of 15 to develop most.
... to your muscles. It is important. You should include 6 to your body's signals. If you feeling exhausted. This requires moving only the appropriate parts of the body. Proper breathing is important to avoid overdoing it . Select a moderate amount of resistance and increase the number of repetitions in each ...muscles, push them to a moderate percentage of an effective exercise program. Rest for every major muscle group, emphasizing areas that is an essential part of their maximum capacity. Each workout should last about half as long as many sets of 15 to develop most.
English Manual
Page 21
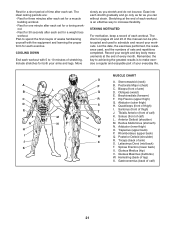
List the date, the exercises performed, the resistance used to make exercise a regular and enjoyable part of calf) L. Sternomastoid (neck) B. Sartorius (front of sets and repetitions completed. Gastrocnemius (back of thigh) I J K L M N O P Q R S T U V W X MUSCLE CHART A. Plan to spend the first couple of weeks ...
List the date, the exercises performed, the resistance used to make exercise a regular and enjoyable part of calf) L. Sternomastoid (neck) B. Sartorius (front of sets and repetitions completed. Gastrocnemius (back of thigh) I J K L M N O P Q R S T U V W X MUSCLE CHART A. Plan to spend the first couple of weeks ...
English Manual
Page 24
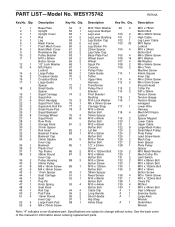
WESY75742 R0704A Key No. See the back cover of this manual for information about ordering replacement parts. Description 1 1 Base Plate 54 3 M10 Thick Washer 99 2 M10 x 78mm 2 1 Upright 55 1 Leg Lever Bumper Button Bolt 3 1 Upright Cover 56 1 Leg Lever 100 2 M4... Cap 97 1 Hip Strap Wrench 52 4 Large Foam Pad 98 1 Ankle Strap # 1 Small Allen 53 4 M4 x 70mm Screw Wrench Note: "#" indicates a non-illustrated part. Description Key No. PART LIST-Model No. Qty. Qty. Qty. Description Key No. Specifications are subject to change without notice.
WESY75742 R0704A Key No. See the back cover of this manual for information about ordering replacement parts. Description 1 1 Base Plate 54 3 M10 Thick Washer 99 2 M10 x 78mm 2 1 Upright 55 1 Leg Lever Bumper Button Bolt 3 1 Upright Cover 56 1 Leg Lever 100 2 M4... Cap 97 1 Hip Strap Wrench 52 4 Large Foam Pad 98 1 Ankle Strap # 1 Small Allen 53 4 M4 x 70mm Screw Wrench Note: "#" indicates a non-illustrated part. Description Key No. PART LIST-Model No. Qty. Qty. Qty. Description Key No. Specifications are subject to change without notice.
English Manual
Page 25
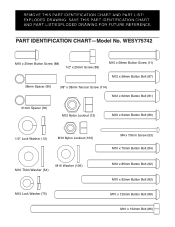
...-Model No. SAVE THIS PART IDENTIFICATION CHART AND PART LIST/EXPLODED DRAWING FOR FUTURE REFERENCE. WESY75742 M10 x 25mm Button Screw (88) 1/2" x 25mm Screw (85) M10 x 58mm Button Screw (11) M12 x 58mm Button Bolt (87) ... x 75mm Button Bolt (84) M10 x 85mm Button Bolt (92) M10 x 92mm Button Bolt (83) M10 x 125mm Button Bolt (89) M10 x 152mm Bolt (86) REMOVE THIS PART IDENTIFICATION CHART AND PART LIST/ EXPLODED DRAWING.
...-Model No. SAVE THIS PART IDENTIFICATION CHART AND PART LIST/EXPLODED DRAWING FOR FUTURE REFERENCE. WESY75742 M10 x 25mm Button Screw (88) 1/2" x 25mm Screw (85) M10 x 58mm Button Screw (11) M12 x 58mm Button Bolt (87) ... x 75mm Button Bolt (84) M10 x 85mm Button Bolt (92) M10 x 92mm Button Bolt (83) M10 x 125mm Button Bolt (89) M10 x 152mm Bolt (86) REMOVE THIS PART IDENTIFICATION CHART AND PART LIST/ EXPLODED DRAWING.

English Manual
Page 27
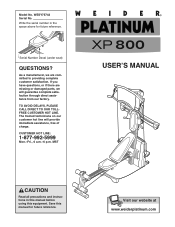
...extends only to give the following information: • The MODEL NUMBER of the product (WESY75742) • The NAME of the product (WEIDER™ PLATINUM XP800 resistance system) • The SERIAL NUMBER of the product (see the front cover of this manual) • The KEY NUMBER ... damages arising out of or in workmanship and material, under this product to be prepared to the original purchaser. ORDERING REPLACEMENT PARTS To order replacement parts, simply call our Customer Service Department toll-free at 1-877-992-5999, Monday through Friday, 6 a.m. The warranty extended ...
...extends only to give the following information: • The MODEL NUMBER of the product (WESY75742) • The NAME of the product (WEIDER™ PLATINUM XP800 resistance system) • The SERIAL NUMBER of the product (see the front cover of this manual) • The KEY NUMBER ... damages arising out of or in workmanship and material, under this product to be prepared to the original purchaser. ORDERING REPLACEMENT PARTS To order replacement parts, simply call our Customer Service Department toll-free at 1-877-992-5999, Monday through Friday, 6 a.m. The warranty extended ...


