

English Manual
Page 4
... that the cables remain on a level surface. Do not use of resistance. 13. Keep children under 12 and pets away from moving parts. 8. The crossbar on the crossbar. 12. Pull on the lower cable only while sitting on 17. Pull stop immediately and make sure that the cables are on the base...
... that the cables remain on a level surface. Do not use of resistance. 13. Keep children under 12 and pets away from moving parts. 8. The crossbar on the crossbar. 12. Pull on the lower cable only while sitting on 17. Pull stop immediately and make sure that the cables are on the base...
English Manual
Page 5
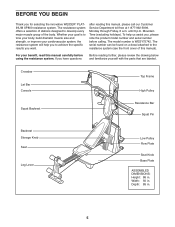
... build dramatic muscle size and strength, or improve your cardiovascular system, the resistance system will help us assist you want. Crossbar Lat Bar Console Top Frame High Pulley Squat Backrest Resistance Bar Squat Pin Backrest Storage Knob Seat Leg Lever Low Pulley Row...your benefit, read this manual). Mountain Time (excluding holidays). For your goal is WESY75742. If you for selecting the innovative WEIDER® PLATINUM XP800 resistance system. BEFORE YOU BEGIN Thank you have questions Before reading further, please review the drawing below and familiarize yourself ...
... build dramatic muscle size and strength, or improve your cardiovascular system, the resistance system will help us assist you want. Crossbar Lat Bar Console Top Frame High Pulley Squat Backrest Resistance Bar Squat Pin Backrest Storage Knob Seat Leg Lever Low Pulley Row...your benefit, read this manual). Mountain Time (excluding holidays). For your goal is WESY75742. If you for selecting the innovative WEIDER® PLATINUM XP800 resistance system. BEFORE YOU BEGIN Thank you have questions Before reading further, please review the drawing below and familiarize yourself ...
English Manual
Page 9
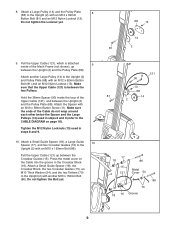
...to the Upright (2) with an M10 x 152mm Bolt (86). Attach a Small Guide Spacer (18), the Crossbar Block, the two Crossbar Guides (15), an M10 Thick Washer (54), and the two Tethers (70) to the CABLE DIAGRAM on... the Cable into the groove in the Crossbar Block (16). Make sure that the Upper Cable (121) is attached 9 inside the loop of the... 2 121 Cover 54 86 70 18 16 Groove 9 Pull the Upper Cable (121) up between the Crossbar Guides (15). Hold the 38mm Spacer (90) inside of the Cable do not wrap around each other below...
...to the Upright (2) with an M10 x 152mm Bolt (86). Attach a Small Guide Spacer (18), the Crossbar Block, the two Crossbar Guides (15), an M10 Thick Washer (54), and the two Tethers (70) to the CABLE DIAGRAM on... the Cable into the groove in the Crossbar Block (16). Make sure that the Upper Cable (121) is attached 9 inside the loop of the... 2 121 Cover 54 86 70 18 16 Groove 9 Pull the Upper Cable (121) up between the Crossbar Guides (15). Hold the 38mm Spacer (90) inside of the Cable do not wrap around each other below...
English Manual
Page 10
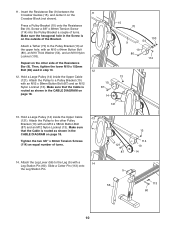
Insert the Resistance Bar (9) between the Crossbar Guides (15), and center it on page 18. Attach a Tether (70) to the Leg (5) with an M12 x 58mm Button Bolt (87) and an M12 Nylon ... 80 114 12 13 10 87 14 121 13. 11. Then, tighten the lower M10 x 152mm Bolt (86) used in the CABLE DIAGRAM on the Crossbar Block (not shown). Tighten the two 3/8" x 38mm Tension Screws (114) an equal number of turns. Screw a 3/8" x 38mm Tension Screw (114) into the Pulley Bracket a couple...
Insert the Resistance Bar (9) between the Crossbar Guides (15), and center it on page 18. Attach a Tether (70) to the Leg (5) with an M12 x 58mm Button Bolt (87) and an M12 Nylon ... 80 114 12 13 10 87 14 121 13. 11. Then, tighten the lower M10 x 152mm Bolt (86) used in the CABLE DIAGRAM on the Crossbar Block (not shown). Tighten the two 3/8" x 38mm Tension Screws (114) an equal number of turns. Screw a 3/8" x 38mm Tension Screw (114) into the Pulley Bracket a couple...
English Manual
Page 19
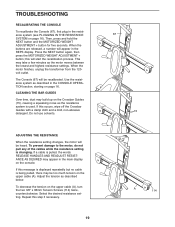
... any of the cables while the resistance setting is being pulled, there may take a few minutes as described below. Repeat this occurs, wipe off the Crossbar Guides with a damp cloth and a mild, non-abrasive detergent. Press the NEXT button again, then press the MOTORIZED WEIGHT ADJUSTMENT + button; When the motor ...process. Use the resistance system as the resistance system is pulled, the words RELEASE HANDLES AND READJUST RESISTANCE AS DESIRED may build up on the Crossbar Guides (15), causing a squeaking noise as described in the main display on page 16. If a cable is used.
... any of the cables while the resistance setting is being pulled, there may take a few minutes as described below. Repeat this occurs, wipe off the Crossbar Guides with a damp cloth and a mild, non-abrasive detergent. Press the NEXT button again, then press the MOTORIZED WEIGHT ADJUSTMENT + button; When the motor ...process. Use the resistance system as the resistance system is pulled, the words RELEASE HANDLES AND READJUST RESISTANCE AS DESIRED may build up on the Crossbar Guides (15), causing a squeaking noise as described in the main display on page 16. If a cable is used.
English Manual
Page 24
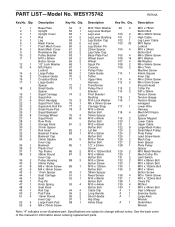
... Nylon 67 1 Console 109 2 M4 x 7mm Locknut 68 1 Pulley Plate Machine Screw 14 4 Large Pulley 69 1 Cable Guide 110 1 45mm Square 15 2 Crossbar Guide 70 2 Tether Inner Cap 16 1 Crossbar Block 71 1 Upper Wire 111 4 M4 x 20mm Screw 17 1 Large Guide Harness 112 2 M4 x 5mm Screw Spacer 72 1 Transformer (Round Head) 18...
... Nylon 67 1 Console 109 2 M4 x 7mm Locknut 68 1 Pulley Plate Machine Screw 14 4 Large Pulley 69 1 Cable Guide 110 1 45mm Square 15 2 Crossbar Guide 70 2 Tether Inner Cap 16 1 Crossbar Block 71 1 Upper Wire 111 4 M4 x 20mm Screw 17 1 Large Guide Harness 112 2 M4 x 5mm Screw Spacer 72 1 Transformer (Round Head) 18...