
English Manual
Page 3
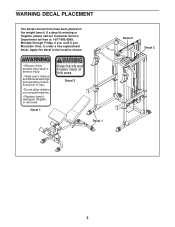
... call our Customer Service Department toll-free at 1-877-992-5999, Monday through Friday, 6 a.m. Mountain Time, to use. • Do not allow children on the weight bench. Decal 2 Decal 1 Decal 2 Decal 2 3 WARNING • Misuse of this product may result in the location shown. ! Apply the decal in serious injury. • Read user...
... call our Customer Service Department toll-free at 1-877-992-5999, Monday through Friday, 6 a.m. Mountain Time, to use. • Do not allow children on the weight bench. Decal 2 Decal 1 Decal 2 Decal 2 3 WARNING • Misuse of this product may result in the location shown. ! Apply the decal in serious injury. • Read user...
English Manual
Page 4
...the use of this manual. 2. Replace all cables at all parts are properly tightened each side of the weight carriage or barbell. 13. Cover the floor beneath the weight bench to catch the barbell if you are adequately informed of all users of the way when performing squat exercises... bind as described in this or any worn parts immediately. 6. Always place an equal amount of weight on each time the weight bench is used. Always move the bench out of the weight bench are exercising, stop immediately and begin cooling down. It is intended for persons over the age of...
...the use of this manual. 2. Replace all cables at all parts are properly tightened each side of the weight carriage or barbell. 13. Cover the floor beneath the weight bench to catch the barbell if you are adequately informed of all users of the way when performing squat exercises... bind as described in this or any worn parts immediately. 6. Always place an equal amount of weight on each time the weight bench is used. Always move the bench out of the weight bench are exercising, stop immediately and begin cooling down. It is intended for persons over the age of...
English Manual
Page 5
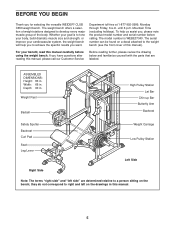
...please note the product model number and serial number before using the weight bench. they do not correspond to right and left side" are labeled. If you for selecting the versatile WEIDER® CLUB C650 weight bench. Weight Rest Barbell High Pulley Station Lat Bar Chin-up Bar Butterfly ...Arm Backrest Safety Spotter Backrest Curl Pad Seat Leg Lever Weight Carriage Low Pulley Station Left Side Right Side Note: The...
...please note the product model number and serial number before using the weight bench. they do not correspond to right and left side" are labeled. If you for selecting the versatile WEIDER® CLUB C650 weight bench. Weight Rest Barbell High Pulley Station Lat Bar Chin-up Bar Butterfly ...Arm Backrest Safety Spotter Backrest Curl Pad Seat Leg Lever Weight Carriage Low Pulley Station Left Side Right Side Note: The...

English Manual
Page 6
...until assembly is completed. • Tighten all parts as you assemble them, unless instructed to do otherwise. • As you assemble the weight bench, make sure you 1 understand the information in the box above. The included Allen wrench and the following information and instructions: • ...the PART IDENTIFICATION CHART. Do not tighten the Locknuts yet. 32 70 Repeat this manual is designed to realize that the versatile weight bench has many parts and that by anyone. Most people find that the assembly process will be assembled successfully by setting aside plenty...
...until assembly is completed. • Tighten all parts as you assemble them, unless instructed to do otherwise. • As you assemble the weight bench, make sure you 1 understand the information in the box above. The included Allen wrench and the following information and instructions: • ...the PART IDENTIFICATION CHART. Do not tighten the Locknuts yet. 32 70 Repeat this manual is designed to realize that the versatile weight bench has many parts and that by anyone. Most people find that the assembly process will be assembled successfully by setting aside plenty...

English Manual
Page 20
... 10mm Spacer (21), and an M8 Nylon Locknut (17). Attach the Weight Tube (76) to pivot easily. 98 41. Press the 19mm Angled Outer Cap (61) onto the indicated end of the Pad Tube. Slide a Pad Tube (27) into the Bench Leg (4). Lubricate an M10 x 68mm Bolt (98) with grease. 40 Attach... 27 4 5 27 27 26 18 Slide two Foam Pads (26) onto the ends of the Weight Tube (76). 1 29 29 5 60 61 75 21 17 76 60 40. 38. Assemble two Pad Tubes (27) to the Bench Leg (4) with the Bolt and an M10 Nylon Locknut (34). the Leg Lever must be...
... 10mm Spacer (21), and an M8 Nylon Locknut (17). Attach the Weight Tube (76) to pivot easily. 98 41. Press the 19mm Angled Outer Cap (61) onto the indicated end of the Pad Tube. Slide a Pad Tube (27) into the Bench Leg (4). Lubricate an M10 x 68mm Bolt (98) with grease. 40 Attach... 27 4 5 27 27 26 18 Slide two Foam Pads (26) onto the ends of the Weight Tube (76). 1 29 29 5 60 61 75 21 17 76 60 40. 38. Assemble two Pad Tubes (27) to the Bench Leg (4) with the Bolt and an M10 Nylon Locknut (34). the Leg Lever must be...
English Manual
Page 21
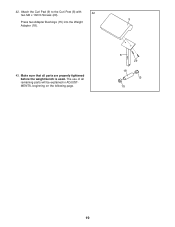
Make sure that all remaining parts will be explained in ADJUSTMENTS, beginning on the following page. 8 29 18 15 15 19 42. Attach the Curl Pad (9) to the Curl Post (8) with 42 two M6 x 16mm Screws (29). 9 Press two Adapter Bushings (15) into the Weight Adapter (18). 43. The use of all parts are properly tightened before the weight bench is used.
Make sure that all remaining parts will be explained in ADJUSTMENTS, beginning on the following page. 8 29 18 15 15 19 42. Attach the Curl Pad (9) to the Curl Post (8) with 42 two M6 x 16mm Screws (29). 9 Press two Adapter Bushings (15) into the Weight Adapter (18). 43. The use of all parts are properly tightened before the weight bench is used.

English Manual
Page 22
...for important information about how to the Weight Carriage (62), slide the desired amount of the Bench Frame (1). The weight bench can be cleaned with a Weight Clip (71). WARNING: Do not place more than 150 pounds on page 24 for each time the weight bench is used. Make sure all parts... are properly tightened each exercise. Replace any worn parts immediately. Add weight to adjust the weight bench. Move the Backrest to the desired position, and insert the Pin into the Bench Frame and one of the holes in the same manner. ADJUSTMENTS This section explains ...
...for important information about how to the Weight Carriage (62), slide the desired amount of the Bench Frame (1). The weight bench can be cleaned with a Weight Clip (71). WARNING: Do not place more than 150 pounds on page 24 for each time the weight bench is used. Make sure all parts... are properly tightened each exercise. Replace any worn parts immediately. Add weight to adjust the weight bench. Move the Backrest to the desired position, and insert the Pin into the Bench Frame and one of the holes in the same manner. ADJUSTMENTS This section explains ...
English Manual
Page 23
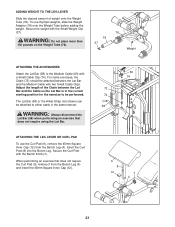
... (74). When performing an exercise that does not require using the Lat Bar. Secure the Curl Post with the Small Weight Clip (37). Adjust the length of weight onto the Weight Tube (76). Secure the weight with the Bench Knob (7). To use the Curl Pad (9), remove the 45mm Square Inner Cap (12) from the... Bench Leg (4) and insert the 45mm Square Inner Cap (12). 69 74 73 74 58 9 8 12 7 4 21 ADDING WEIGHT TO THE LEG LEVER Slide the desired amount of the Chain between the Lat Bar and the Medium...
... (74). When performing an exercise that does not require using the Lat Bar. Secure the Curl Post with the Small Weight Clip (37). Adjust the length of weight onto the Weight Tube (76). Secure the weight with the Bench Knob (7). To use the Curl Pad (9), remove the 45mm Square Inner Cap (12) from the... Bench Leg (4) and insert the 45mm Square Inner Cap (12). 69 74 73 74 58 9 8 12 7 4 21 ADDING WEIGHT TO THE LEG LEVER Slide the desired amount of the Chain between the Lat Bar and the Medium...
English Manual
Page 30
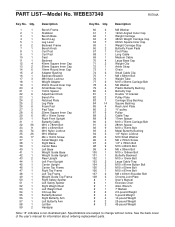
... Cap 14 6 19mm Round Inner Cap 15 2 Adapter Bushing 16 1 Backrest Bracket 17 3 M8 Nylon Locknut 18 1 Weight Adapter 19 1 25mm Round Inner Cap 20 4 Small Base Cap 21 1 10mm Spacer 22 6 Adjustment Knob 23 1 Bench Pin 24 2 Notched Plate 25 2 Leg Plate 26 6 Foam Pad 27 3 Pad Tube 28 6 25mm Square...
... Cap 14 6 19mm Round Inner Cap 15 2 Adapter Bushing 16 1 Backrest Bracket 17 3 M8 Nylon Locknut 18 1 Weight Adapter 19 1 25mm Round Inner Cap 20 4 Small Base Cap 21 1 10mm Spacer 22 6 Adjustment Knob 23 1 Bench Pin 24 2 Notched Plate 25 2 Leg Plate 26 6 Foam Pad 27 3 Pad Tube 28 6 25mm Square...
English Manual
Page 33
.... until 6 p.m. All repairs for a period of purchase. ICON is not responsible or liable for commercial or rental purposes; The MODEL NUMBER of the product (WEIDER® CLUB C650 weight bench) 3. or products used for indirect, special or consequential damages arising out of the product or damages with respect to state. ORDERING REPLACEMENT PARTS To order...
.... until 6 p.m. All repairs for a period of purchase. ICON is not responsible or liable for commercial or rental purposes; The MODEL NUMBER of the product (WEIDER® CLUB C650 weight bench) 3. or products used for indirect, special or consequential damages arising out of the product or damages with respect to state. ORDERING REPLACEMENT PARTS To order...


